Using Balena and Nginx Proxy Manager to secure a Webcam
I have an old Web cam which does not support HTTPS and where the dynamic IP resolver service of the manufacturer stopped working some years ago. The camera uses an UMTS hotspot to connect to the Internet and gets a new IP address every now and then. Graciously the camera would send out an email with it’s new IP address after every reboot, however I then would have to update this address manually in the surveilance app each time. Since the camera is working fine, I wanted to put it behind a HTTPS proxy and use DuckDNS to have a domain pointing to it. An old Raspberry Pi 3 serves as the hardware basis for this project.
Idea and Requirements
I want to have a secure conection using HTTPS to the Web interface of the webcam. Since the camera has a dynamic IP address, I want to register a domain with DuckDNS to provide a stable entrypoint. In order for this to work, the UMTS provider needs to allow ingres traffic to the SIM card. In Austria, only the provider Drei offers this as far as I found out.
We will use BalenaOS to provision the Raspberry Pi, because it will be located at a remote location and I want easy access. We need the following parts:
- UMTS modem with Wifi
- Webcam
- Raspberry Pi 3 with 16GB storage card
- Balena Cloud
- Nginx Proxy Manager container
- Duck DNS service container
Setup using Balena Cloud
The first step is to register for Balena Cloud. Up to 10 devices can be deployed free of charge. The documentation of Balena is excellent and provides a great onboarding experience. After creating a fleet, I added the Raspberry Pi as a new device and entered the basic wifi details.
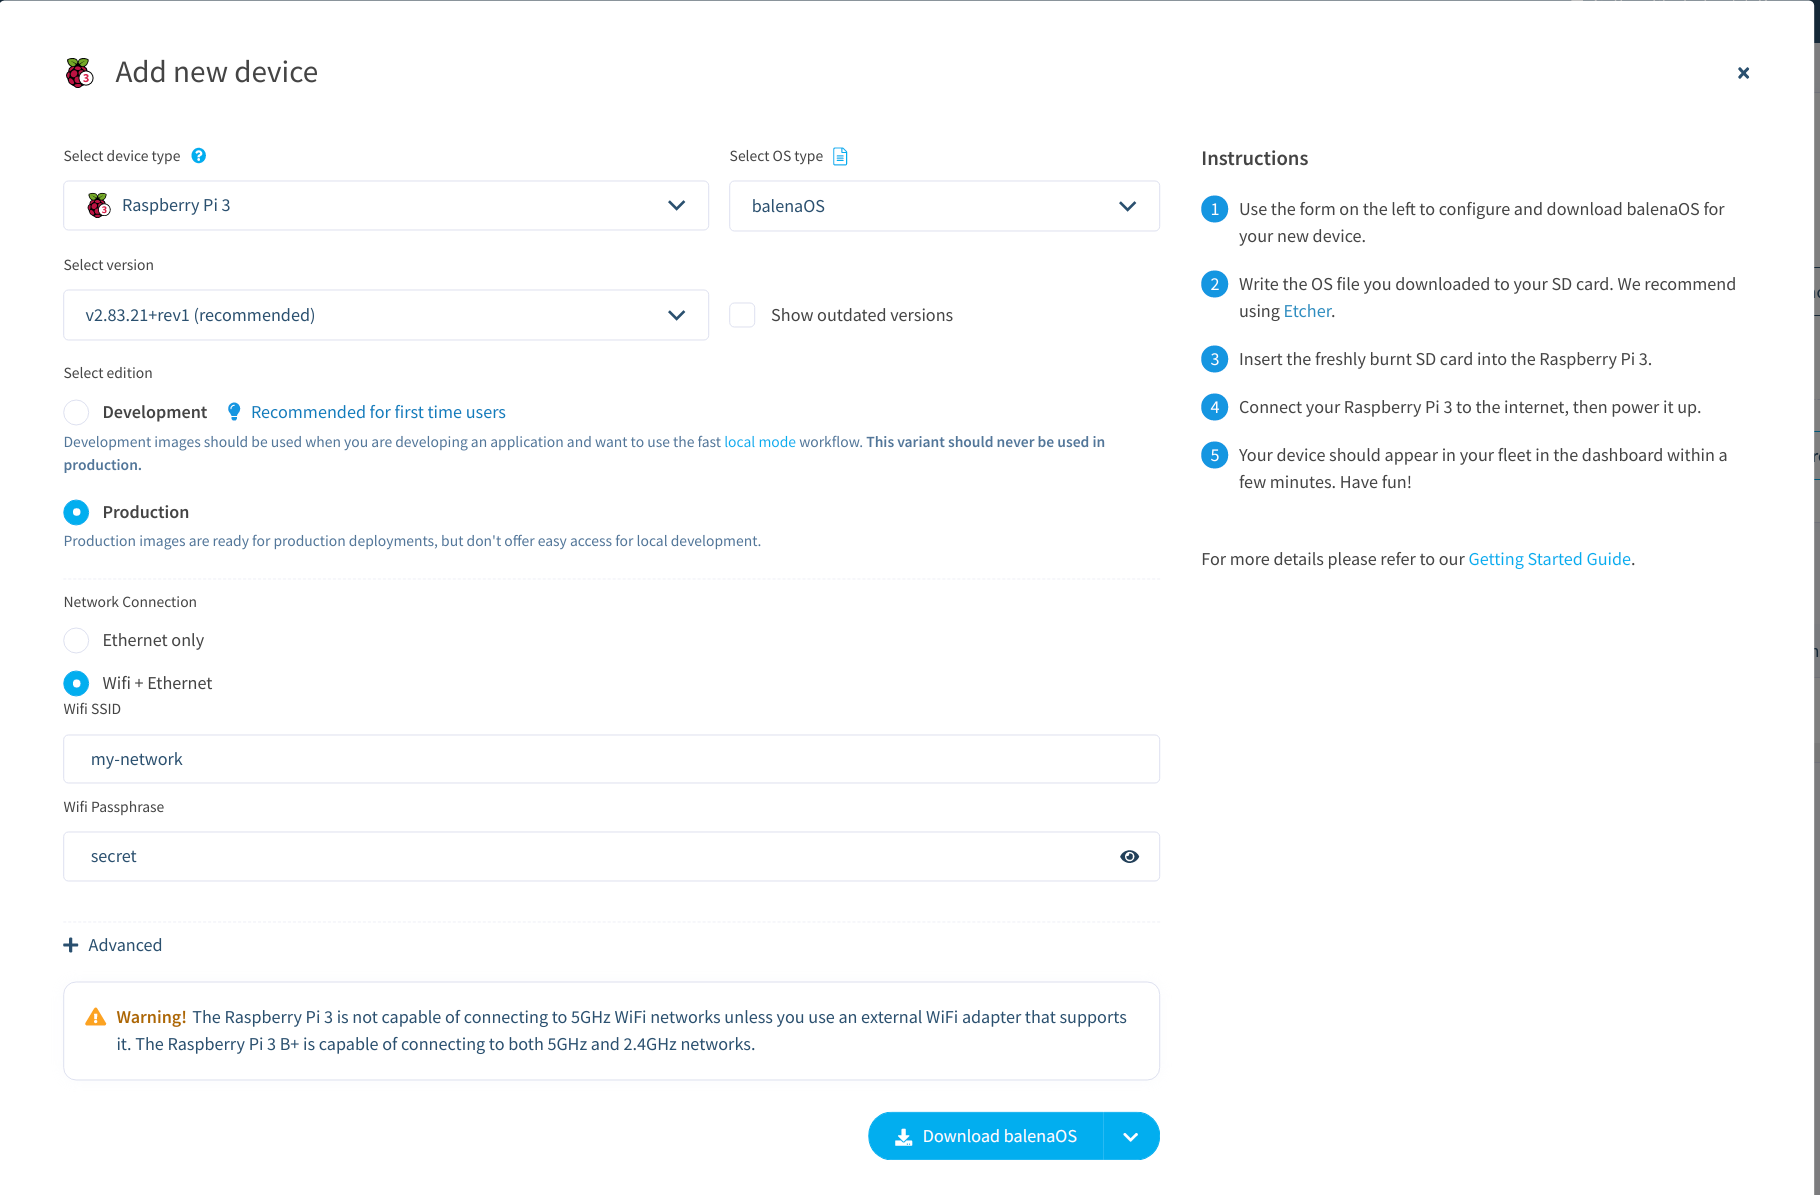
The Device Registration Dialog
Afterwards you can download a custom image of BalenaOS and flash it on the SD card using the USB startup disk creator tool that comes with Ubuntu. After waiting for some minutes, the device should show up in the Balena Cloud interface.
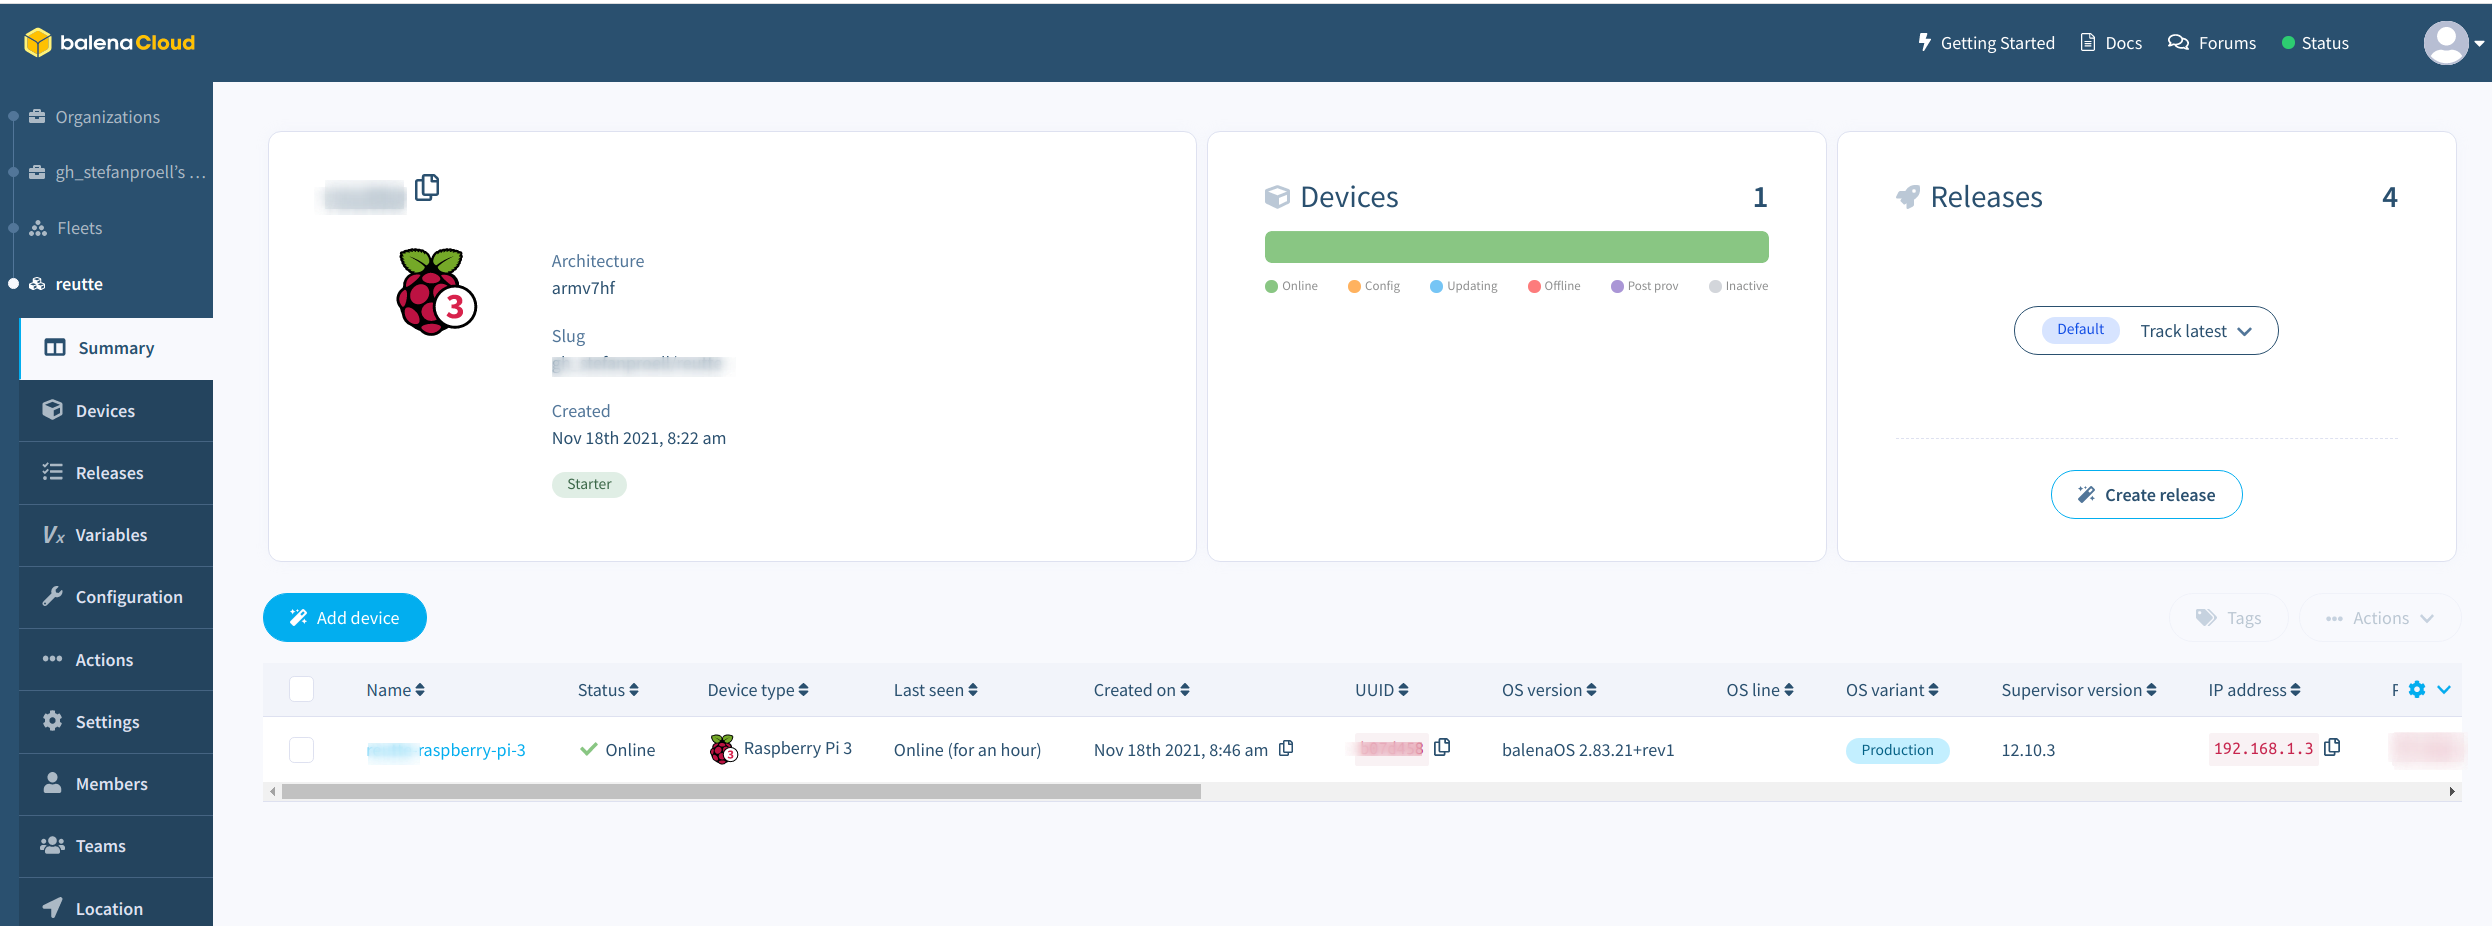
The Fleet
Then you need to install the Balena CLI and add the binary to the path.
You can then login using the CLI by typing balena login.
Enter your credentials are you are good to go.
For testing you can retrieve the fleets and devices: balena fleets
You should see the previously registered Raspberry Pi.
Network Setup
For testing I used my regular wifi network and I also have the battery powered UMTS Wifi modem activated. In order to add a second wifi network and to have a fallback wifi, you need to modify the configuration files. This can be easily done using the built in terminal of Balena Cloud.
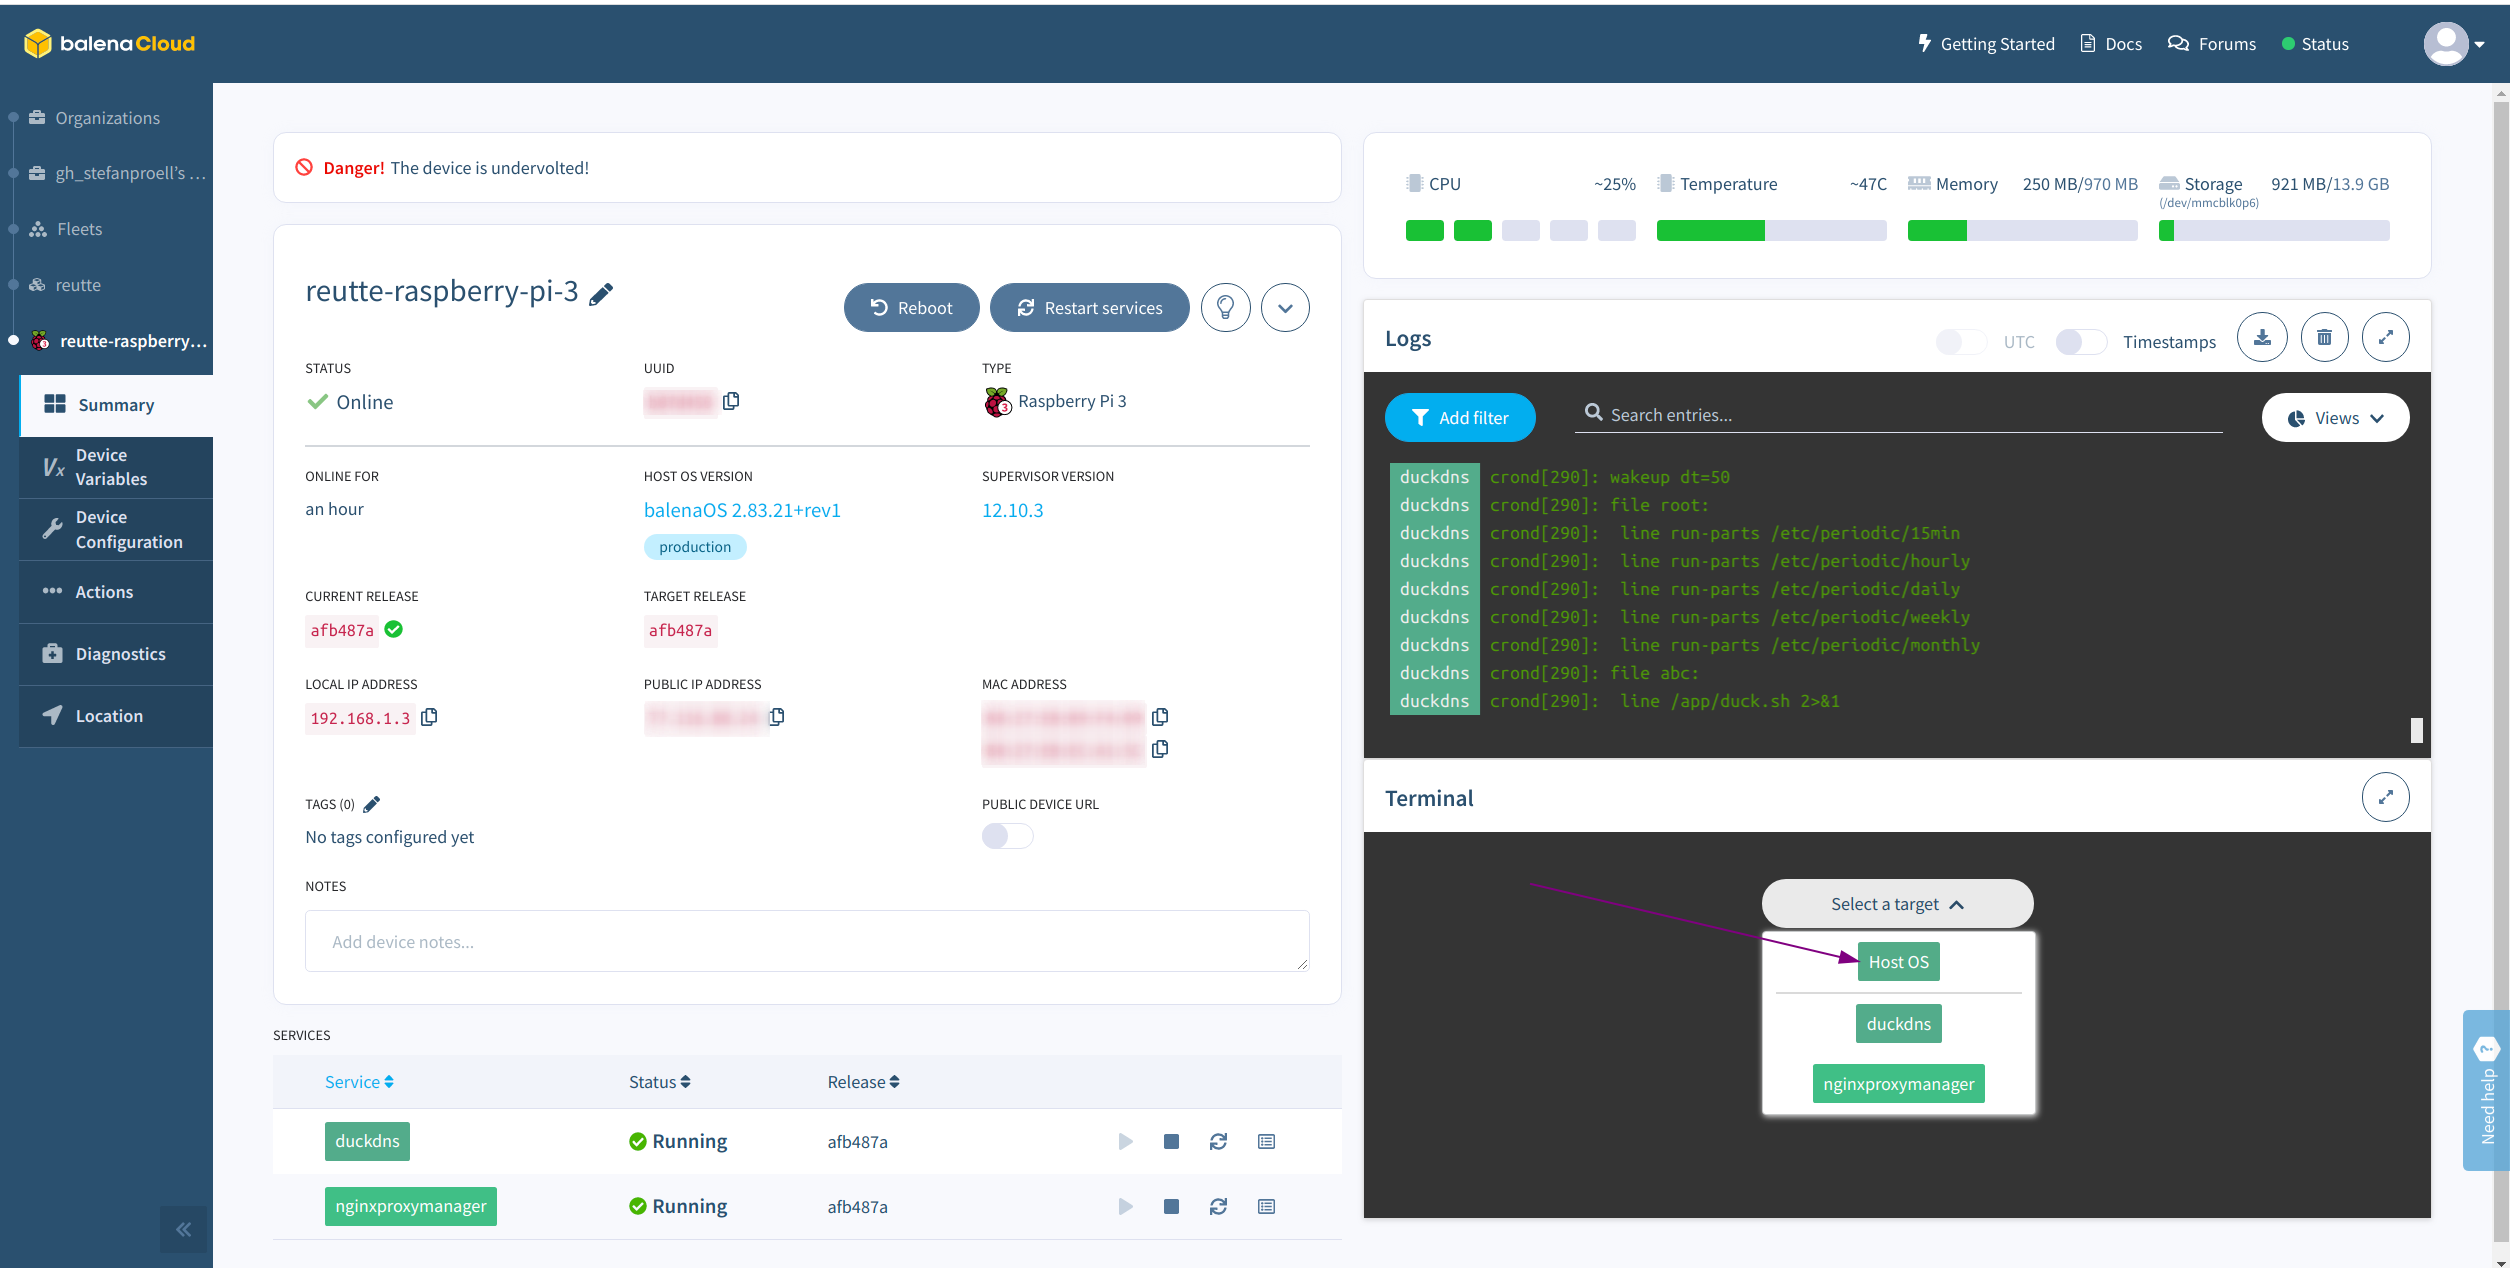
The Fleet
The networking configuration templates can be found in /mnt/boot/system-connections/.
The actual configuration is stored in /etc/NetworkManager/system-connections/, but these files will be overwritten by the configuration stored in /mnt/boot/system-connections/ after every reboot. This the latter is the right place to edit the network configuration.
Make sure to append a .ignore to all the connections you do not need.
I created two files. The file balena-wifi-0-umts contains the configuration for the wifi of the UMTS modem while the file balena-wifi-1-home contains the configuration for my home network.
When the umts wifi is available, this should be the preferred network, the fallback is the home network.
The UMTS Wifi
The wifi network the camera will use in the wild is powered by a small HUAWAI UMTS modem with Wifi capabilities.
I assigned a static IPv4 and I set the priority in order to select this network first.
The important part for this is the setting in the connection section.
autoconnect=TRUE
autoconnect-priority=2
The static IP is defined in the IPv4 section.
I assign the static address 192.168.1.3 and the gateway is 192.168.1.1.
address1=192.168.1.3/24,192.168.1.1
dns=8.8.8.8;8.8.4.4;
This is the complete configuration is below.
[connection]
id=balena-wifi-umts
type=wifi
autoconnect=TRUE
autoconnect-priority=2

[wifi]
hidden=true
mode=infrastructure
ssid=HUAWEI

[ipv4]
address1=192.168.1.3/24,192.168.1.1
dns=8.8.8.8;8.8.4.4;
dns-search=
method=manual

[ipv6]
addr-gen-mode=stable-privacy
method=auto

[wifi-security]
auth-alg=open
key-mgmt=wpa-psk
psk=SECRET
The Home Network
My home network is just using DHCP.
[connection]
id=balena-wifi-home
type=wifi
autoconnect=TRUE
autoconnect-priority=1

[wifi]
hidden=true
mode=infrastructure
ssid=home

[ipv4]
method=auto

[ipv6]
addr-gen-mode=stable-privacy
method=auto

[wifi-security]
auth-alg=open
key-mgmt=wpa-psk
psk=DIFFERENT-SECRET
After a reboot, the device will pick the available network based on the priority. The network with the higher integer will be picked first.
Define the Containers
The grat thing about Balena is that it can run any Docker container.
All you need to do is provid a docker-compose.yml file with the service definitions and push it to the cloud.
The following compose file is pretty self explainatory.
version: '2.1'
volumes:
    datavolume:
    letsencryptvolume:
services:
  nginxproxymanager:
    image: 'jc21/nginx-proxy-manager:latest'
    restart: unless-stopped
    ports:
      - '80:80'
      - '81:81'
      - '443:443'
    volumes:
      - datavolume:/data
      - letsencryptvolume:/etc/letsencrypt
  duckdns:
    image: lscr.io/linuxserver/duckdns
    container_name: duckdns
    environment:
      - PUID=1000
      - PGID=1000
      - TZ=Europe/Vienna
      - LOG_FILE=false
    restart: unless-stopped
We define two services: Nginx Proxy Manager and DuckDNS.
DuckDNS
Duck DNS is a free DDNS service which will point a subdomain of duckdns.org our Raspberry Pi IP address, even when the Pi sits behind a NAT.
All you need to do is to register a domain and note the token.
In this tutorial, we will use the domain name example.duckdns.org, which is of course not my subdomain.
In order to tell our Dockerized DuckDNS service which domain we have and what our token is, we need to add two device variables in Balena.
Those variables will be injected into the container.
Add the variables SUBDOMAINS and TOKEN there.
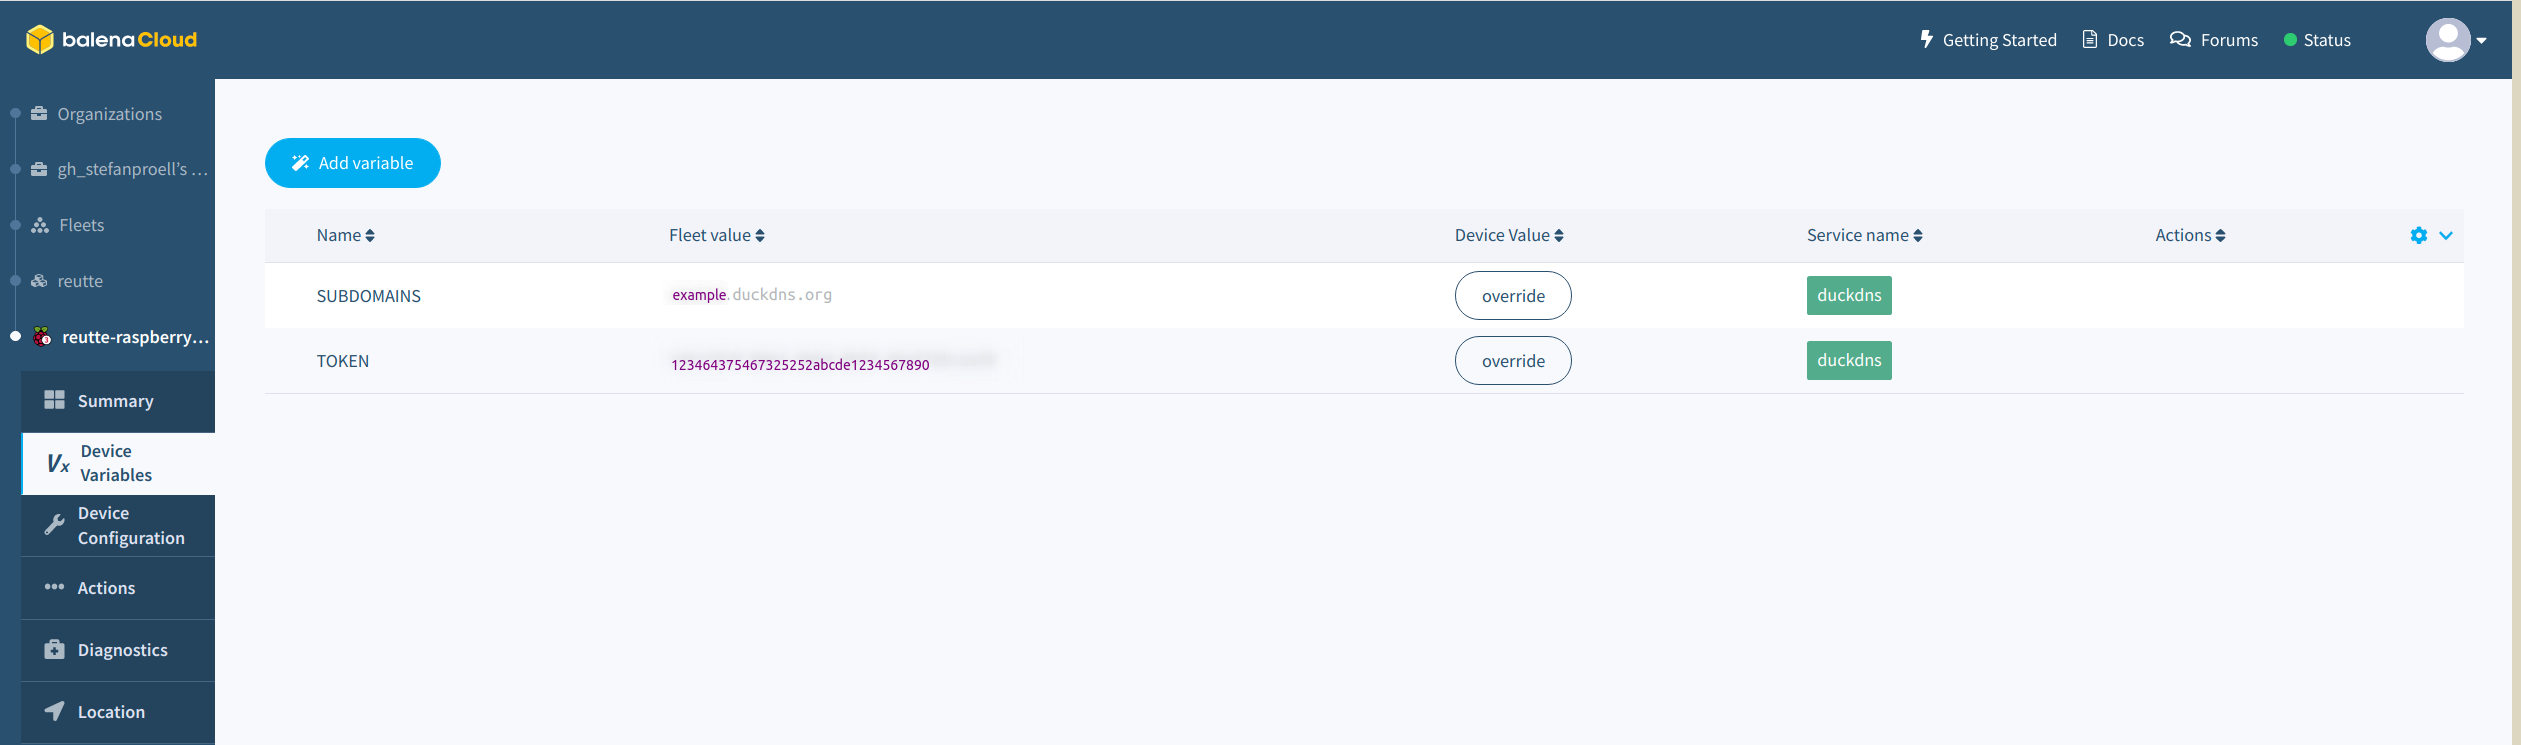
Duck DNS Configuration
Restart the Raspberry Pi using the Balena interface in order to trigger the DNS update of the new IP address.
The subdomain example.duckdns.org neets to point to your Raspberry before the next step.
Nginx Proxy Manager
The Nginx Proxy Manager (NPM) will respond to all requests via HTTPS and then forward the request to the actual target inside our protected network. This way we can serve services which do not offer HTTPS themselves still in a secure way. Nginx Proxy Manager uses Let’s Encrypt certificates.
After logging in for the first time, please set a good password. Then, create a new SSL Certificate and enter the DuckDNS domain and the token.
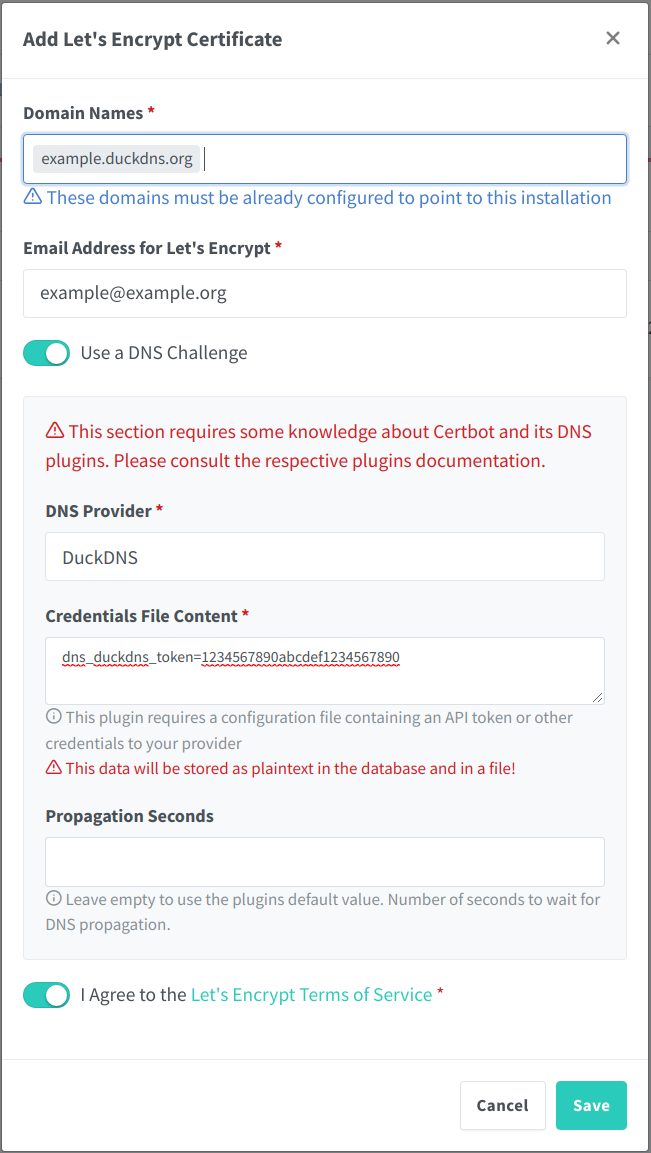
Obtain a Let’s Encrypt Certificate
Then you can add the web cam as a new proxy host that should be served via the NPM. Here you need to add the Webcam’s IP address (not the Raspberry Pi’s one) and the port.
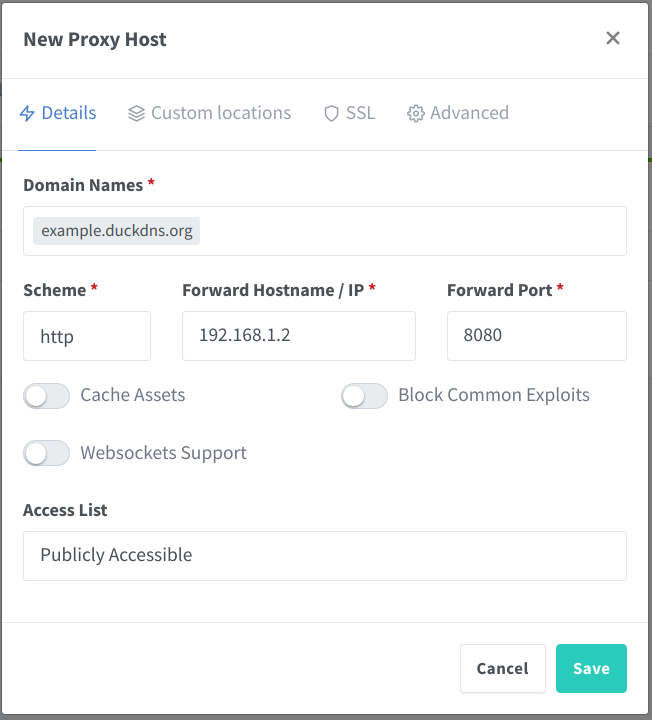
Define the Proxy Target
Enable the certificate we just created:
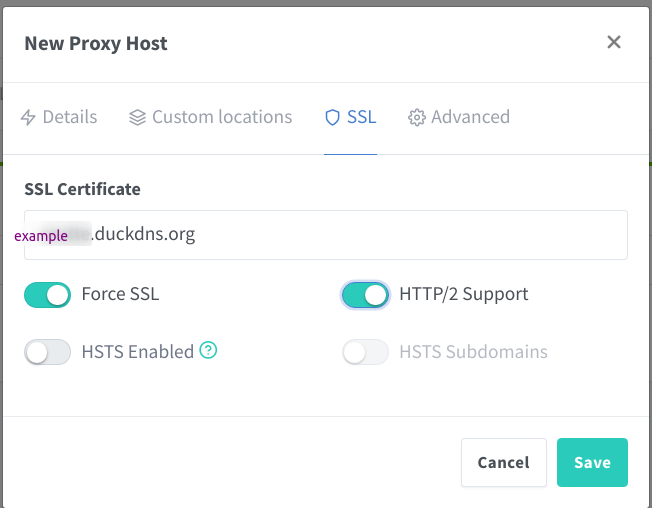
Assign the SSL Certificate
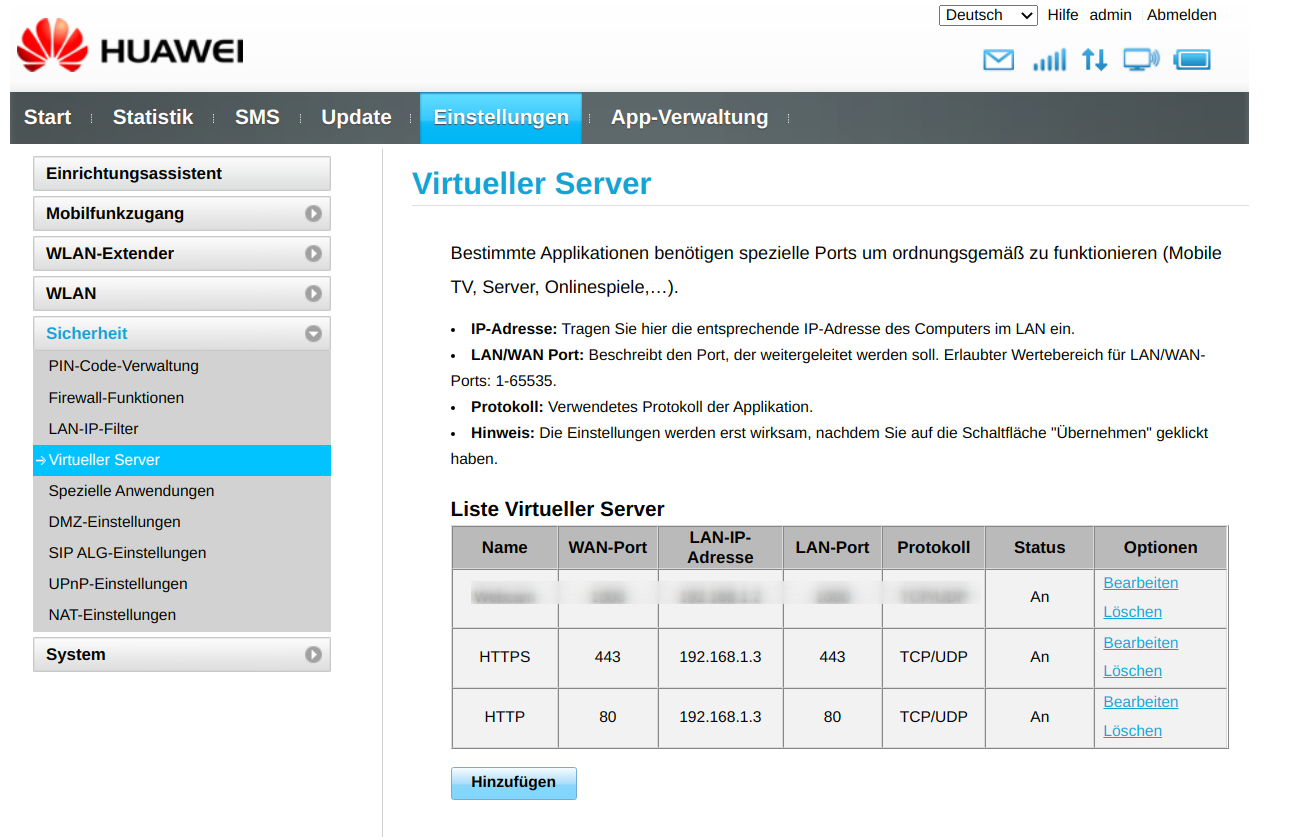
Firewall rules
In order for the web cam to become accessible, you need to allow traffic from the HTTPS port 443 to pass through.
Assign the SSL Certificate
Conclusion
Using Balena is a great way of deploying Docker containers on small IoT devices as the Raspberry Pi. Using these tools can upgrade an existing piece of hardware to become more secure and accessible. Of course you can use the same technique to expose all kinds of services via HTTPS behind a firewall.