Linux

OpenWrt: Extend an existing wifi with a guest wifi network

OpenWrt on a TP-Link RE450

Recently a Wifi repeater I setup years a go was reset by accident and I lost the configuration which was providing extended wifi coverage and guest wifi on a TP-Link RE450. Reconfiguring the setup cost me much more time than I am willing to admit, thus I wanted to share the basics in order to be prepared next time. Also I have a backup now.

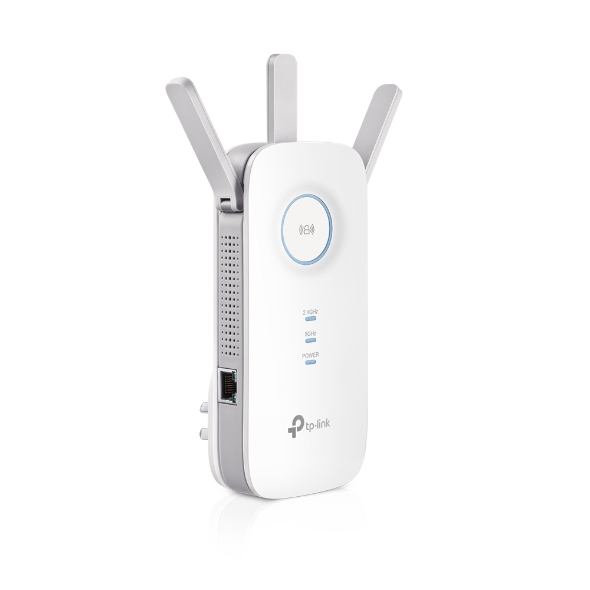
The TP-Link RE450 v1.1 (Image from TP-Link)

The TP-Link RE450 v1.1 (Image from TP-Link)

The TP-Link 450 is a pretty nice and affordable device which has two different wifi bands (5Ghz, 2.4Ghz). You can get it for around 50 Euros and it comes with three antennas and an ethernet port. Also it can run LEDE / OpenWrt, an open source firmware for embedded systems, such as routers and wifi extenders. The history of LEDE and OpenWrt can be read here, in this article I will call the software OpenWrt altough the interface still shows LEDE. In this article I will refer to the RE 450 as router.

Connecting to the router

Since this router will be embedded into an existing computer network, it is essential to give it a unique IP in a unique subnet. I have decided to assign the IP address 192.168.2.1 and the subnet 255.255.255.0 to the router. The existing network is a wireless network called Wifi with the subnet 192.168.1.1/24. Our plan is to add a guest wifi network 192.168.3.0/24 with its own SSID called Guest and its own password. Clients from the guest network should not be able to access any other devices within the guest network and also not be able to access any clients from the existing network.

After installing the firmware, the router will have the default address 192.168.1.1. In order to avvoid a clash with the existing Wifi network, I attached the router with an ethernet cable to the computer and disabled wifi on my computer during the setup. I then assigned a static IP address 192.168.1.2 for my PC using the same subnet. And while I am already at it, I created a second ethernet profile using the address 192.168.2.5 to switch to the desired subnet once the router is configured. Now you can easily switch between the subnets.

Installing the firmware

The first task is to get rid of the proprietary firmware and install OpenWrt. There are many instructions out there, it is important to verify the firmware and device version with great attention. Otherwise you might produce a 50 Euro paperweight of waste weekends (been there.) In case you have an older version installed, please consider updating.

For this article, I upgraded from LEDE 17.01 to a more recent OpenWRT release 19.07 and downloaded this particular release. For the initial setup, open up a browser and go to 192.168.1.1.

Basic setup of the router

We now have installed OpenWrt on the router and can begin to configure it. You will be greated by the OpenWrt interface and advised to set a password.

The first login.

The first login.

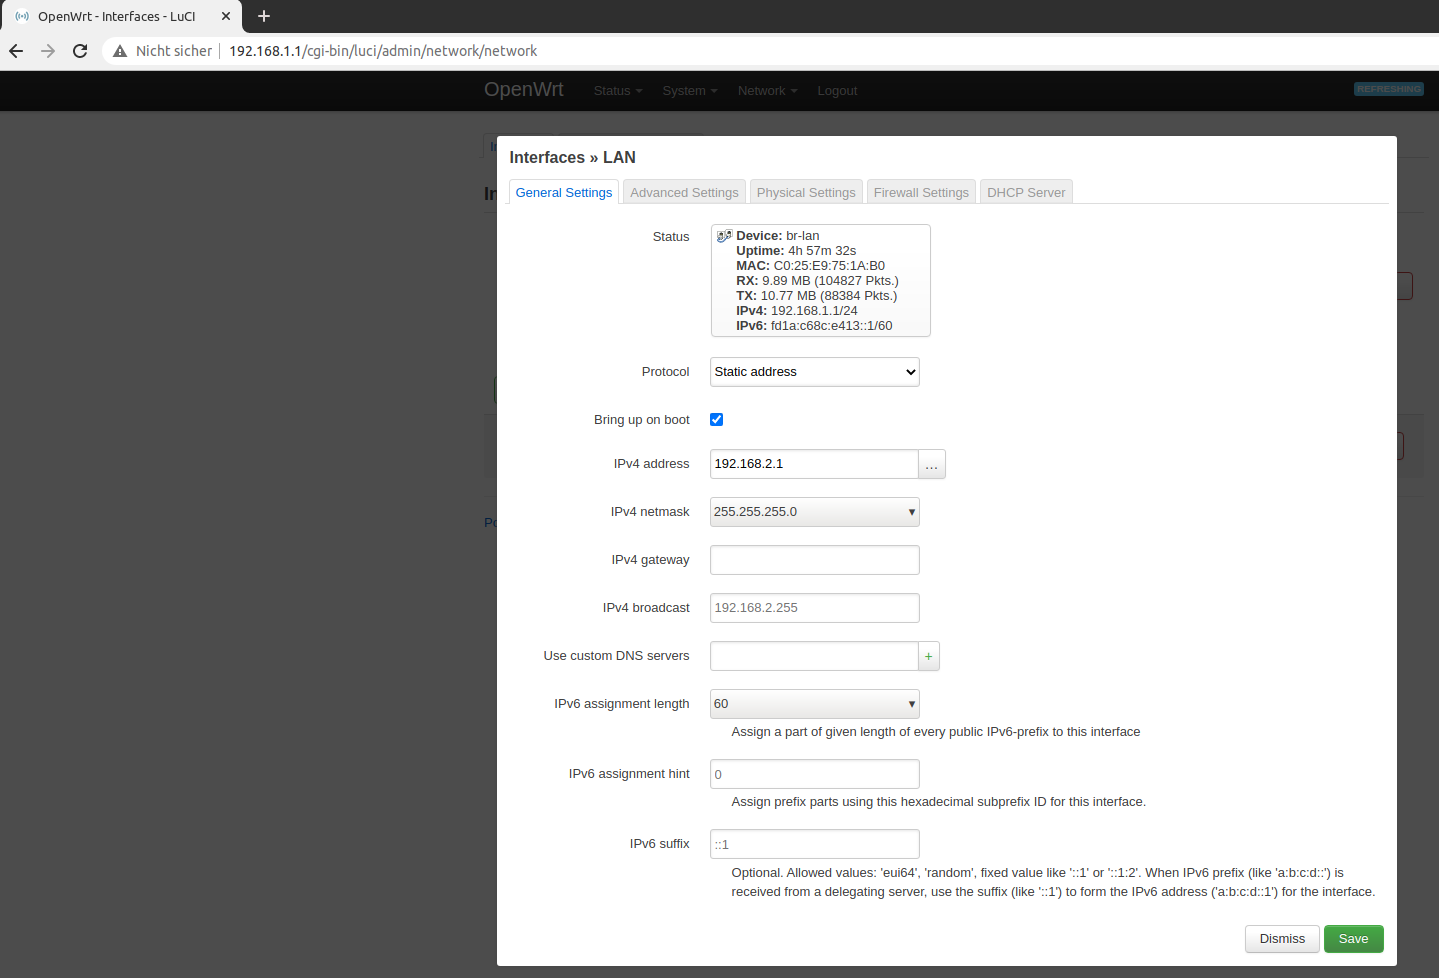
We follow the advice and set a good password. Next we will set a static IP by going to Network > Interfaces and edit the existing LAN interface. This is obviously the ethernet connection we are connected to and we want to make sure we always find this device with the static ip 192.168.2.1 in the standard subnet.

Assign a static IP

Assign a static IP

Always save and apply thanges. Afther this change you have to switch to the 192.168.2.5 profile we created earlier so that you can access the router again. Now when we have logged in at 192.168.2.1 with our new password, we should be greeted with the OpenWrt Luci Web interface.

Setup the interfaces and wifi networks

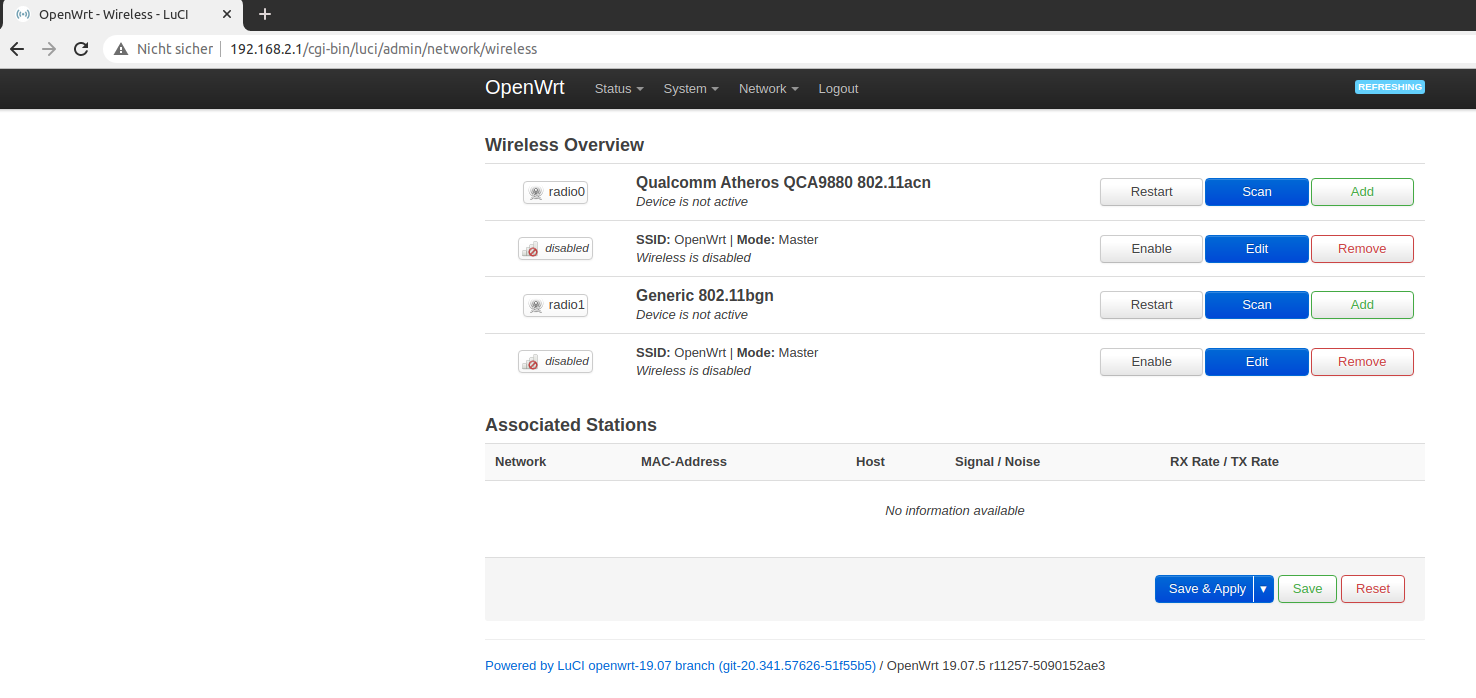
THe first step is to connect to the existing Wifi network, so that we have a working internet connection on the router for downloading updates. Go to Network > Wireless. You will see the default wireless interfaces called OpenWrt for both devices (3.4 Ghz and 5Ghz).

The default Wifi interfaces

The default Wifi interfaces

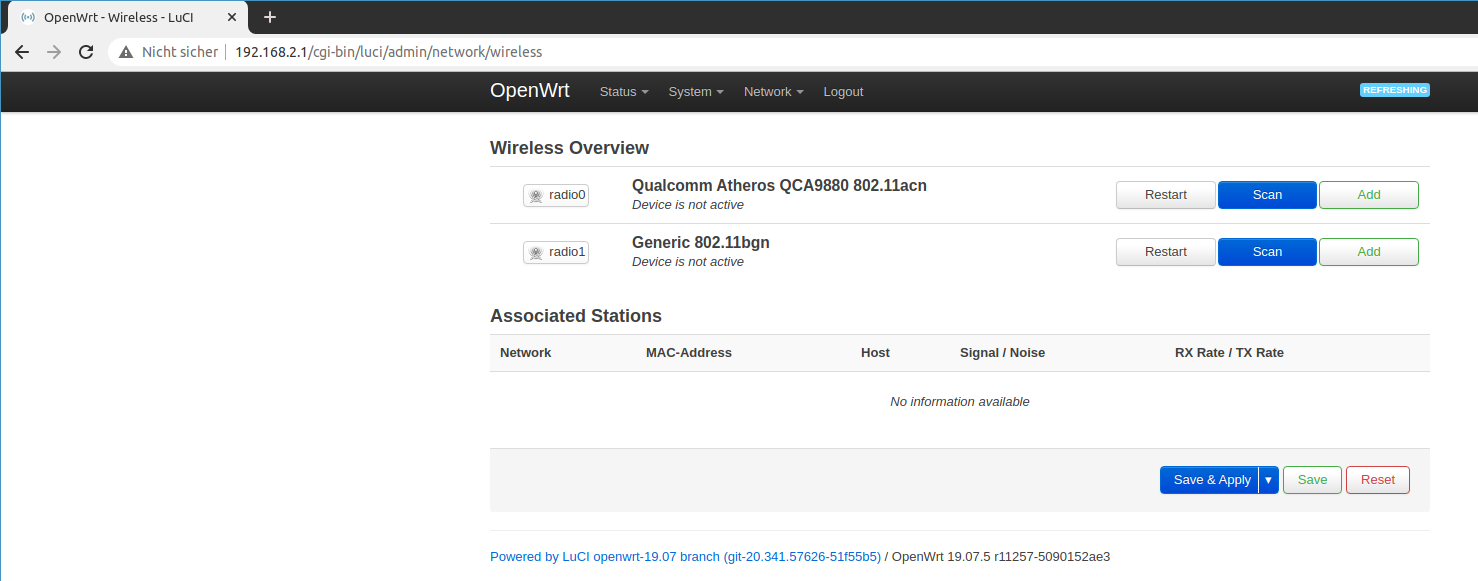
Remove them so that you reach a clean state.

No wireless interfaces, only devices

No wireless interfaces, only devices

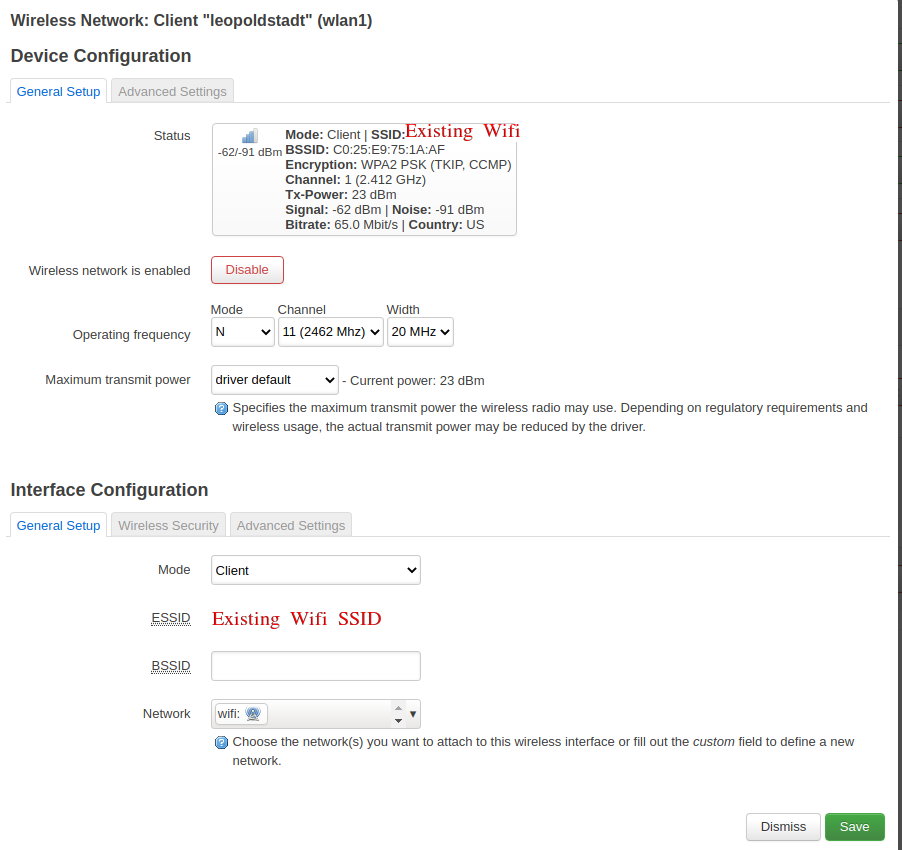
Depending if your existing wireless network is on the 5Ghz band or the 2.4 Ghz band, use the appropriate device and click scan network and select the existing network. Obviously you need to be in range to see the network.

Join the existing Wifi network

Join the existing Wifi network

You will then be promped with a details page where you enter the passphrase for the existing network and where you can select the name of the new network. This is maybe a bit confusing, because this will create a new interface instead. Add the name wifi. On the tab firewall settings, add this network to the wan zone. This is the crucial step, because the existing wifi will act as the Internet uplink for the guest network.

The joined, existing wifi network

The joined, existing wifi network

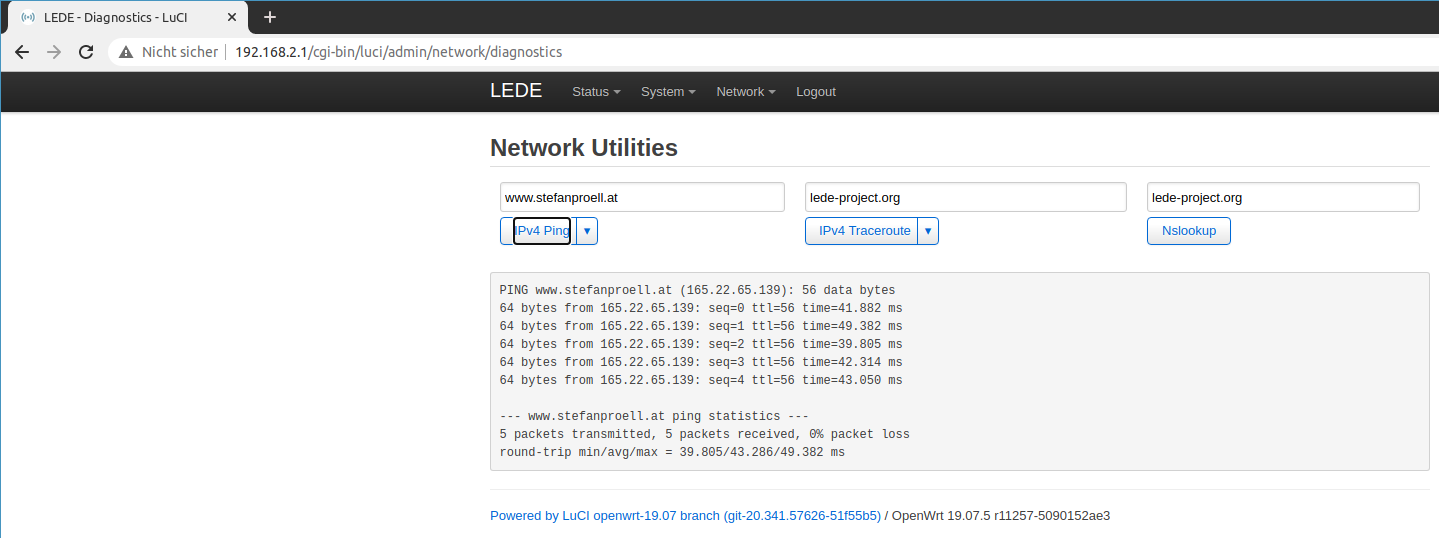
Make sure to save and apply. You should then be able t ping any web page using Network > Diagnostics.

Testing ping

Testing ping

If this works it would be a perfect time to make a backup of the configuration.

Setup the Guest Wifi

The guest wifi also needs a new interface. Thus go to Network > Interfaces and click add new. Select static IP address and assign the name guestwifi. Leave interface unassigned for now.

Add the guest interface

Add the guest interface

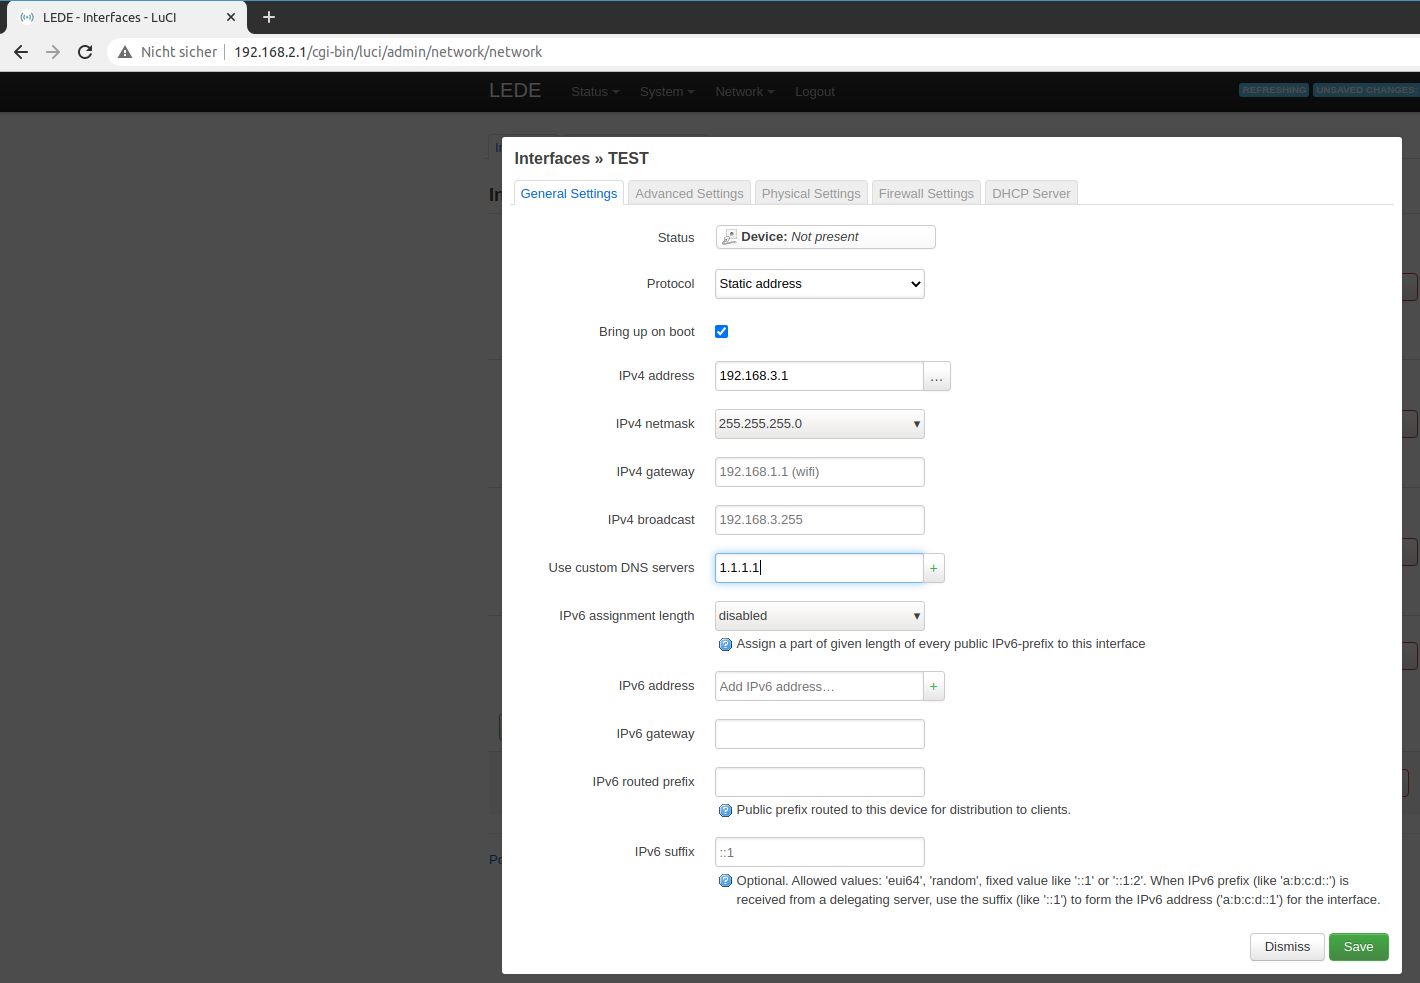
On the next page, define a static address. This time we will use 192.168.3.1 and the default subnet 255.255.255.0. Also you should add a public DNS server like 1.1.1.1 or 8.8.8.8.

Set a static address.

Set a static address.

Then click on the firewall tab and create a new zone guestwifi.

Add a new firewall zone

Add a new firewall zone

Then click on the DHCP server tab and enable the service.

Enable DHCP service.

Enable DHCP service.

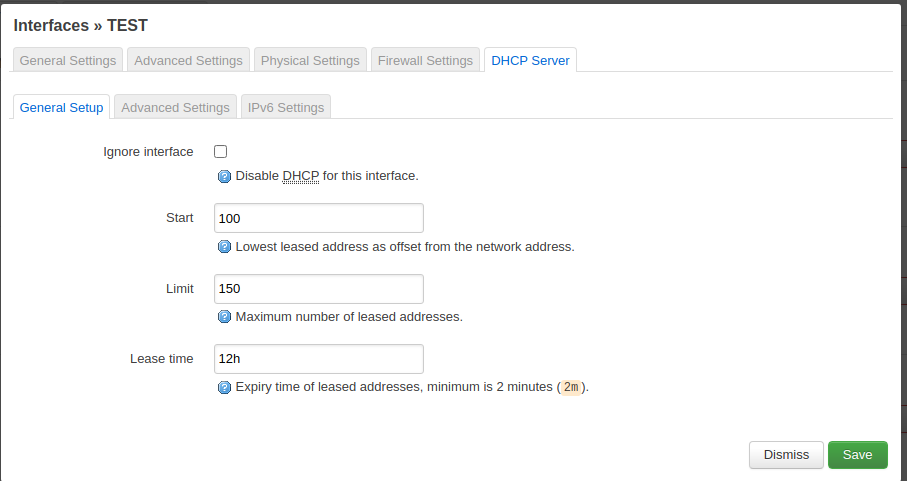
Review the settings and save the changes.

The DHCP settings can remain as they are.

The DHCP settings can remain as they are.

Every guest will then get an IP address from the 192.168.3.1 subnet. Save and apply.

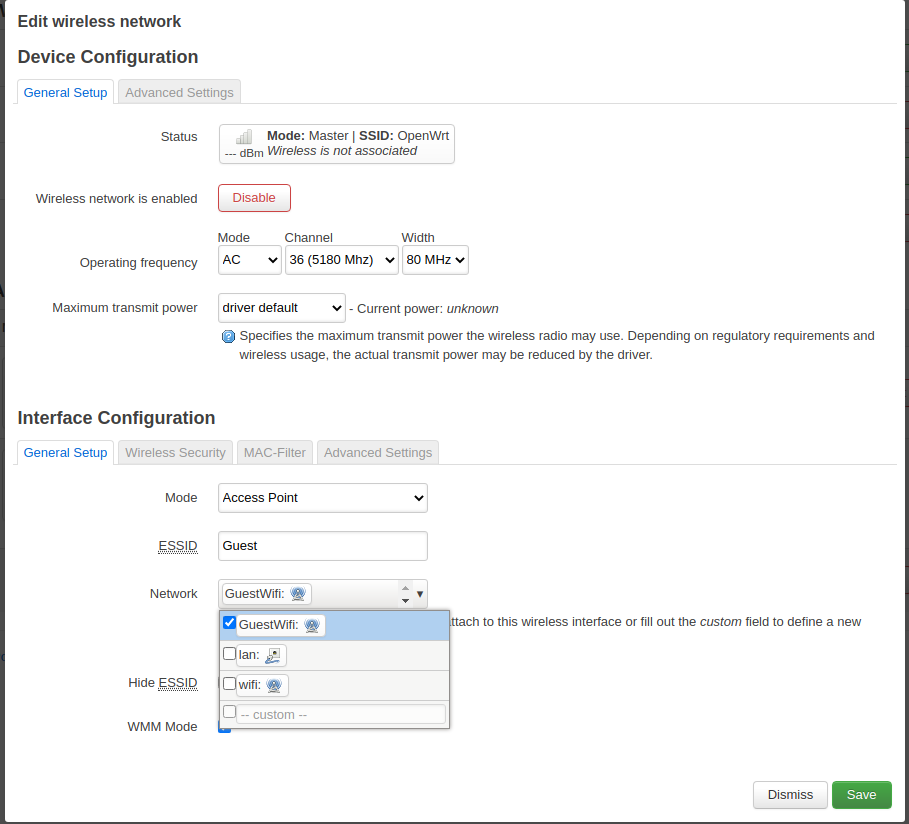
Then proceed to Network > Wireless again and create a new wireless guest network. I used the second antenna device to achieve this. Click on add and pick Access Point for the mode and give it a name, for instance Guest.

Add the guest network.

Add the guest network.

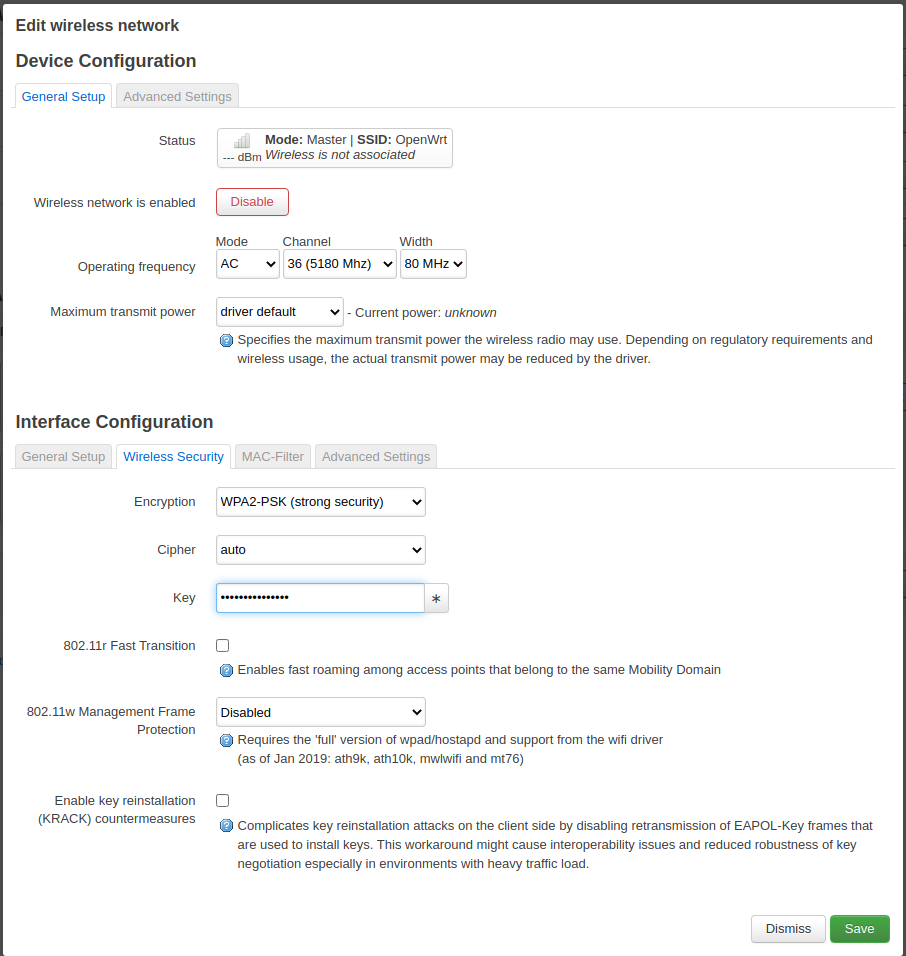
Then - and this is very important - go to the Wireless Security tab and pick WPA2 as the encryption standard and set a password you can share with your guests.

Set a password and enable encryption.

Set a password and enable encryption.

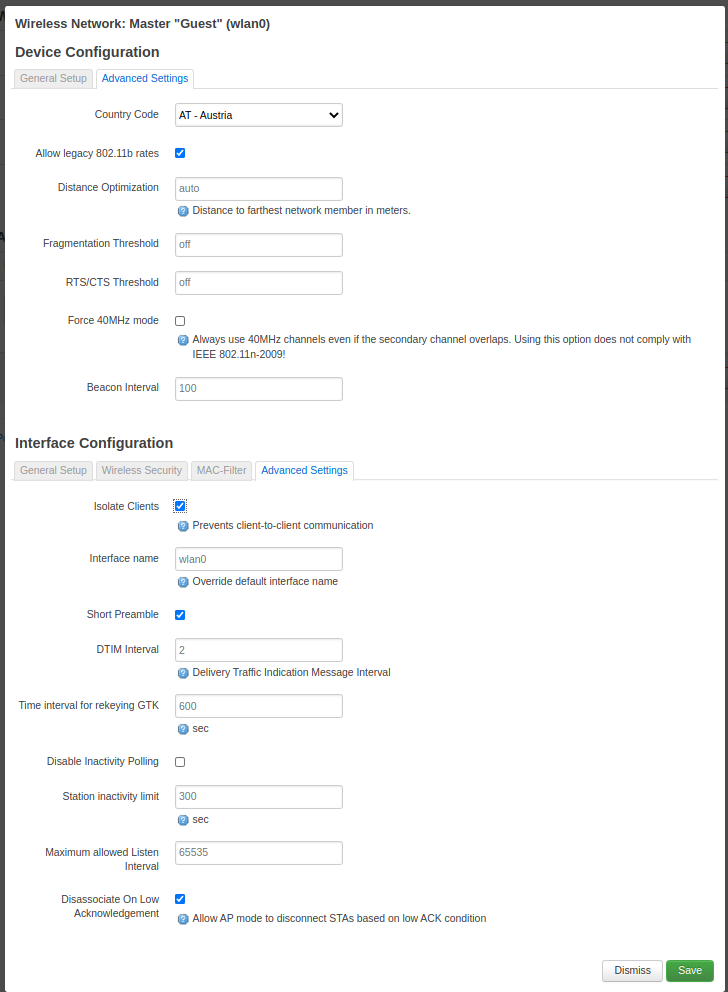
The last step is to enable client isolation in order to prevent that your guests try nasty things on each other. You find the setting at the advanced tab.

Enable client isolation

Enable client isolation

Now you should be able to connect to the Guest wifi and get an IP address assigned to your client. Bit it will be pretty boring because there is no internet yet.

Setup the firewall

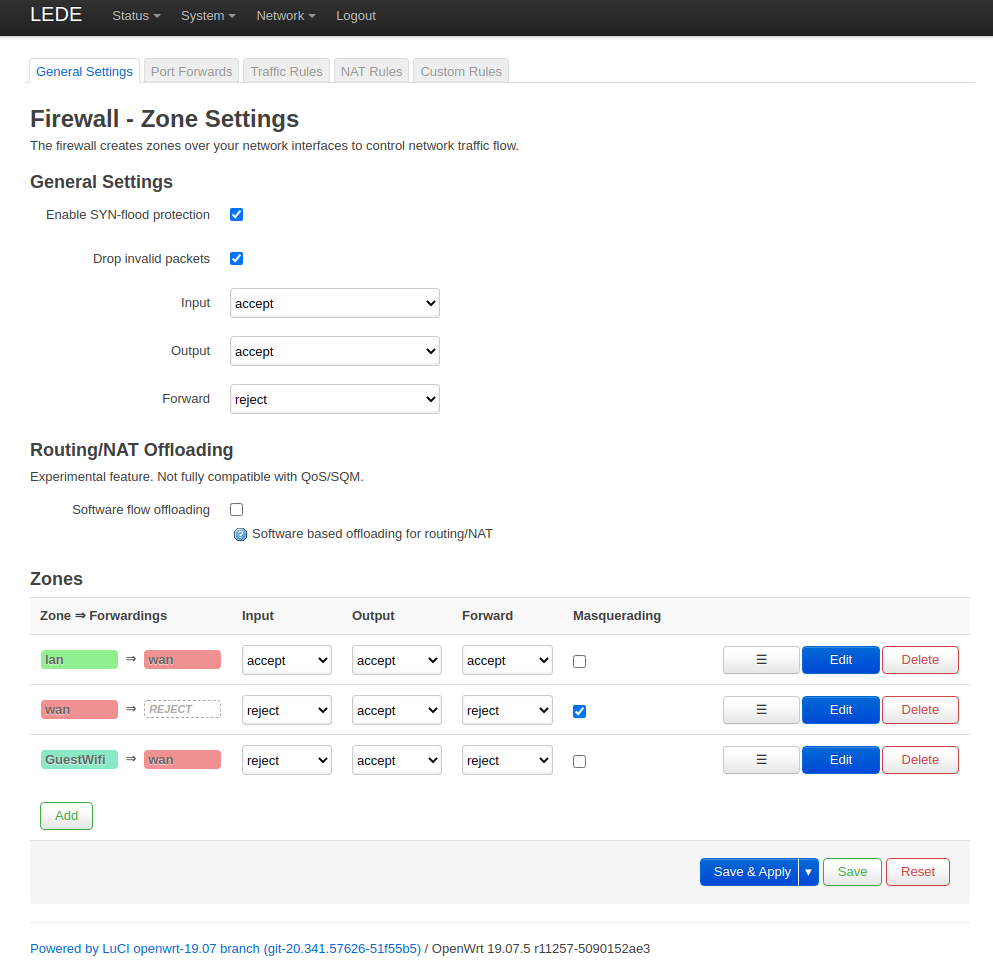
The last step involves setting up the firewall. Go to Network > Firewall. First of all we need to ensure that we have different zones for lan, wan, wifi and guestwifi. The lan and wan zones are created by default. We have created the other two zones wifi and guestwifi.

The zone overview should look similar to this. We can see that the guestwifi zone can be forwarded to the wan zone. Also make sure that masquerading is enabled for the wan zone (it is per default).

Firewall zones

Firewall zones

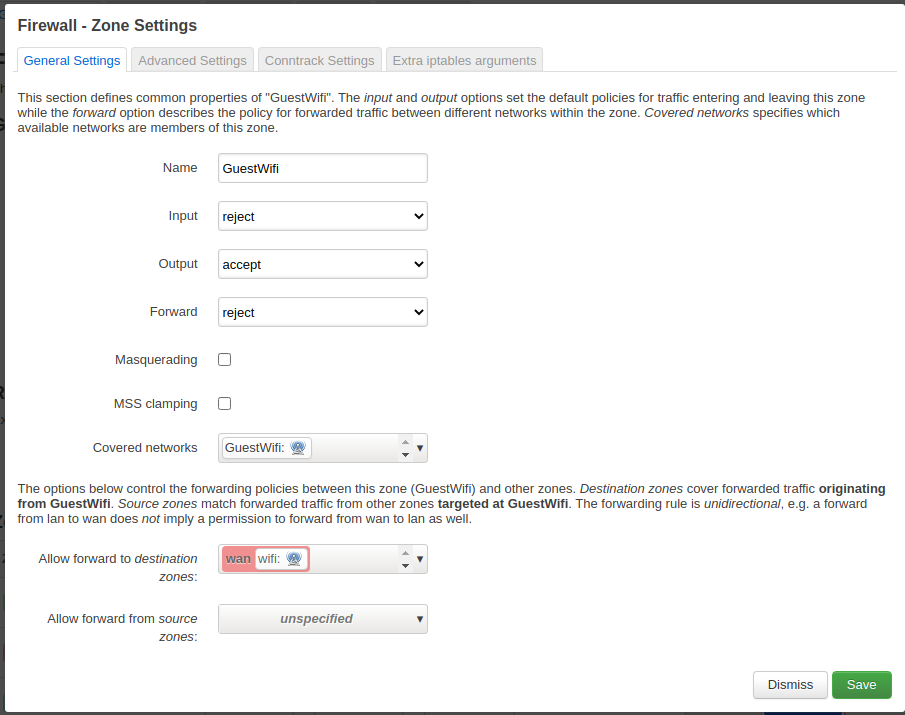
The details of the guestwifi zone settings are shown below. Note the default reject settings for the INPUT and OUTPUT chain and that the only allowed zone to forward traffic to is the wan zone.

Guestwifi zone details

Guestwifi zone details

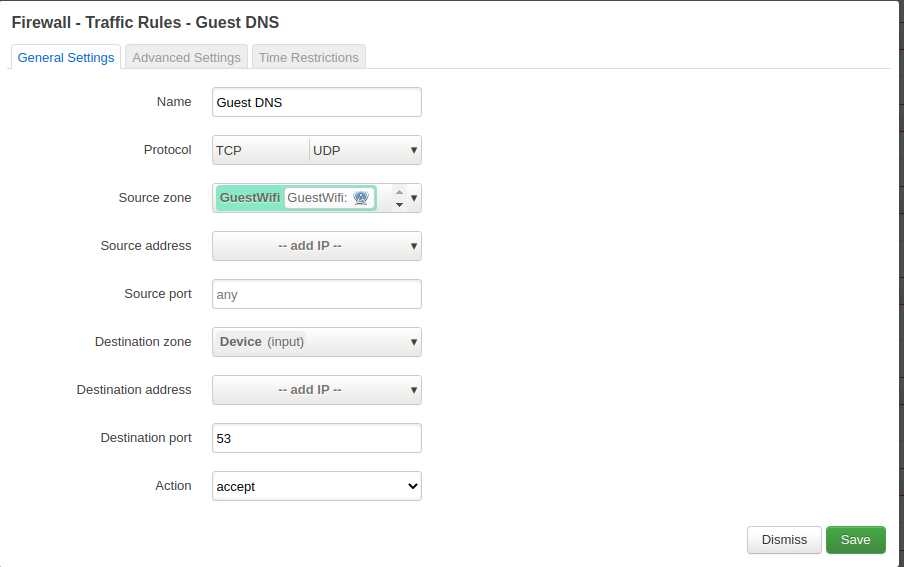
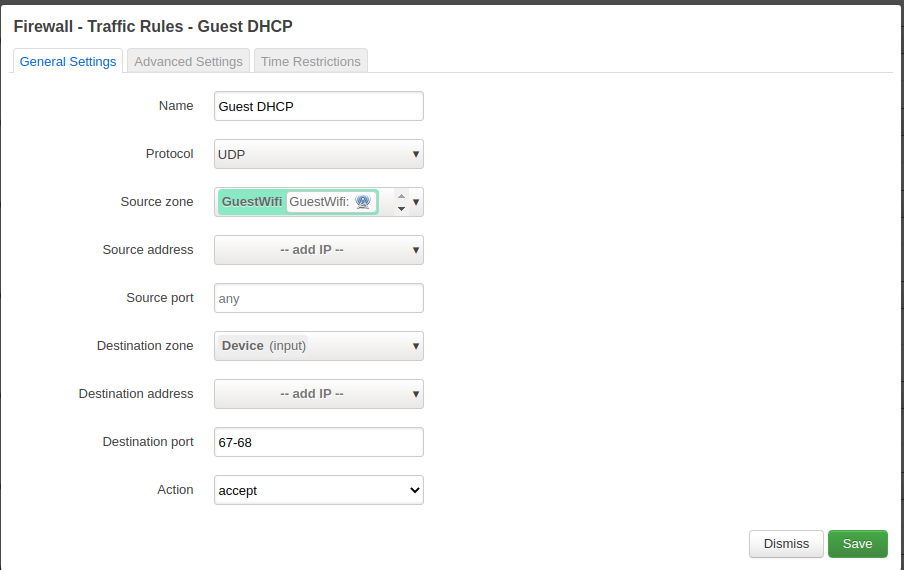
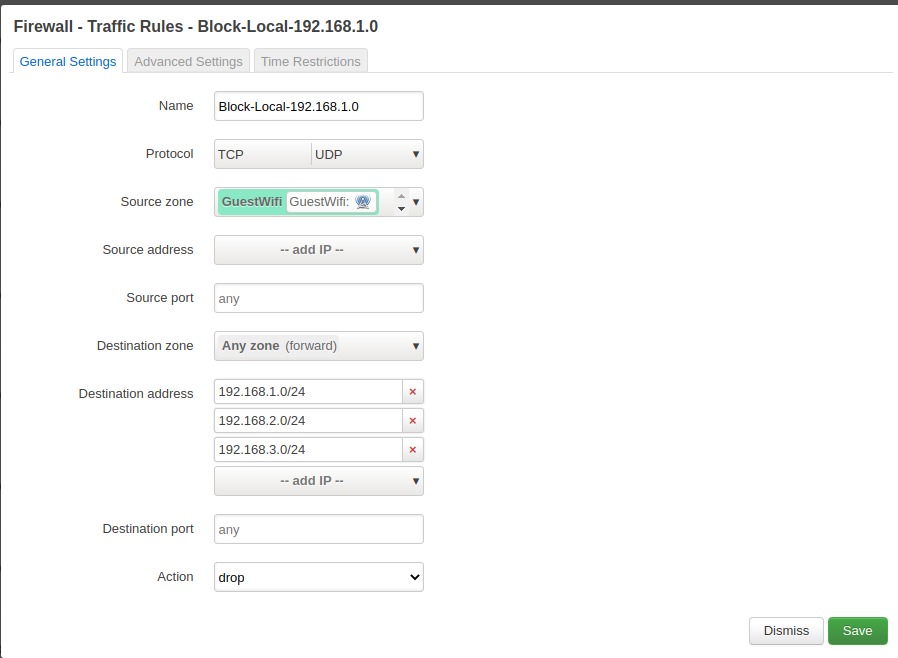
Now we have to setup three traffic rules in order to enable DHCP and DNS for the guests and to prevent them from accessing the other networks and the router web interface.

Enable DNS

Allow port 53 to be used.

Allow DNS

Allow DNS

Enable DHCP (ports 67 - 68)

Allow the UDP port range 67 to 68 for DHCP requests.

Guestwifi zone details

Guestwifi zone details

Block other networks

In order to separate the guest wifi from our regular wifi and the router, we block the entire subnets.

Guestwifi zone details

Guestwifi zone details

Conclusion

OpenWrt works very nice once the setup is clear. Some of the naming conventions are a bit confusing, but I guess this is normal given that it is a complex matter. This tutorial shows how to create a guest network on a device which is itself a client in an existing wifi network.

Using the Papercolor Theme in Vim and Zsh

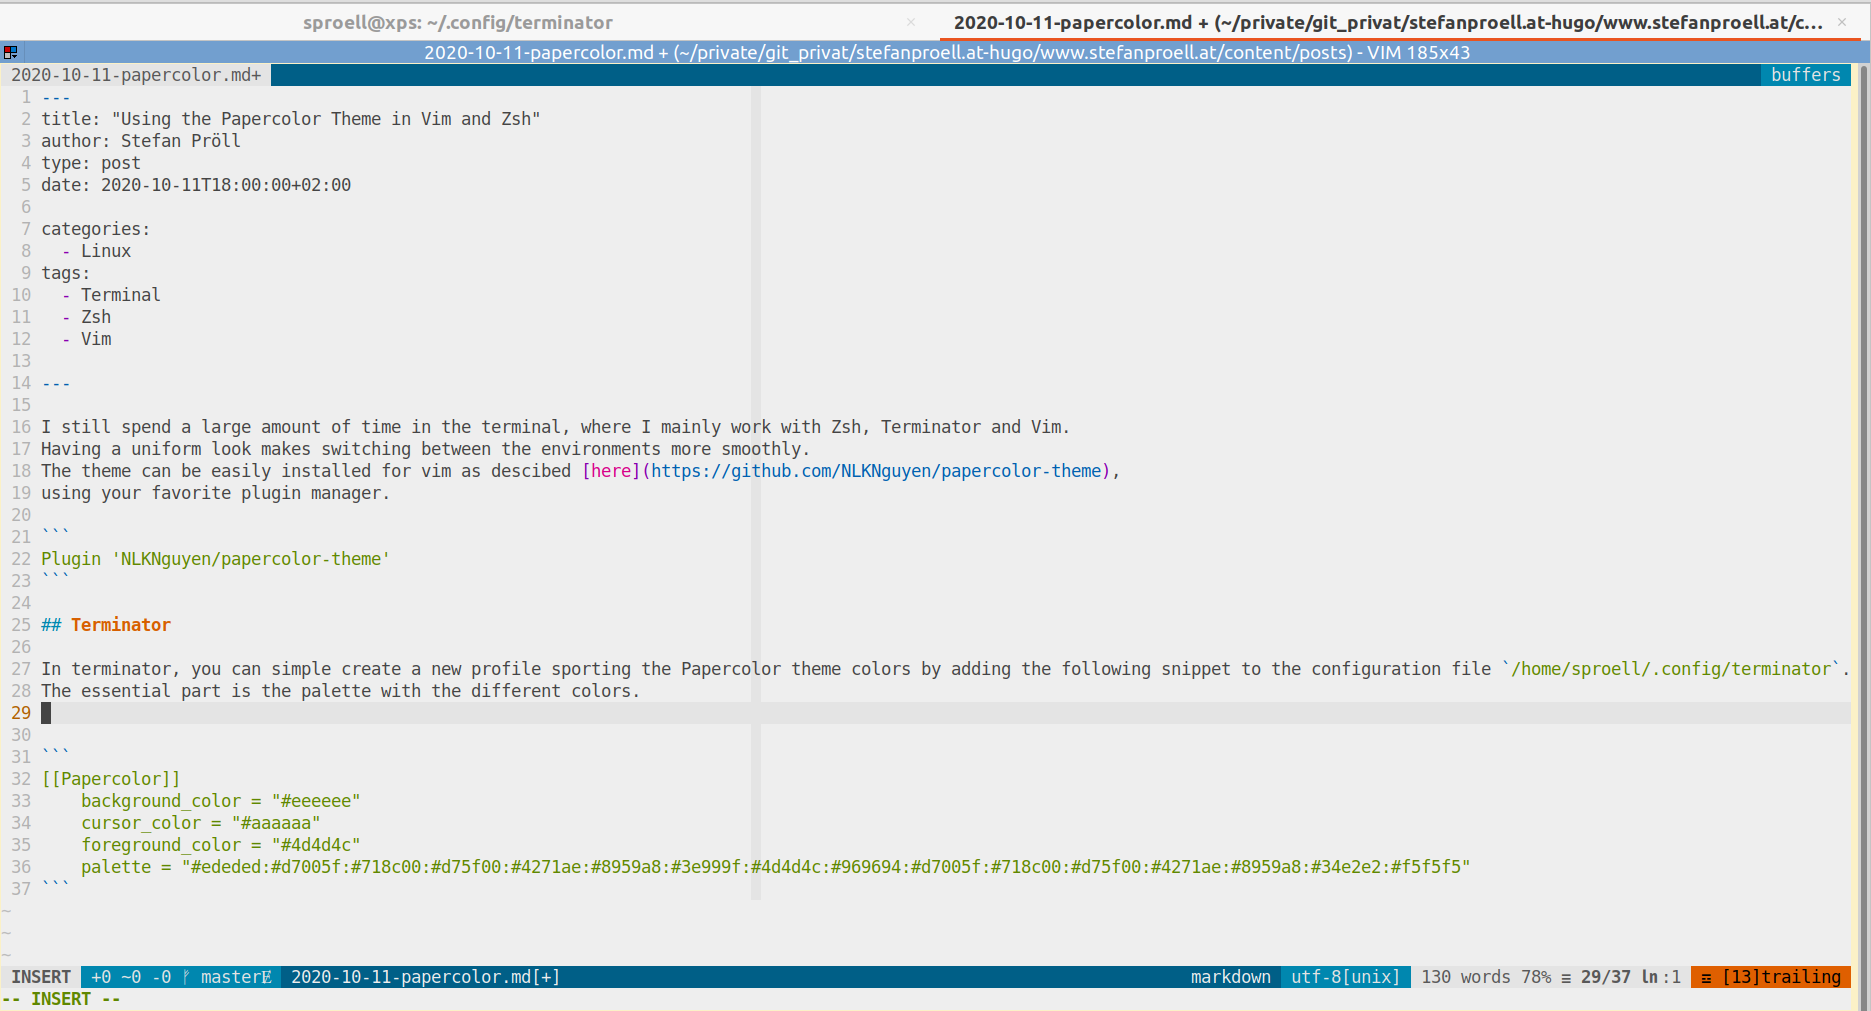
I still spend a large amount of time in the terminal, where I mainly work with Zsh, Terminator and Vim. Having a uniform look makes switching between the environments more smoothly. The theme can be easily installed for vim as descibed here, using your favorite plugin manager.

Plugin 'NLKNguyen/papercolor-theme'

How does it look in Vim?

Like this!

Vim with the Papercolor theme

Terminator

In terminator, you can simple create a new profile sporting the Papercolor theme colors by adding the following snippet to the configuration file /home/sproell/.config/terminator. The essential part is the palette with the different colors.

[[Papercolor]]
    background_color = "#eeeeee"
    cursor_color = "#aaaaaa"
    foreground_color = "#4d4d4c"
    palette = "#ededed:#d7005f:#718c00:#d75f00:#4271ae:#8959a8:#3e999f:#4d4d4c:#969694:#d7005f:#718c00:#d75f00:#4271ae:#8959a8:#34e2e2:#f5f5f5"

This will provide you with a Zsh like this:

Vim with the Papercolor theme

Automated encrypted incremental backups with restic to a Synology mount

Synology

The Synology devices are easy to setup but the backup applications are not that great. In addition, Synology does not offer SSH key based authentication for non-privileged accounts out of the box. After each upgrade the SSH key setup might be gone and it always feels like a hack.

The following text describes how to setup painless, automated, encrypted, incremental backups via CIFS using Restic. The script makes use of passwords stored in the gnome keyring and thus can mount a CIFS aka Samba share without having to store the Synology user password in the /etc/fstab file or in the clear in a local file.

Restic

To quote the restic web site

restic is a program that does backups right. The design goals are: Easy: Doing backups should be a frictionless process, otherwise you are tempted to skip it. Restic should be easy to configure and use, so that in the unlikely event of a data loss you can just restore it. Likewise, restoring data should not be complicated. Fast: Backing up your data with restic should only be limited by your network or hard disk bandwidth so that you can backup your files every day. Nobody does backups if it takes too much time. Restoring backups should only transfer data that is needed for the files that are to be restored, so that this process is also fast. Verifiable: Much more important than backup is restore, so restic enables you to easily verify that all data can be restored. Secure: Restic uses cryptography to guarantee confidentiality and integrity of your data. The location where the backup data is stored is assumed to be an untrusted environment (e.g. a shared space where others like system administrators are able to access your backups). Restic is built to secure your data against such attackers, by encrypting it with AES-256 in counter mode and authenticating it using Poly1305-AES. Efficient: With the growth of data, additional snapshots should only take the storage of the actual increment. Even more, duplicate data should be de-duplicated before it is actually written to the storage backend to save precious backup space. Free: restic is free software and licensed under the BSD 2-Clause License and actively developed on GitHub.

The pre-requisits

We need the following things beforewe can start the backup:

  • A Synology user account
  • Restic installed on the local machine
  • The username and password stored in the Gnome keyring using the secret-tool
  • An initialized restic repository
  • The repository password stored in the Gnome key ring

The prerequisits are rather easy to setup. We need to add the username and password once to the Gnome keyring. We can use a label and some attributes. The attributes are used for finding the username and password again in the key ring.

secret-tool store --label="Synology username" synology username

Our user should also be able to mount the remote folder. One wayt to achieve this is by allowing the user to use sudo without a password for the mount and unmount command. This can be done by adding the following line to the sudoers file:

stefan ALL=(ALL) NOPASSWD: /usr/bin/mount, /usr/bin/umount, /usr/bin/mkdir, /usr/bin/chown

The restic commands are pretty self explainatory.

restic -r ${SYNOLOGY_BACKUP_PATH} backup \
      ~/git \
      ~/.aliases \
      ~/.zshrc \
      ~/.bashrc \
      ~/.vimrc \
      ~/.ssh

In order to be mindfiul about the used storage, we will prune snapshots after a while.

 # Prune older snapshots but keep 2 pe day, 7 days and 4 weeks
    restic -r ${SYNOLOGY_BACKUP_PATH} \
      forget \
      --prune \
      --keep-hourly 2 \
      --keep-daily 7 \
      --keep-weekly 4

The automation part is done by a classic cron job which runs for instance every 4 hours.

The prerequisits are described in the comments of the script below.

The backup script

The following script will backup the folders and files listed in the backup command.

#!/usr/bin/env bash
# exit when any command fails
set -e

# The following script assumes that you initialized the directory $SYNOLOGY_BACKUP_PATH
# on the Synology as a new restic repository:
# restic -r ${SYNOLOGY_BACKUP_PATH} init
# Make sure to add the username and the password first to the key ring
# secret-tool store --label="Synology username" synology username
# secret-tool store --label="Synology password" synology password
# Also add the restic password to the keyring
# secret-tool store --label="Restic password" restic password
# Add the mount and umount command without sudo password
# by using sudo visudo and add this line (adapt username)
# sproell ALL=(ALL) NOPASSWD: /usr/bin/mount, /usr/bin/umount, /usr/bin/mkdir, /usr/bin/chown
# Add a cron job which runs every 4 hours (for example)
# MAILTO="stefan.proell@cropster.com"
# 0 */4 * * * DISPLAY=:0 /home/sproell/scripts/automatic-restic-backup.sh

NAS_IP=192.168.1.10

BACKUP_MOUNT_TARGET=/media/${USER}/cropster-synology-backup
SYNOLOGY_PATH=/home
SYNOLOGY_BACKUP_PATH="${BACKUP_MOUNT_TARGET}/2020-restic-backups"
LOCAL_USER_ID=$( id -u )
LOCAL_GROUP_ID=$( id -g )

isPathMounted() { findmnt -rno TARGET "$1" >/dev/null;} 

runResticBackup()
{
  # Store the repository password in the environment variable
  RESTIC_PASSWORD=$( secret-tool lookup restic password )
  export RESTIC_PASSWORD

  # Check of the remote directory exists, otherwise create it
  [ -d ${SYNOLOGY_BACKUP_PATH} ] ||  ( \
    sudo mkdir ${SYNOLOGY_BACKUP_PATH};\
    sudo chown -R ${LOCAL_USER_ID}:${LOCAL_GROUP_ID} \
    ${SYNOLOGY_BACKUP_PATH})

  restic -r ${SYNOLOGY_BACKUP_PATH} snapshots
  restic -r ${SYNOLOGY_BACKUP_PATH} backup \
    ~/git \
    ~/.aliases \
    ~/.zshrc \
    ~/.bashrc \
    ~/.vimrc \
    ~/.ssh
  # Prune older snapshots but keep 2 pe day, 7 days and 4 weeks
  restic -r ${SYNOLOGY_BACKUP_PATH} \
    forget \
    --prune \
    --keep-hourly 2 \
    --keep-daily 7 \
    --keep-weekly 4
  sudo umount ${BACKUP_MOUNT_TARGET}
  unset RESTIC_PASSWORD
  unset SYNO_PASS
}

echo "Current date: $( date )"
# Can I ping the nas?
echo "Pinging the NAS 10 times"
ping -c 10 $NAS_IP > /dev/null && echo "up... proceeding" || ( echo "NAS down.";exit 1)


# Get username and password from key chain
SYNO_USER=$( secret-tool lookup synology username )
SYNO_PASS=$( secret-tool lookup synology password )

if isPathMounted "${BACKUP_MOUNT_TARGET}";
  then 
    echo "${BACKUP_MOUNT_TARGET} is mounted"   
    
   else 
   # Check if the directory exists locally, otherwise create it
    [ -d ${BACKUP_MOUNT_TARGET} ] ||  sudo mkdir ${BACKUP_MOUNT_TARGET}
    sudo mount -t cifs \
      -o username=${SYNO_USER},password="${SYNO_PASS}",vers=2.0,uid=${LOCAL_USER_ID},gid=${LOCAL_GROUP_ID},noauto,user \
      "//192.168.1.10${SYNOLOGY_PATH}/" \
      "${BACKUP_MOUNT_TARGET}"
fi

runResticBackup

if isPathMounted "${BACKUP_MOUNT_TARGET}";
  then
    sudo umount ${BACKUP_MOUNT_TARGET}
fi

Connecting to MySQL 5.6 using TLSv1 on Ubuntu 20.04.1

Ubuntu 20.04 updated some security policies which has the effect that some connections might not work anymore. This happened for instance with connections to AWS Aurora 5.6 recently.

Background

AWS Aurora 5.6 only supports TLSv1 for encrypted connection.

This TLS protocol version is considered insecure for some time now and has been disabled in Ubuntu 20.04 and MySQL Client 8 respectively. If MySQL configuration permits TLSv1, TLSv1.1, and TLSv1.2, but your host system configuration permits only connections that use TLSv1.3 or higher, you cannot establish MySQL connections at all, because no protocol permitted by MySQL is permitted by the host system. The problem manifests itself in the following error:

ERROR 2026 (HY000): SSL connection error: error:1425F102:SSL routines:ssl_choose_client_version:unsupported protocol

You can see the supported version on the MySQL server using

SHOW GLOBAL VARIABLES LIKE 'tls_version';

Specifying the protocol version explicitly did not help:

mysql --defaults-extra-file=~/.aws_mysql_aurora --tls-version=TLSv1

The (bug report)[https://bugs.launchpad.net/ubuntu/+source/mysql-8.0/+bug/1872541/comments/27] is also reflected in the official docs, but siumply copying the suggested fix won’t do.

Example of the problem

The following python snippet throws a protocol error with Ubuntu 20.4.

import mysql.connector
from mysql.connector import ClientFlag

config = {
    'user': 'me',
    'password': 'secret',
    'host': '127.0.0.1',
    'port': '3306',
    'database': 'sakila',
    'raise_on_warnings': True,
    'client_flags': [ClientFlag.SSL]
}

cnx = mysql.connector.connect(**config)
cur = cnx.cursor(buffered=True)
cur.execute("SHOW STATUS LIKE 'Ssl_cipher'")
print(cur.fetchone())
cur.close()
cnx.close()

The error thrown by Python is

mysql.connector.errors.InterfaceError: 2055: Lost connection to MySQL server at '127.0.0.1:8001', system error: 1 [SSL: UNSUPPORTED_PROTOCOL] unsupported protocol (_ssl.c:1108)

The quick fix

It is possible to lower the TLS version requirements in the openssl config of Ubuntu. But in order for this to work with Aurora 5.6, you need to lower the TLS version to TLSv1. This can be achieved by adapting the OpenSSL settings in /etc/ssl/openssl.cnf.

First add a default section on top of the file:

openssl_conf = default_conf

and then at the end of the file add:

[ default_conf ]

ssl_conf = ssl_sect

[ssl_sect]

system_default = system_default_sect

[system_default_sect]
MinProtocol = TLSv1
MaxProtocol = None
CipherString = DEFAULT:@SECLEVEL=1

This lowers the allower TLS version tro TLSv1 again. Now the python script from above can be executed.

Proper fix

The solution above can also be used by applying the SSL configuration only to the current script and not the whole operating system. This is of course the wiser plan and should therefore be used. In order to use TLSv1 with Python you can

  1. Create a virtual environment with proper versions for the relevant packages
  2. Load the openssl configuration from above as an environment file

Requirements for Python

The following dependencies can be defined in a requirements.txt file.

mysql-connector-python==8.0.22
pandas==1.2.0
pkg-resources==0.0.0
SQLAlchemy==1.3.22

Virtual Environment

You can also use the following snippet for a Makefile to create the virtual environment. My colleague Jonas suggested the following code:

venv: requirements.txt
	test -d venv || python3 -m venv venv
	venv/bin/pip3 install --upgrade pip setuptools
	venv/bin/pip3 install -Ur requirements.txt
	touch venv/bin/activate

Environment Variables in the Terminal

In order to connect you need to set the following environment variables. Make sure to use a full path for the openssl.cfg file. You can write those variables into a file called .venv and then source it: source .venv. Note that this is obviously sensitive data.

export OPENSSL_CONF=/full/path/to/config/openssl.cfg
export DB_HOST=127.0.0.1
export DB_PORT=3306
export DB_USER=alice
export DB_PASSWORD=SECRET
export DB_NAME=sakila

Environment Variables in IntelliJ

The same method also works when you set the environment variables in the run / debug configuration of IntelliJ. You need to make sure that you use the right venv as interpreted for the project.

  1. Create a new virtual environment venv using make venv
  2. Set this environment as the interpreter of this project: File –> Project Structure –> Project SDK
  3. Create a new run / debug configuration and add the environment variables from above
  4. Make sure the run configuration uses the SDK

Python Example

Then you can use the following snippet.

import mysql.connector
import sqlalchemy as sqlalchemy
from mysql.connector.constants import ClientFlag
import pandas as pd

import logging
logging.basicConfig(
    format='%(asctime)s %(levelname)-8s %(message)s',
    level=logging.INFO,
    datefmt='%Y-%m-%d %H:%M:%S')

sql_query = """
SELECT
    last_name
FROM sakila.actor
ORDER BY actor_id DESC
LIMIT 10
"""

def get_connection_config():
    """
    OPENSSL_CONF=/full/path/to/config/openssl.cfg
    DB_HOST=127.0.0.1
    DB_PORT=3306
    DB_USER=alice
    DB_PASSWORD=SECRET
    DB_NAME=sakila

    :return: db_config_dict
    """
    if(os.getenv('DB_PASSWORD') != None):
        mysql_config = {
            'host': os.getenv('DB_HOST'),
            'port': os.getenv('DB_PORT'),
            'user': os.getenv('DB_USER'),
            'password': os.getenv('DB_PASSWORD'),
            'database': os.getenv('DB_NAME'),
            'client_flags': [ClientFlag.SSL]
        }
        return mysql_config
    else:
        print("You need to set the env variables")
        exit(1)

if __name__ == "__main__":
    mysql_config = get_connection_config()

    """Use a cursor object
    
    You can retrieve data by using a cursor object and iterate over the results.
    Close cursors and connections when done.
    """

    mysql_connection = mysql.connector.connect(**mysql_config)

    cursor = mysql_connection.cursor()
    cursor.execute(sql_query)

    for (_username) in cursor:
        logging.info("Actor: {}".format(last_name))

    cursor.close()
    mysql_connection.close()

    """Use Pandas for retrieving data
    
    The more convenient way of retrieving data is to use Pandas.
    It will return a data frame and you can easily paginate large result sets in a loop.
    
    """
    mysql_connection = mysql.connector.connect(**mysql_config)
    for chunk in pd.read_sql_query(con=mysql_connection, sql=sql_query, chunksize = 5):
        logging.info("last_name: {}".format(chunk['last_name']))

    exit(0)

You can find the code also at my Github repository.

Workaround

If the hack above should not work, what will help is downgrading the MySQL Client to the Version 5.7. I downloaded the bundle from here and unpacked it. Then I installed the following packages:

sudo apt-get install libtinfo5 libaio1
sudo dpkg -i mysql-common_5.7.31-1ubuntu18.04_amd64.deb
sudo dpkg -i mysql-community-client_5.7.31-1ubuntu18.04_amd64.deb

Then I could connect again without any extra settings and flags.

Update 2020-10-14

The workaround stopped to function for some reason. I then found this trick described here which offers a temporary fix. It uses a local configuration file for openssl. This file can then be used for single commands by prefixing the variable. Save the configuration below in a file, for instance ~/.openssl_allow_tls1.0.cnf.

openssl_conf = openssl_init

[openssl_init]
ssl_conf = ssl_sect

[ssl_sect]
system_default = system_default_sect

[system_default_sect]
CipherString = DEFAULT@SECLEVEL=1

and then export this in a terminal export OPENSSL_CONF=~/configurations/ssl/openssl_allow_tls1.0.cnf.

Update 2020-10-19

If you need to update your system, make sure to hold the installed MySQL 5.7 version of the client. You could see which version would be installed if you would upgrade now:

$ apt-cache policy mysql-community-client mysql-common

mysql-community-client:
  Installed: 5.7.31-1ubuntu18.04
  Candidate: 8.0.22-1ubuntu20.04
  Version table:
     8.0.22-1ubuntu20.04 500
        500 http://repo.mysql.com/apt/ubuntu focal/mysql-8.0 amd64 Packages
 *** 5.7.31-1ubuntu18.04 100
        100 /var/lib/dpkg/status
mysql-common:
  Installed: 5.7.31-1ubuntu18.04
  Candidate: 8.0.22-1ubuntu20.04
  Version table:
     8.0.22-1ubuntu20.04 500
        500 http://repo.mysql.com/apt/ubuntu focal/mysql-8.0 amd64 Packages
     5.8+1.0.5ubuntu2 500
        500 http://at.archive.ubuntu.com/ubuntu focal/main amd64 Packages
        500 http://at.archive.ubuntu.com/ubuntu focal/main i386 Packages
 *** 5.7.31-1ubuntu18.04 100
        100 /var/lib/dpkg/status

Then you can pin the version to 5.7 using a wildcard *1 by adding the packages to /etc/apt/preferences.

Package: mysql-common
Pin: version 5.7.*
Pin-Priority: 1001

Package: mysql-community-client
Pin: version 5.7.*
Pin-Priority: 1001

Package: libmysqlclient21
Pin: version 5.7.*
Pin-Priority: 1001

Use an SSH tunnel ending at the host also within a Docker container

There are many use cases for SSH tunnels as they allow accessing resources behind firewalls and other obstacles over a secure channel. Since more and more services are containerized, it makes sense to use SSH tunnels also within the context of containers, especially for testing. Using SSH tunnels within Docker containers would require installing an SSH client and mounting keys. In many cases this is not possible without building a new Docker image which includes the client. As this is a cumbersome approach, an easy but insecure solution exists, which is recommended in many tutorials or posts on StackOverflow. This fix makes use of the --net=host flag, which allows accessing all ports of the host - also open SSH tunnels. But for obvious reasons, this is dangerous.

A better approach is to bind the SSH tunnel to the bridge network of the Docker service. This bridge is available to all the containers connected to the particular network and thus can also forward specific ports. This technique gives a much more fine granular control over which containers may access the tunnel.

You can list the bridges with ifconfig.

br-b273916af970: flags=4163<UP,BROADCAST,RUNNING,MULTICAST>  mtu 1500
        inet 172.18.0.1  netmask 255.255.0.0  broadcast 172.18.255.255
        ether dd:bb:aa:cc:bb  txqueuelen 0  (Ethernet)
        RX packets 0  bytes 0 (0.0 B)
        RX errors 0  dropped 0  overruns 0  frame 0
        TX packets 205  bytes 22043 (22.0 KB)
        TX errors 0  dropped 0 overruns 0  carrier 0  collisions 0

br-c92ab5650a7a: flags=4099<UP,BROADCAST,MULTICAST>  mtu 1500
        inet 172.19.0.1  netmask 255.255.0.0  broadcast 172.19.255.255
        ether aa:bb:cc  txqueuelen 0  (Ethernet)
        RX packets 0  bytes 0 (0.0 B)
        RX errors 0  dropped 0  overruns 0  frame 0
        TX packets 0  bytes 0 (0.0 B)
        TX errors 0  dropped 0 overruns 0  carrier 0  collisions 0

docker0: flags=4163<UP,BROADCAST,RUNNING,MULTICAST>  mtu 1500
        inet 172.17.0.1  netmask 255.255.0.0  broadcast 172.17.255.255
        ether bb:aa:cc:aa:bb:  txqueuelen 0  (Ethernet)
        RX packets 3919  bytes 227485 (227.4 KB)
        RX errors 0  dropped 0  overruns 0  frame 0
        TX packets 3205  bytes 8586636 (8.5 MB)
        TX errors 0  dropped 0 overruns 0  carrier 0  collisions 0

You can find out the bridge a container uses with docker inspect «container». The default bridge is called docker0. You then need to enable packet forwarding to this bridge for IP tables. Note that the change below is not persisted, you need to do it again after reboot or add it permanently.

sudo iptables -I INPUT 3 -i docker0 -j ACCEPT

After this step you open a SSH tunnel on the host and also use it inside your container. This way you do not have to install SSH clients, keys etc. The trick is to bind the SSH connection to the right interface. Below you can see an example command, which allows to connect to a MySQL database via a bastion host, a typical scenario for cloud services.

ssh -L 172.17.0.1:7002:mysqlcluster:3306 bastion.example.org

Then you can access the forwarded port within the docker container on the same IP / interface, e.g. 172.17.0.1:7200 This way you can for instance use the Percona PMM container for momitoring your cluster also on your local machine, without having to deploy it and expose it via the Web.

Setup a SSH tunnel in IntelliJ

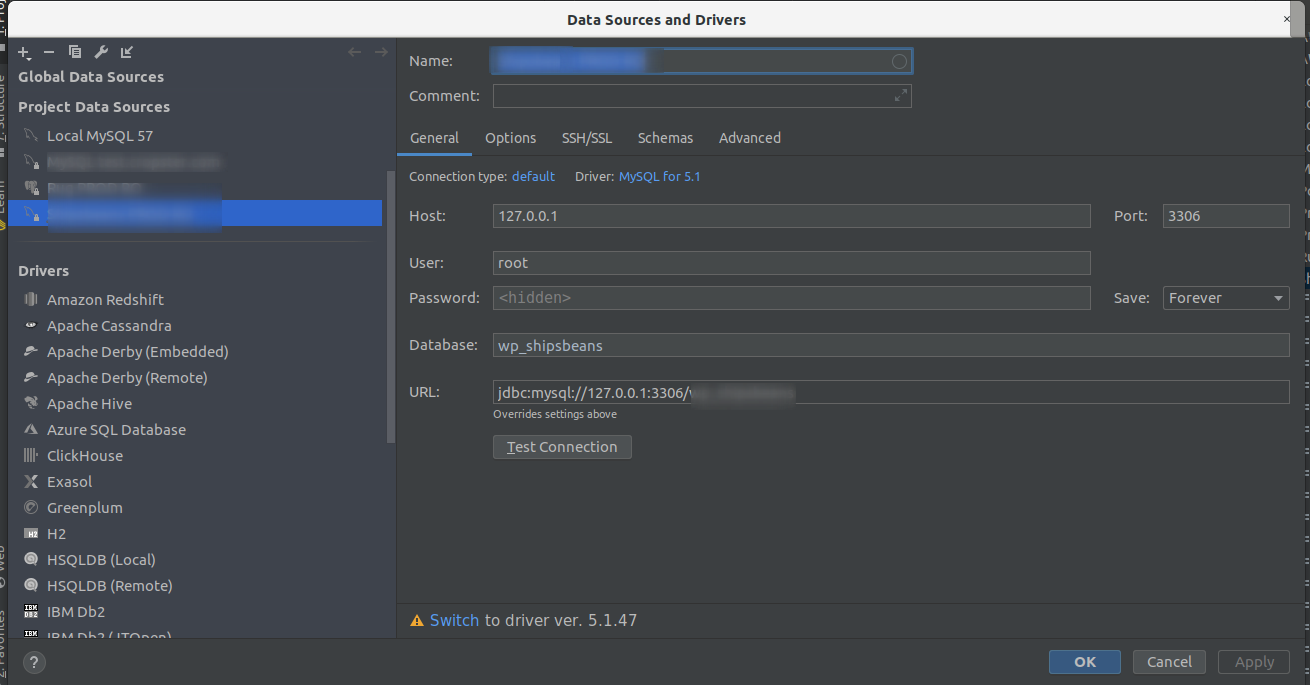
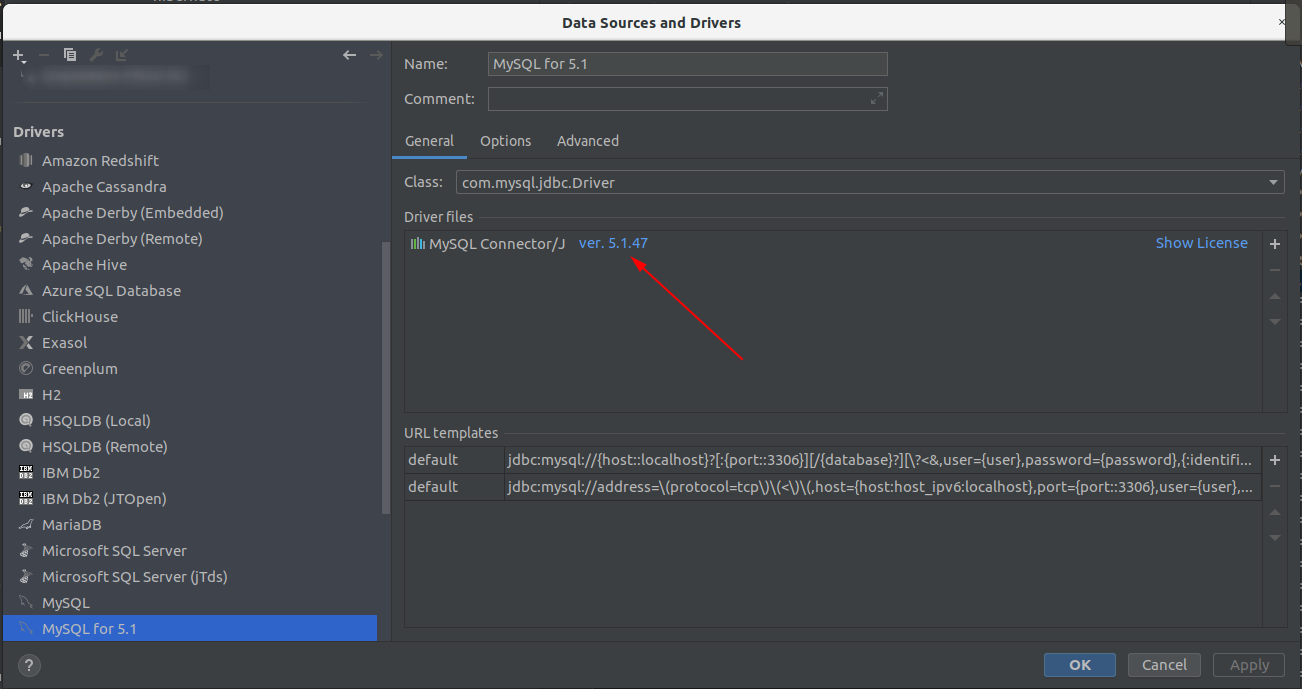
There seems to be a problem with the older MySQL driver and IntelliJ Ultimate. When I tried to connect to a remote MySQL instance using a tunnel, IntelliJ would refuse to connect. IntelliJ would show an error similar to the following:

Cannot connect to a database. Tried three times.

The linked online help page was not really helpful. I could create the tunnel manually and verify the settings, all seemed fine. As a next step I inspected the MySQL error log on the remote server and noticed that errors in relation to my connection attempts wer showing. Thus I knew at least that the connection issue was not caused by SSH, but rather seems to be related to MySQL.

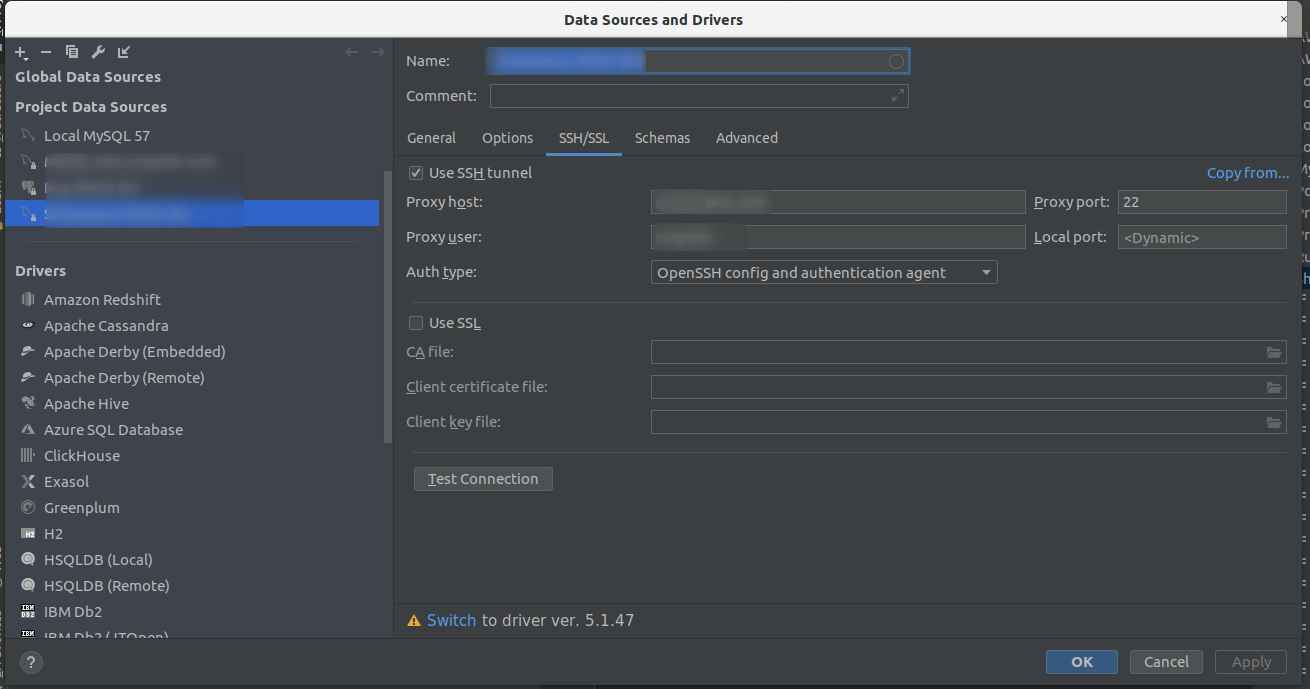
I then upgraded the MySQL driver and the connection worked out of the box. I use a SSH config section similar to this:

Host remote-mysql-database-server
	User bob
	Hostname 10.20.30.40
	IdentityFile ~/.ssh/rsa_id

This can then be used in IntelliJ. For more complex setups, for instance when you need to connect to AWS RDS and have to use a bastion host, I found it easier to setup the connection details also in the SSH config file and keep the IntelliJ configuration simple.

IntelliJ MySQL settings

MySQL Driver

SSH settings

Demystifying MySQL User Management (Part 1)

Managing user accounts can be a bit confusing, when working with MySQL. The two main commands in that context: CREATE USER and GRANT. Obviously, CREATE user is for adding a new user while GRANT is used for assigning permissions.

Pre-requisits: Docker Compose

For testing access to a MySQL instance, we can use Docker for running said instance and two different client containers. The docker-compose snipped below orchestrates those three containers and puts them on a shared network.

version: '3'
services:
  mysql-db:
    image: mysql:8
    container_name: mysql-8-server
    restart: unless-stopped
    command: --default-authentication-plugin=mysql_native_password
    environment:
      MYSQL_DATABASE: 'world'
      MYSQL_ALLOW_EMPTY_PASSWORD: 'yes'      
    ports:
      - '3308:3306'
    expose:
      - '3306'      
    volumes:
      - my-data-volume:/var/lib/mysql
      - ./demo_data/world.sql:/docker-entrypoint-initdb.d/world.sql:ro
    networks:
      mysql-test-net:
        ipv4_address: 172.28.1.2
  mysql-client-1:
    image: alpine-mysql:latest
    container_name: client-1
    restart: unless-stopped
    command: tail -f /dev/null
    networks:
      mysql-test-net:
        ipv4_address: 172.28.1.3
  mysql-client-2:
      image: alpine-mysql:latest
      container_name: client-2
      restart: unless-stopped
      command: tail -f /dev/null
      networks:
        mysql-test-net:
          ipv4_address: 172.28.1.4
volumes:
  my-data-volume:
networks:
    mysql-test-net:
        ipam:
            driver: default
            config:
                - subnet: 172.28.0.0/16

The docker-compose script is pretty self explainatory. We use a MySQL 8 container, that allows connecting with the root user and an empty password. We persist the data of the MySQL database in a seperate data volume called my-data-volume and we also load the example database called world which we downloaded before.

In order to have a nice and simple image for the clients., we can use the Alpine image and pre-install the MySQL client inside it, by using the following Dockerfile.

FROM alpine:3.7
RUN apk add --no-cache mysql-client

You need to build it once on your host with the command

docker build --tag alpine-mysql:latest .

After starting docker-compose with docker-compose up, We end up with three containers:

  • mysql-8-server
  • client-1
  • client-2

MySQL User Accounts, Access and Permissions

In this blog post, I would like to highlight some issues that arise when you add accounts for users that can connect from different hosts. Our docker container accepts connections for root from any host. In the wild, this is of course bad practice and we are going to change that as soon as we have added a second account.

Connect to the MySQL server by starting the MySQL client inside the container client-1 and point it to the right host by providing the hostname of the database server. Docker resolves the container names for us nicely, because all three containers are inside the same network. In order to improve the readability, we also changed the prompt so that it is more obvious from which client we are connecting to.

$ docker exec -it client-1 mysql -uroot -h mysql-8-server --prompt "Client 1 >"
Welcome to the MariaDB monitor.  Commands end with ; or \g.
Your MySQL connection id is 9
Server version: 8.0.12 MySQL Community Server - GPL

Copyright (c) 2000, 2018, Oracle, MariaDB Corporation Ab and others.

Type 'help;' or '\h' for help. Type '\c' to clear the current input statement.

Client 1 >

The Root User

Lets make our example more secure by allowing root to connect only from the machine where the database instance is running at. Being still connected from client-1 as root, we can change the permissions. But lets have a look what users are there anyways.

Client 1 >SELECT User, Host, authentication_string  FROM mysql.user\G
*************************** 1. row ***************************
                 User: root
                 Host: %
authentication_string: 
*************************** 2. row ***************************
                 User: mysql.infoschema
                 Host: localhost
authentication_string: $A$005$THISISACOMBINATIONOFINVALIDSALTANDPASSWORDTHATMUSTNEVERBRBEUSED
*************************** 3. row ***************************
                 User: mysql.session
                 Host: localhost
authentication_string: $A$005$THISISACOMBINATIONOFINVALIDSALTANDPASSWORDTHATMUSTNEVERBRBEUSED
*************************** 4. row ***************************
                 User: mysql.sys
                 Host: localhost
authentication_string: $A$005$THISISACOMBINATIONOFINVALIDSALTANDPASSWORDTHATMUSTNEVERBRBEUSED
*************************** 5. row ***************************
                 User: root
                 Host: localhost
authentication_string: 
5 rows in set (0.00 sec)

As we can see there are five preinstalled accounts The users mysql.infoschema, mysql.session and mysql.sys are internal accounts that cannot be used for client connections. Do not delete them though, they are needed for internal tasks. Then there are two root accounts: ‘root’@’%’ and ‘root’@’localhost’. The first one is the problematic one, because with the wildcard ‘%’, clients can connect from any remote computer. We definetely do not want that.

So lets drop it:

DROP USER 'root'@'%';

When you now run the SELECT query again, you will notice that it still works. Even after you run FLUSH PRIVILEGES. The reason is that the server will verify the connection settings only after the next time the client connects. So lets exit the session and try to connect again.

$ docker exec -it client-1 mysql -uroot -h mysql-8-server --prompt "Client 1 >"
ERROR 1130 (HY000): Host '172.28.1.3' is not allowed to connect to this MySQL server

As expected, we cannot connect from a remote server anymore. Lets login using MySQL container.

docker exec -it mysql-8-server  mysql -uroot -h localhost --prompt "Server >"
Welcome to the MySQL monitor.  Commands end with ; or \g.
Your MySQL connection id is 11
Server version: 8.0.12 MySQL Community Server - GPL

Copyright (c) 2000, 2018, Oracle and/or its affiliates. All rights reserved.

Oracle is a registered trademark of Oracle Corporation and/or its
affiliates. Other names may be trademarks of their respective
owners.

Type 'help;' or '\h' for help. Type '\c' to clear the current input statement.

Server >

Note how we are now connecting to the mysql-8-server and using localhost as the hostname.

Localhost vs 127.0.0.1

In the example above we connected using localhost as the hostname. When we try the same with the IP address 127.0.0.1 of the loopback interface, which is often seen as synonymous, it does not work anymore.

docker exec -it mysql-8-server  mysql -uroot -h 127.0.0.1 --prompt "Server >"ERROR 1130 (HY000): Host '127.0.0.1' is not allowed to connect to this MySQL server

This is confusing, after all (after using apt-get install inetutils-ping for installing the tool inside the MySQL container), we can verify that localhost resolves to 127.0.0.1.

But there is more to that. First of all, MySQL can use hostname resolution and would make a DNS request to get the IP address from a hostname. As this can be pretty slow, it is turned off by default, as you can verify like this:

Server >show variables like 'skip_name_resolve';
+-------------------+-------+
| Variable_name     | Value |
+-------------------+-------+
| skip_name_resolve | ON    |
+-------------------+-------+
1 row in set (0.00 sec)

Further more, localhost is a special hostname for MySQL. You can connect to MySQL either by using a TCP connection or a file socket. The file socket only works on the same machine as the server is running and it is the faster method. This is why MySQL treats connections coming from localhost per default as socket connections. If you want to use 127.0.0.1, you can add this as a second host for the existing user using GRANT.

Server >GRANT ALL PRIVILEGES ON *.* TO 'root'@'127.0.0.1';
ERROR 1410 (42000): You are not allowed to create a user with GRANT

Now thats weird? After all, we are root and should be allowed to do anything, but we see this error message above. The reason is that there does not yet exist an account for ‘root’@’127.0.0.1’ yet.

Server >CREATE USER 'root'@'127.0.0.1' IDENTIFIED BY 'super-secret';
Query OK, 0 rows affected (0.07 sec)

Server >GRANT ALL PRIVILEGES ON *.* to 'root'@'127.0.0.1';
Query OK, 0 rows affected (0.07 sec)

Server >GRANT GRANT OPTION ON *.* to 'root'@'127.0.0.1';
Query OK, 0 rows affected (0.08 sec)

You always need to create a user account first before setting permissions with GRANT.

While we are at it, we can also set a password for root. Note how we set the password for both root accounts. Accounts are always identified with ‘username’@’hostname’.

Server >ALTER USER 'root'@'localhost' IDENTIFIED BY 'super-secret';
Server >ALTER USER 'root'@'127.0.0.1' IDENTIFIED BY 'super-secret';

Adding Users

Let’s logon with our new credentials again and create a new user called bob and add some permissions for the world database.

CREATE USER 'bob' IDENTIFIED BY 'secret';

What looks pretty harmless adds an account for the user called bob. Without adding a host, MySQL simply adds the wildcard for hosts and allows therefore connecting to the MySQL instance from any IP address. You can verify it with the follwing command that I am going to use more often in the course of this post.

Server >SHOW GRANTS FOR 'bob';
+---------------------------------+
| Grants for bob@%                |
+---------------------------------+
| GRANT USAGE ON *.* TO `bob`@`%` |
+---------------------------------+
1 row in set (0.00 sec)

Thats not what we had in mind. Lets delete bob’s account again and create it with a proper host.

DROP USER 'bob';
CREATE USER 'bob'@'172.28.1.3' IDENTIFIED BY 'secret';

Note how we limited the account to allow connections only from Client 1, by provoding its IP. You can’t connect from Client 2.

stefan@stefan-desktop:~/Docker-Projects/MySQL-Demo$ docker exec -it client-1 mysql -ubob -h mysql-8-server -psecret --prompt "Client 1 >"
Welcome to the MariaDB monitor.  Commands end with ; or \g.
Your MySQL connection id is 14
Server version: 8.0.12 MySQL Community Server - GPL

Copyright (c) 2000, 2018, Oracle, MariaDB Corporation Ab and others.

Type 'help;' or '\h' for help. Type '\c' to clear the current input statement.

Client 1 >exit
Bye
stefan@stefan-desktop:~/Docker-Projects/MySQL-Demo$ docker exec -it client-2 mysql -ubob -h mysql-8-server -psecret --prompt "Client 2 >"
ERROR 1045 (28000): Access denied for user 'bob'@'172.28.1.4' (using password: YES)

This are the very basics of MySQL account management. In the future I plan to go into more details.
Lightning fast integration tests with Docker, MySQL and tmpfs

Integration tests that involve database operations requite to tear down and re-initialize a database multiple times. Although most developer machines offer SSD and enough RAM, database initialization can consume a considerable amount of time nevertheless.

Docker allows defining volumes that are mounted directly into the memory by using tmpfs. We can utilize this feature to utilize the speed up disk operations as during database imports, by moving the data from the disk into the memory.

The following example measures the time for writing 1GB worth of data to an SSD:

dd if=/dev/zero of=/tmp/output bs=1024k count=1024; 
1024+0 Datensätze ein
1024+0 Datensätze aus
1073741824 bytes (1,1 GB, 1,0 GiB) copied, 2,22033 s, 484 MB/s</code>```


For comparison, the following steps create a RAM disk and write the data to memory.

$ sudo mount -o size=1G -t tmpfs none /tmp/tmpfs

$ dd if=/dev/zero of=/tmp/tmpfs/output bs=1024k count=1024; 1024+0 Datensätze ein 1024+0 Datensätze aus 1073741824 bytes (1,1 GB, 1,0 GiB) copied, 0,309017 s, 3,5 GB/s


As you can see writing 1GB to memory is 7x faster. With the following Docker run command, you can spin-up a default MySQL container, where the data directory resides in a tmpfs.

docker run -d
–rm
–name mysql-56-in-memory
-p 3307:3306
–tmpfs /var/lib/mysql:rw,noexec,nosuid,size=1024m
-e MYSQL_ALLOW_EMPTY_PASSWORD=TRUE
-e MYSQL_DATABASE=dev
mysql:5.6


The arguments of Docker run mean the following

  * &#8211;rm: delete the container once it was stopped
  * &#8211;name: a name for the container
  * -p: map the host&#8217;s port 3307 to the port 3306 inside the container. This allows to run multiple MySQL containers in parallel and connect to them from the host via the port specified
  * &#8211;tmpfs: This line mounts the internal directory of the container to a RAM disk. It should be writeable (rm). Noexec prevents the execution of binaries, nosuid prevents changing the permission flags and the size specifies the size occupied by the tmpfs partition in memory. Adapt this to your usecase. The minimum for MySQL is around 200MB. Add the space needed for your data, indices etc.
  * MYSQL\_ALLOW\_EMPTY_PASSWORD does what it implies
  * MYSQL_DATABASE defines the name of a database to be created

If you run this command you can connect to the container like this: _mysql -u root -h 127.0.0.1 -P 3307_

The container behaves like a normal MySQL database, unless the data is not persisted on a hard disk, but only stored in the ephemeral memory. If you stop the container, it will be removed by docker and if you reboot the machine the data will be gone. for obvious reasons this is only a good idea for test data that can be re-created at any time.

You can achieve the same also with Docker Compose if you would like to orchestrate multiple containers.

version: ‘3’ services: mysql-56-integration: container_name: mysql-56-in-memory restart: unless-stopped image: mysql:5.6 environment: - MYSQL_ALLOW_EMPTY_PASSWORD='true’ - MYSQL_HOST=’’ volumes: - data:/var/cache ports: - “3307:3306”

volumes: data: driver_opts: type: tmpfs device: tmpfs```

Setup AWS MySQL 5.6 Aurora as a Slave for an external Master with SSL

Setting up Aurora as a slave for an external MySQL server that acts as the master is a bit tricky. Of course we want a secured connection. For this reason we need to create client certificates to be used by AWS RDS. The steps below should work for RDS as well.

Generate and Sign the Certificates

The process is actually simple, but AWS is picky how you generate the certificates. I was using a SHA flag that was accepted by a regular MySQL 5.6 instance, but caused a cryptic (pun intended) MySQL 2026 Generic SSL error and it was quite hard to find the source. Also note that you need to have different common names (CN) for all three certificate pairs. They do not necessarily need to fit the actual domain name, but they need to be different. 

First we need to create the certificate authority that can sign the keys

# Generate a certificate authority key pair
openssl genrsa 2048 > ca-key.pem
# Notice the CN name. It needs to be different for all of the three key pairs that we create!
openssl req -new -x509 -nodes -days 3600 -key ca-key.pem -out ca.pem -subj "/C=AT/ST=Tirol/L=Innsbruck/O=The Good Corp/OU=IT Department/CN=ca.mysql"

Then create the server key pair

#Generate a server key. Note again the different CN
openssl req -newkey rsa:2048 -days 3600 -nodes -keyout server-key.pem -out server-req.pem -subj "/C=AT/ST=Tirol/L=Innsbruck/O=The Good Corp/OU=IT Department/CN=server.mysql"
# Convert the format
openssl rsa -in server-key.pem -out server-key.pem
# Sign it
openssl x509 -req -in server-req.pem -days 3600 -CA ca.pem -CAkey ca-key.pem -set_serial 01 -out server-cert.pem

Finally we generate a client certificate and its key. You can repeat these steps to generate multiple certificates for clients

# Again, note the CN
openssl req -newkey rsa:2048 -days 3600 -nodes -keyout client-key.pem -out client-req.pem -subj "/C=AT/ST=Tirol/L=Innsbruck/O=The Good Corp/OU=IT Department/CN=client.mysql"
# Convert
openssl rsa -in client-key.pem -out client-key.pem
# Sign
openssl x509 -req -in client-req.pem -days 3600 -CA ca.pem -CAkey ca-key.pem -set_serial 01 -out client-cert.pem
# Verify
openssl verify -CAfile ca.pem server-cert.pem client-cert.pem

Now we have all the certs we need.

Master Setup

The setup is pretty standard. Add the server certificates to the MySQL configuration of your master and restart.

# SSL Server Certificate
ssl-ca=/etc/mysql/ssl/ca.pem
ssl-cert=/etc/mysql/ssl/server-cert.pem
ssl-key=/etc/mysql/ssl/server-key.pem

Then create a user for the slave

CREATE USER 'aws'@'%' IDENTIFIED BY 'SECRET';
GRANT REPLICATION CLIENT, REPLICATION SLAVE ON *.* TO 'aws'@'%' IDENTIFIED BY 'SECRET' REQUIRE SSL;```


# Slave Setup

On AWS you do not have SUPER() privileges, but can use stored procedures provided by Amazon to setup the slave.

Start fresh by removing old records. If there was no previous setup, there might be an error.

CALL mysql.rds_remove_binlog_ssl_material; CALL mysql.rds_reset_external_master;


Now you need to pass the client certificate data as a JSON to AWS Aurora.

CALL mysql.rds_import_binlog_ssl_material('{“ssl_ca”:"—–BEGIN CERTIFICATE—– MIIBAgMBVRpcm9sMRIw… … —–END CERTIFICATE—–\n”,“ssl_cert”:"—–BEGIN CERTIFICATE—– KAoIBAQCzn28awhyN8V56Z2bskCiMhJt4 … —–END CERTIFICATE—–\n”,“ssl_key”:"—–BEGIN RSA PRIVATE KEY—– SbeLNsRzrPoCVGGqwqR6gE6AZu … —–END RSA PRIVATE KEY—–"}');


A message that the SSL data was accepted will appear if you pasted the certificate, the key and the CA certificate correctly.

Finally, start the replication and check the status

CALL mysql.rds_start_replication; SHOW SLAVE STATUS\G```

Tests and Troubleshooting

On the master, you can check if the slave even tries to connect for instance with tcpdump. In the example below the IP 1.2.3.4 would be the AWS gateway address as seen by your firewall.

sudo tcpdump src host 1.2.3.4 -vv```


<div class="twttr_buttons">
  <div class="twttr_twitter">
    <a href="http://twitter.com/share?text=Setup+AWS+MySQL+5.6+Aurora+as+a+Slave+for+an+external+Master+with+SSL" class="twitter-share-button" data-via="" data-hashtags=""  data-size="default" data-url="https://blog.stefanproell.at/2018/11/30/setup-aws-mysql-5-6-aurora-as-a-slave-for-an-external-master-with-ssl/"  data-related="" target="_blank">Tweet</a>
  </div>
  
  <div class="twttr_followme">
    <a href="https://twitter.com/@stefanproell" class="twitter-follow-button" data-show-count="true" data-size="default"  data-show-screen-name="false"  target="_blank">Follow me</a>
  </div>
</div>

Install Innotop from Source

Innotop is a great tool but not included in the current Ubuntu repositories. Here is how you install it manually:

# Install perl database interface
sudo apt-get install libdbi-perl
# Install MySQL and Terminal perl modules
sudo cpan Term::ReadKey DBD::mysql
# Clone innotop
git clone https://github.com/innotop/innotop.git
# Enter directory
cd innotop
# Make
perl Makefile.PL
# Install
sudo make install

Then you can run innotop like this

innotop --user $ADMIN_USER --password $ADMIN_PASSWORD --host $HOST```


<div class="twttr_buttons">
  <div class="twttr_twitter">
    <a href="http://twitter.com/share?text=Install+Innotop+from+Source" class="twitter-share-button" data-via="" data-hashtags=""  data-size="default" data-url="https://blog.stefanproell.at/2018/11/07/install-innotop-from-source/"  data-related="" target="_blank">Tweet</a>
  </div>
  
  <div class="twttr_followme">
    <a href="https://twitter.com/@stefanproell" class="twitter-follow-button" data-show-count="true" data-size="default"  data-show-screen-name="false"  target="_blank">Follow me</a>
  </div>
</div>

Grafana and InfluxDB with SSL inside a Docker Container

Self-signed SSL certificates

On the host, create a directory for storing the self signed SSL certificates. This directory will be mounted in the Grafana container as well as in the InfluxDB container to /var/ssl. Create the self signed SSL certificates as follows:

mkdir -p /docker/ssl
cd /docker/ssl/
# Generate a private key
openssl genrsa -des3 -out server.key 1024
# Generate CSR
openssl req -new -key server.key -out server.csr
# Remove password
openssl rsa -in server.key -out server.key
# Generate self signed cert
openssl x509 -req -days 365 -in server.csr -signkey server.key -out server.crt
# Set permissions
sudo chmod 644 server.crt
sudo chmod 600 server.key

Next, create a config directory and create individual configuration files for Grafana and InfluxB: mkdir conf

Grafana

In the file ./conf/grafana/defaults.ini set the protocol to https and provide the paths to the mounted ssl directory in the container.

#################################### Server ##############################
[server]
# Protocol (http, https, socket)
protocol = https
...
...
# https certs & key file
cert_file = /var/ssl/server.crt
cert_key = /var/ssl/server.key
...```


## InfluxDB

The file ./conf/influxdb/influxdb.conf is also pretty simple. Add a [http] category and add the settings:

[meta] dir = “/var/lib/influxdb/meta” [data] dir = “/var/lib/influxdb/data” engine = “tsm1” wal-dir = “/var/lib/influxdb/wal” [http] https-enabled = true https-certificate =”/var/ssl/server.crt” https-private-key =”/var/ssl/server.key”


## Environment

You can set environment variables in <span class="lang:default decode:true crayon-inline ">env files</span> for the services.

### env.grafana

GF_INSTALL_PLUGINS=grafana-clock-panel,briangann-gauge-panel,natel-plotly-panel,grafana-simple-json-datasource


### env.influxdb

INFLUXDB_REPORTING_DISABLED=true INFLUXDB_DB= INFLUXDB_HTTP_AUTH_ENABLED=true INFLUXDB_ADMIN_USER=admin INFLUXDB_ADMIN_PASSWORD= INFLUXDB_USER= INFLUXDB_USER_PASSWORD= INFLUXDB_WRITE_USER= INFLUXDB_WRITE_USER_PASSWORD=


## Docker Compose

Now you can launch the service by using <span class="lang:default decode:true crayon-inline ">docker-compose up</span> for the following file. Note

version: ‘2’

services: influxdb: image: influxdb:latest container_name: influxdb ports: - “8083:8083” - “8086:8086” - “8090:8090” env_file: - ‘env.influxdb’ volumes: - data-influxdb:/var/lib/influxdb - /docker/ssl:/var/ssl - /docker/conf/influxdb/influxdb.conf:/etc/influxdb/influxdb.conf

grafana:
    image: grafana/grafana:latest
    container_name: grafana
    ports:
        - "3000:3000"
    links:
        - influxdb
    env_file:
        - 'env.grafana'
    volumes:
        - data-grafana:/var/lib/grafana
        - /docker/ssl:/var/ssl
        - /docker/conf/grafana/defaults.ini:/usr/share/grafana/conf/defaults.ini

volumes: data-influxdb: data-grafana:```

Lets Encrypt Setup

If you require valid certificates, you can also use certificates from lets encrypt.

First, create the certificates on the host:

certbot certonly --standalone --preferred-challenges http --renew-by-default -d iot.example.org```


Then use this docker-compose file.

version: ‘2’

services: influxdb: image: influxdb:latest container_name: influxdb ports: - “8083:8083” - “8086:8086” - “8090:8090” env_file: - ‘env.influxdb’ volumes: - data-influxdb:/var/lib/influxdb - /etc/letsencrypt/live/iot.example.org/fullchain.pem:/var/ssl/server.crt - /etc/letsencrypt/live/iot.example.org/privkey.pem:/var/ssl/server.key - /docker/conf/influxdb/influxdb.conf:/etc/influxdb/influxdb.conf

grafana:
    image: grafana/grafana:latest
    container_name: grafana
    ports:
        - "3000:3000"
    links:
        - influxdb
    env_file:
        - 'env.grafana'
    volumes:
        - data-grafana:/var/lib/grafana
        - /etc/letsencrypt/live/iot.example.org/fullchain.pem:/var/ssl/server.crt
        - /etc/letsencrypt/live/iot.example.org/privkey.pem:/var/ssl/server.key
        - /docker/conf/defaults.ini:/usr/share/grafana/conf/defaults.ini

volumes: data-influxdb: data-grafana:```

Jupyter docker stacks with a custom user

Jupyter allows to set a custom user instead of**_jovyan_** which is the default for all containers of the [Jupyter Docker Stack][1]. You need to change this user or its UID and GID in order to get the permissions right when you mount a volume from the host into the Jupyter container. The following steps are required:

  1. Create an unprivileged user and an asociated group on the host. Here we call the user and the group docker_worker
  2. Add your host user to the group. This gives you the permissions to modify and read the files also on the host. This is useful if your working directory on the hist is under source code control (eg. git)
  3. Launch the container with the correct settings that change the user inside the container

It is important to know that during the launch the container needs root privileges in order to change the settings in the mounted host volume and inside the container. After the permissions have been changed, the user is switched back and does not run with root privileges, but your new user. Thus make sure to secure your Docker service, as the permissions inside the container also apply to the host.

Prepare an unprivileged user on the host

1. sudo groupadd -g 1011 docker_worker
2. sudo useradd -s /bin/false -u 1010 -g 1020 docker_worker
3. Add your user to the group: sudo usermod -a -G docker_worker stefan```


# Docker-compose Caveats

It is important to know that docker-compose supports either an array or a dictionary for environment variables ([docs][2]). In the case below we use arrays and we quote all variables. If you accidentally use a dictionary, then the quotes would be passed along to the Jupyter script. You would then see this error message:&nbsp;

/usr/local/bin/start-notebook.sh: ignoring /usr/local/bin/start-notebook.d/* Set username to: docker_worker Changing ownership of /home/docker_worker to 1010:1020 chown: invalid user: ‘'-R’’```

The docker-compose file

version: '2'
services:
    datascience-notebook:
        image: jupyter/base-notebook:latest
        volumes:
            - /tmp/jupyter_test_dir:/home/docker_worker/work            
        ports:
            - 8891:8888
        command: "start-notebook.sh"
        user: root
        environment:
          NB_USER: 'docker_worker'
          NB_UID: 1010
          NB_GID: 1020
          CHOWN_HOME: 'yes'
          CHOWN_HOME_OPTS: -R```


Here you can see that we set the variables that cause the container to ditch jovyan in favor of docker_worker.

> NB\_USER: &#8216;docker\_worker&#8217;  
> NB_UID: 1010  
> NB_GID: 1020  
> CHOWN_HOME: &#8216;yes&#8217;  
> CHOWN\_HOME\_OPTS: -R

This facilitates easy version control of the working directory of Jupyter. I also added the snipped to my [Github Jupyter template][3].

<div class="twttr_buttons">
  <div class="twttr_twitter">
    <a href="http://twitter.com/share?text=Jupyter+docker+stacks+with+a+custom+user" class="twitter-share-button" data-via="" data-hashtags=""  data-size="default" data-url="https://blog.stefanproell.at/2018/08/08/jupyter-docker-stacks-with-a-custom-user/"  data-related="" target="_blank">Tweet</a>
  </div>
  
  <div class="twttr_followme">
    <a href="https://twitter.com/@stefanproell" class="twitter-follow-button" data-show-count="true" data-size="default"  data-show-screen-name="false"  target="_blank">Follow me</a>
  </div>
</div>

 [1]: https://github.com/jupyter/docker-stacks
 [2]: https://docs.docker.com/compose/compose-file/#environment
 [3]: https://github.com/stefanproell/jupyter-notebook-docker-compose/blob/master/README.md

Unbrick a Netgear WNR3500L V2

It finally happened… After experimenting with alternative [firmware][1] for my WNR3500L router, I uploaded the wrong version and converted the device into a rather expensive paperweight. After some searching, I found this page, explaining how to revitalize the router by using a USB-TTL converter cable. You can get (e.g. [CP2102 Module Modul USB to TTL Converter)][2] for a few bucks Ebay, but expect a few weeks for the delivery from China.  If you follow the tutorial on the OpenRouters page closely, it should work out quite nicely.

Update: 2018-01-21

It happened again. I flashed an unsupported version of LEDE on the device and it did not want to boot again. I followed the same procedure as described [here][3], butthe router was complaining about a version missmatch of the device ID and the image ID. Turns out, I had to explicitly use binary mode for FTP. Here are the steps again.

  1. Connect the serial cables as shown
  2. Make sure router is off
  3. Launch minicom in a terminal and make sure the settings are valid for ttyUSB0
  4. Boot the router and immediately press Ctrl+C in the terminal
  5. Type tftpd in the prompt, the router should start a FTP server on 192.168.1.1
  6. Open a second terminal, cd into the directory where the firmware is
  7. Make sure its the right version 🙂
  8. Start the FTP client: ftp 192.168.1.1
  9. Change to binary mode (this is very important): mode binary
  10. Move the file: put FIRMWARE.chr
  11. The router should detect the file and process it
  12. Reboot and enjoy

Connecting a Serial TTYUSB Device to the Router

[][4]

When you see this message below, you need to abort the boot process.

Willkommen zu minicom 2.7

Optionen: I18n 
Übersetzt am Feb  7 2016, 13:37:27.
Port /dev/ttyUSB0, 17:47:29

Drücken Sie CTRL-A  Z für Hilfe zu speziellen Tasten
Found a Samsung NAND flash with 2048B pages or 128KB blocks; total size 128MB
Decompressing...done


CFE for WNR3500Lv2 version: v1.0.9
Build Date: Fri May  6 11:54:17 CST 2011 
Init Arena
Init Devs.
Boot partition size = 262144(0x40000)
NFLASH Boot partition size = 524288(0x80000)
et0: Broadcom BCM47XX 10/100/1000 Mbps Ethernet Controller 5.60.136 
CPU type 0x19749: 480MHz
Tot mem: 131072 KBytes

Device eth0:  hwaddr 84-1B-5E-4E-FF-84, ipaddr 192.168.1.1, mask 255.255.255.0
        gateway not set, nameserver not set
Checking crc...done.
Loader:raw Filesys:raw Dev:flash0.os File: Options:(null)
Loading: .. 3848 bytes read
Entry at 0x80001000
Closing network.
Starting program at 0x80001000

When pressing Ctrl+C does not work, make sure your minicom settings look like this:

A - Serieller Anschluss      : /dev/ttyUSB0                           |
B - Pfad zur Lockdatei       : /var/lock                              |
C - Programm zur Rufannahme  :                                        |
D - Programm zum Wählen      :                                        |
E - Bps/Par/Bits             : 115200 8N1                             |
F - Hardware Flow Control    : Nein                                   |
G - Software Flow Control    : Nein```


<div class="twttr_buttons">
  <div class="twttr_twitter">
    <a href="http://twitter.com/share?text=Unbrick+a+Netgear+WNR3500L+V2" class="twitter-share-button" data-via="" data-hashtags=""  data-size="default" data-url="https://blog.stefanproell.at/2018/01/21/unbrick-a-netgear-wrt3500l-v2/"  data-related="" target="_blank">Tweet</a>
  </div>
  
  <div class="twttr_followme">
    <a href="https://twitter.com/@stefanproell" class="twitter-follow-button" data-show-count="true" data-size="default"  data-show-screen-name="false"  target="_blank">Follow me</a>
  </div>
</div>

 [1]: http://tomatousb.org/mods
 [2]: http://rover.ebay.com/rover/0/e11400.m1842.l3160/7?euid=c40a3d49f9c34424a8772822b99d9e6b&loc=http%3A%2F%2Fcgi.ebay.de%2Fws%2FeBayISAPI.dll%3FViewItem%26item%3D280736990675%26ssPageName%3DADME%3AL%3AOC%3ADE%3A3160
 [3]: https://www.myopenrouter.com/article/how-install-third-party-firmware-netgear-wnr3500lv2-serial-cable-linux
 [4]: ./media/2013/04/IMG_20130405_171101.jpg

Illegal mix of collations: IntelliJ and UTF8mb4

When using variables inside SQL scripts within IntelliJ products (e.g. DataGrip), certain queries will not work because the encodings of the IntelliJ client and the server missmatch. This occurs for instance when you compare variables. A typical error message looks like this:

[HY000][1267] Illegal mix of collations (utf8mb4_unicode_520_ci,IMPLICIT) \
   and (utf8mb4_general_ci,IMPLICIT) for operation 'like'```


IntelliJ products do not yet support MySQL&#8217;s utf8mb4 character set encodings. The problem occurs when using variables in queries. Per default. IntelliJ uses a UTF-8 encoding for the connection. When you use utf8mb4 as the database default character set, then variables will be encoded in UTF-8 while the database content remailns in utf8mb4. It is not possible to provide the character set encodings to the IntelliJ settings, as it will refuse to connect.

Check your server settings using the MySQL client:

MySQL [cropster_research]> show variables like ‘%char%'; +————————–+—————————-+ | Variable_name | Value | +————————–+—————————-+ | character_set_client | utf8mb4 | | character_set_connection | utf8mb4 | | character_set_database | utf8mb4 | | character_set_filesystem | binary | | character_set_results | utf8 | | character_set_server | utf8mb4 | | character_set_system | utf8 | | character_sets_dir | /usr/share/mysql/charsets/ | +————————–+—————————-+


This seems correct, but when you connect with the IntelliJ client, you will get wrong results when you use variables. Until the products supportutf8mb4, you would need to add the following settings to the script in order to force the right settings.

SET character_set_connection=utf8mb4; SET collation_connection=utf8mb4_unicode_520_ci;```

Flashing a OnePlus One from CM to LineageOS

As Cyanogen Inc closed down its operations in December 2016, CyanogenMod was affected too and my OnePlus One (OPO) did not receive updates anymore. This is not ideal, as new and old bugs have will remain. For instance did my phone often not reconnect to the 4G network, when a wifi connection was lost, This was very annoying. For this reason, if was about time to upgrade to a new OS: LineageOS.

LineageOS

[LineageOS][1] is a fork of CyanogenMod and contunes the quite successful project for our benefit. [LineageOS][2]14 is compatible with Android 7.1 and very easy to install. These are the steps which I had to follow.

How to Upgrade

  • Create a backup with Helios. Use the [Chrome Helium app][3] if the app on your mobile phone refuses to start.
  • Download and install [adb][4]
  • Download the TWRP custom ROM: https://twrp.me/Devices/
  • Download [LineageOS][5]. The codename for the OPO is bacon.
  • Download the [Google apps mini distribution][6] (stock is too large) [here][7].
  • Enable developer tools and connect the phone with a USB cable
  • Reboot the device with adb:./adb reboot bootloader 
  • Check if the device is recognized:./fastboot devices 
  • Enable OEM unlock:fastboot oem unlock 
  • Install the custom rom:fastboot flash recovery twrp-x.x.x-x-bacon.img 
  • Reboot into the new ROM:With the device powered down, hold the Volume Down and Power buttons.

Copy the files to the device

# Lineage
adb push ~/Downloads/OPO-Upgrade/lineage-14.1-20170918-nightly-bacon-signed.zip /sdcard/
# Google Apps
adb push ~/Downloads/OPO-Upgrade/open_gapps-arm-7.1-mini-20170924.zip /sdcard/```


Install both zip files by selecting first the LineageOS and then the Google Apps Zip file

Thats it. Reboot and begin with the setup or restore the backup.

## Update 28.09.2017

The problem that the phone would not reconnect to 3G/4G again after losing the Wifi signal still persisted with LineageOS. A friend recommended flashing the firmware of the device. After installing the version<span id="ERrNAupH" class="rHaZZnshWI">2016_1-25_.4.0.1.c7-00011</span> downloaded from [here][8] solved the issue for now. No more connection problems so far

<div class="twttr_buttons">
  <div class="twttr_twitter">
    <a href="http://twitter.com/share?text=Flashing+a+OnePlus+One+from+CM+to+LineageOS" class="twitter-share-button" data-via="" data-hashtags=""  data-size="default" data-url="https://blog.stefanproell.at/2017/09/24/flashing-a-oneplus-one-from-cm-to-lineageos/"  data-related="" target="_blank">Tweet</a>
  </div>
  
  <div class="twttr_followme">
    <a href="https://twitter.com/@stefanproell" class="twitter-follow-button" data-show-count="true" data-size="default"  data-show-screen-name="false"  target="_blank">Follow me</a>
  </div>
</div>

 [1]: https://en.wikipedia.org/wiki/LineageOS
 [2]: https://lineageos.org/
 [3]: https://chrome.google.com/webstore/detail/helium-backup/gpglbgbpeobllokpmeagpoagjbfknanl
 [4]: https://wiki.lineageos.org/adb_fastboot_guide.html
 [5]: https://download.lineageos.org/bacon
 [6]: https://wiki.lineageos.org/gapps.html#installation
 [7]: http://opengapps.org/?api=7.1&variant=nano
 [8]: https://forum.xda-developers.com/oneplus-one/general/firmware-modem-oneplus-one-lollipop-t3300907