I use the following snippet to turn on the MySQL general_log inside my
development MySQL containers to peek what is going on: ./mysql-general-log.sh container
#!/bin/bash

# Usage: ./mysql-general-log.sh [container_name]
# This script sets MySQL general logging in a specified Docker container, tails the log,
# and then disables general logging.

# Default container name if not provided as an argument
CONTAINER=mysql-container

# If a container name is provided as an argument, use that instead
if [ ! -z "$1" ]; then
    CONTAINER=$1
fi

docker exec -it $CONTAINER sh -c 'mysql -uroot -h 127.0.0.1 -e "SET GLOBAL general_log_file=\"/tmp/mysql-genneral.log\";" -e "SET GLOBAL general_log=1"'
docker exec -it $CONTAINER sh -c 'tail -f /tmp/mysql-genneral.log'
docker exec -it $CONTAINER sh -c 'mysql -uroot  -h 127.0.0.1 -e "SET GLOBAL general_log=0"'
Simply use gpg --edit-key AAAAAAAAAABBBBBBBBBBBBBBCCCCCCCDDDDDDDDD and select the key you want to edit with its associated number (1).
Then type expire and select the new duration you want the key to be valid for. Close with save.
You then need to enter the password and you are done.
I needed to upload a gzipped file to our Nexus repository and was struggling to find the right configuration for the content type.
This is the compression function:
def compress_file(input_file, output_file):
    """Comporess the SQL dump"""
    with open(input_file, 'rb') as f_in:
        with gzip.open(output_file, 'wb') as f_out:
            shutil.copyfileobj(f_in, f_out)
    return output_file
My original attempt for uploading the compressed file looked like below, but while Nexus stored the file without an error, the downloaded file was not a valid gzip file.
def upload_to_nexus(file_path, nexus_config):
    """
    Upload the compressed file to Nexus.
    :param file_path:
    :param nexus_config:
    :return:
    """
    """Open the compressed file in binary mode"""
    with open(file_path, 'rb') as f:
        # Define the headers and files for the request
        headers = {'Content-Type': 'application/gzip'}
        files = {'file': (file_path, f)}

        response = requests.put(nexus_config['url'],
                                auth=HTTPBasicAuth(nexus_config['user'], nexus_config['password']),
                                files=files, headers=headers)
        return response
The original attempt used the files parameter files={'file': (filename, f)}, as it would be interpreted as a multipart file upload.
Using the data=f parameter as shown below, was sending the file’s contents as raw binary data directly in the request body.
This is useful when the server expects the body to contain just the file data, without any additional encoding or form fields.
This way, Nexus accepted the upload and the download was also valid.
def upload_to_nexus(file_path, nexus_config):
    """
    Upload the SQL dump file to Nexus.
    :param file_path: Path to the SQL dump file.
    :param nexus_config: Nexus configuration details.
    :return: Response from the server.
    """
    with open(file_path, 'rb') as f:
        # Make the request to upload the file
        response = requests.put(nexus_config['url'],
                                auth=HTTPBasicAuth(nexus_config['user'], nexus_config['password']),
                                data=f)

        if response.status_code == 200:
            logging.info("Uploaded file successfully")
        else:
            logging.error(f"Failed to upload file. Status code: {response.status_code}, Response: {response.text}")

        return response
KILL permits an optional CONNECTION or QUERY modifier:
KILL CONNECTION is the same as KILL with no modifier: It terminates the connection associated with the given processlist_id, after terminating any statement the connection is executing.
KILL QUERY terminates the statement the connection is currently executing, but leaves the connection itself intact.
In order to test the behavior manually, you can use two different MySQL connections by starting the client twice.
I had to disable the automatic reconnection which is enabled by the MySQL client per default.
To do so, I simply had to add the following to ~/.my.cnf:
[mysql]
reconnect=false
A small test programm
In order to play around with both commands, I needed SQL statements which take a little while, in order to have enough time to kill them.
While SLEEP() comes to mind, it is not ideal because MySQL detects that sleeping does not change any data.
The following Python program stores large blobs in the MySQL database.
While it is not recommended to store binary data in MySQL because it is slow, it is a good use case for demoing some behavior of the database.
The snipped creates random binary files of 100 MB in a loop and stores them in a table.
It also stores the SHA256 hash of each file, so that we can later ensure that the file has actually been written into the database entirely.
After all, we want to ensure that either way of killing a query does ensure that the transaction itself is atomic, meaning that it either goes through entirely, ro gets rolled back.
The important part is that we wrap the entire loop into a transaction.
import hashlib
import os
import time

import mysql.connector

# Replace these with your own database credentials
db_config = {
    'host': '127.0.0.1',
    'port': '3306',
    'user': 'root',
    'database': 'MeasurementDB',
}

try:
    # Connect to the MySQL database
    conn = mysql.connector.connect(**db_config)
    cursor = conn.cursor(dictionary=True)

    # Create a table for measurement data
    create_table_query = """
    CREATE TABLE IF NOT EXISTS DataBlobs (
    id INT AUTO_INCREMENT PRIMARY KEY,
    file_name VARCHAR(255) NOT NULL,
    file_data LONGBLOB NOT NULL,
    file_size INT NOT NULL,
    file_type VARCHAR(100) NOT NULL,
    file_hash char(64) NOT NULL
    );
    """
    cursor.execute(create_table_query)
    cursor.execute("TRUNCATE TABLE DataBlobs")

    # Start a transaction
    conn.start_transaction()

    try:
        for x in range(0,10):
            # Define the file size in bytes
            file_size = 100 * 1024 * 1024

            # Generate a random binary file
            random_data = os.urandom(file_size)

            # Specify the file name
            file_name = "random_file.bin"

            # Write the random data to the file
            with open(file_name, "wb") as file:
                file.write(random_data)

            file = open(file_name,mode='rb').read()

            # Compute SHA256 hash
            file_hash = hashlib.sha256(file).hexdigest();

            cursor.execute("SELECT CONNECTION_ID() AS conn_id")
            query_result = cursor.fetchone()
            print("Current Connection ID: {}".format(query_result['conn_id']))

            insert_query = "INSERT INTO DataBlobs (file_name, file_data, file_size, file_type, file_hash) VALUES (%s, %s, %s, %s, %s)"
            tic = time.time()
            cursor.execute(insert_query, ('random_file-{}.bin'.format(x), random_data, len(random_data), 'application/octet-stream', file_hash))
            toc = time.time()
            print("-- Insert file {} successfully ({} seconds).".format('random_file-{}.bin'.format(x), str(round((toc - tic),2))))

            tic = time.time()
            cursor.execute("SELECT file_name, IF((sha2(file_data,256)=file_hash),'equal', 'not equal') AS equal FROM MeasurementDB.DataBlobs ORDER BY id DESC LIMIT 1;")
            toc = time.time()

            query_result = cursor.fetchone()
            print("-- Hash of file {} is {} ({} seconds).".format(query_result['file_name'], query_result['equal'], str(round((toc - tic),2))))


        conn.commit()
    except mysql.connector.Error as err:
        conn.rollback()  # Rollback the transaction if there's an error
        print(f"Error: {err}")
    finally:
        cursor.close()
        conn.close()

except mysql.connector.Error as err:
    print(f"Connection error: {err}")
finally:
    conn.close()
Results and Screencasts
Below are the three results I tested.
Run through without killing anything
The following screencast shows the MySQL Workbench and the Python script in the command line.
In this example, the script just runs through without interruptions and commits the entire transaction at the end with a COMMIT.
Then you can see that the data is stored in the table and also our script reports identical hashes.
Long running queries go through uninterrupted
This is the standard case. But what happens if we must abort the query?
Killing the entire connection
The second example shows how we kill the entire connection by using the button in MySQL Workbench.
In AWS RDS you would need tob use the CALL mysql.rds_kill stored procedure provided by AWS, see the docs.
Killing the connection
The entire execution is aborted immediately, the data is rolled back. The MeasurementDB.DataBlobs table remains empty.
Killing only the statement
The third example is interesting, because it seems to depend at which state of the execution of a statement the KILL QUERY arrives.
Instead of killing the entire transaction immediately, it depends if MySQL decides that it rather finishes the current statement.
It might require multiple attempts to actually abort the execution.
Killing only the query
Also in this case the transaction is rolled back and no data is permanently stored within the table.
Recently I had to setup a new laptop and forgot that the SSM feature of the AWS CLI requires an additional (and denoted optional) plugin to be installed.
This SSM plugin plugin can be obtained here.
It took my quite a while to find out that the missing plugin is the source of this rather obscure SSH client error message.
kex_exchange_identification: Connection closed by remote host
Connection closed by UNKNOWN port 65535
Since there were some changes regarding supported ciphers and other versions of the involved tools, I was digging down the wrong holes.
Installing the plugin fixed it.
I have an old Web cam which does not support HTTPS and where the dynamic IP resolver service of the manufacturer stopped working some years ago.
The camera uses an UMTS hotspot to connect to the Internet and gets a new IP address every now and then.
Graciously the camera would send out an email with it’s new IP address after every reboot, however I then would have to update this address manually in the surveilance app each time.
Since the camera is working fine, I wanted to put it behind a HTTPS proxy and use DuckDNS to have a domain pointing to it.
An old Raspberry Pi 3 serves as the hardware basis for this project.
Idea and Requirements
I want to have a secure conection using HTTPS to the Web interface of the webcam.
Since the camera has a dynamic IP address, I want to register a domain with DuckDNS to provide a stable entrypoint.
In order for this to work, the UMTS provider needs to allow ingres traffic to the SIM card.
In Austria, only the provider Drei offers this as far as I found out.
We will use BalenaOS to provision the Raspberry Pi, because it will be located at a remote location and I want easy access.
We need the following parts:
UMTS modem with Wifi
Webcam
Raspberry Pi 3 with 16GB storage card
Balena Cloud
Nginx Proxy Manager container
Duck DNS service container
Setup using Balena Cloud
The first step is to register for Balena Cloud. Up to 10 devices can be deployed free of charge.
The documentation of Balena is excellent and provides a great onboarding experience.
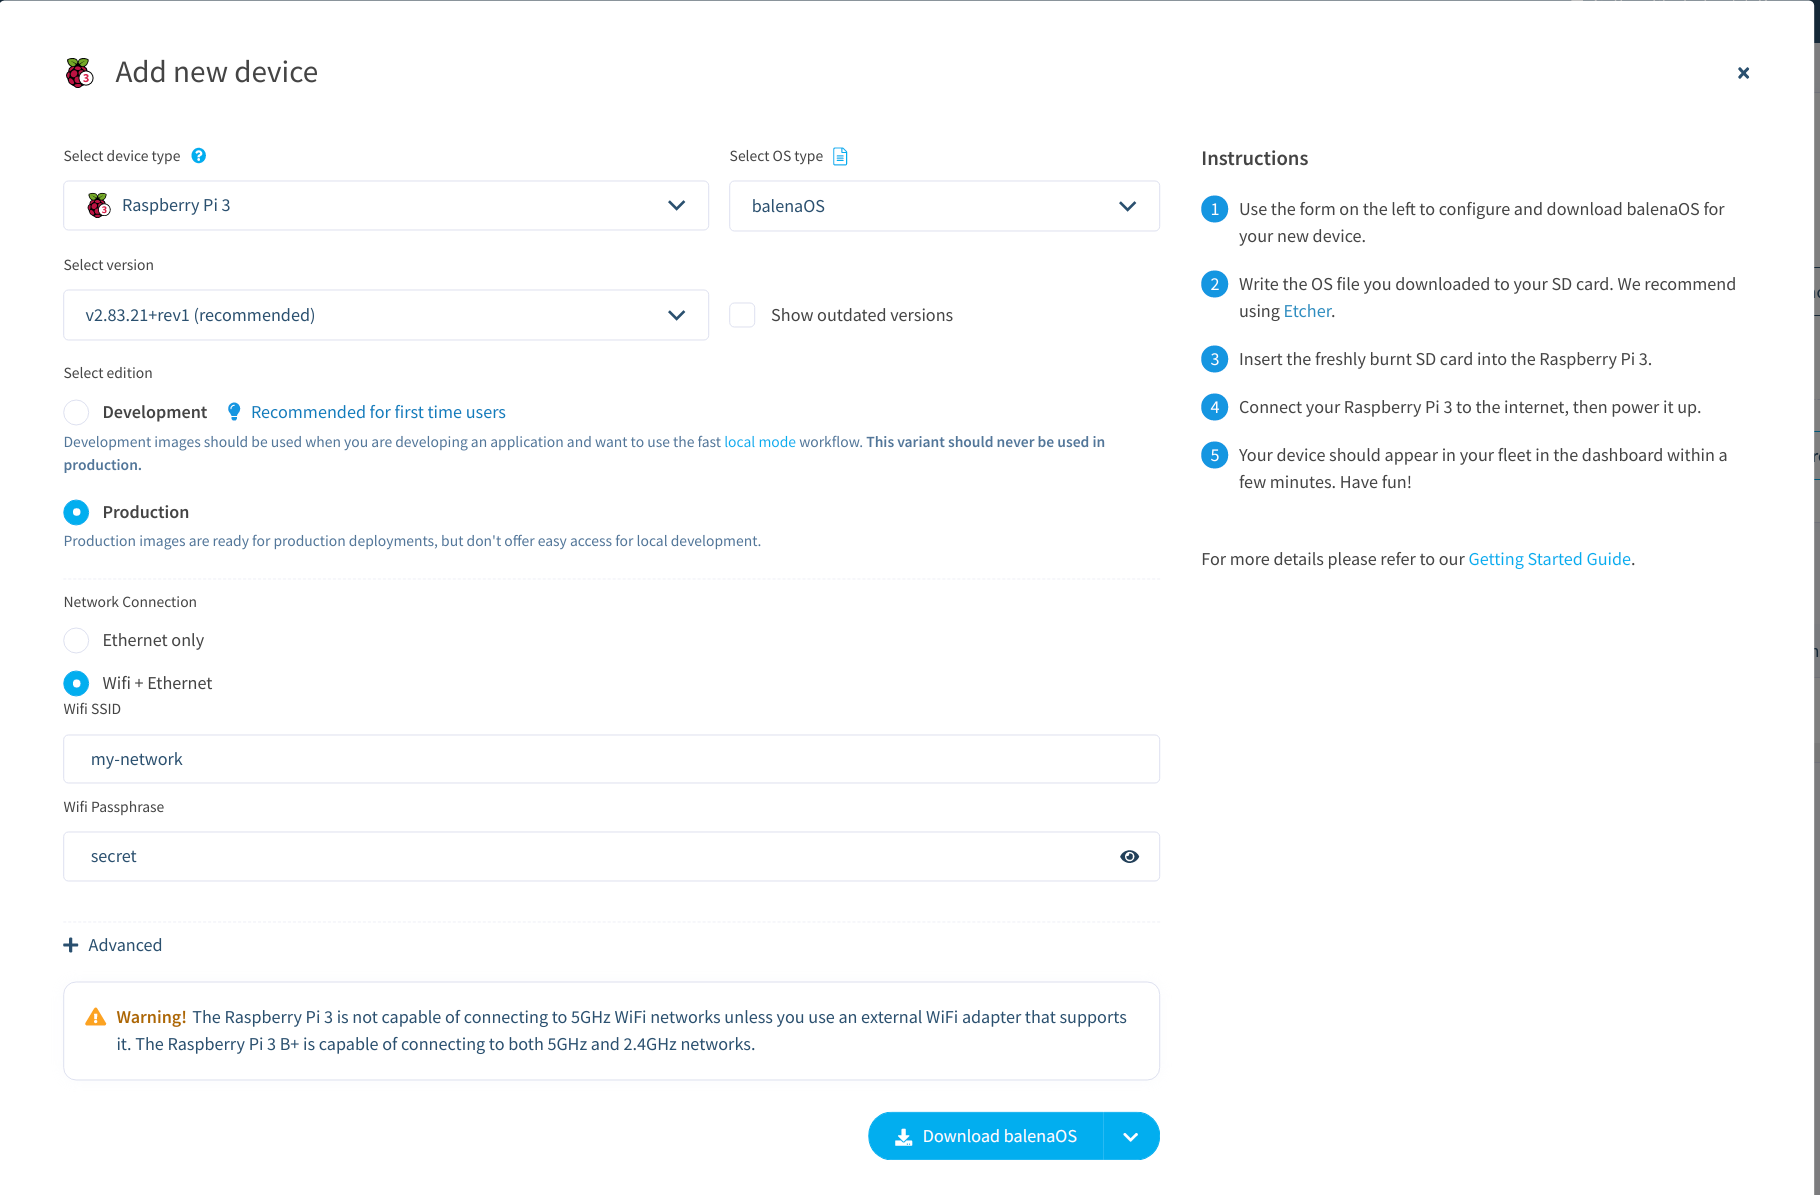
After creating a fleet, I added the Raspberry Pi as a new device and entered the basic wifi details.
The Device Registration Dialog
Afterwards you can download a custom image of BalenaOS and flash it on the SD card using the USB startup disk creator tool that comes with Ubuntu.
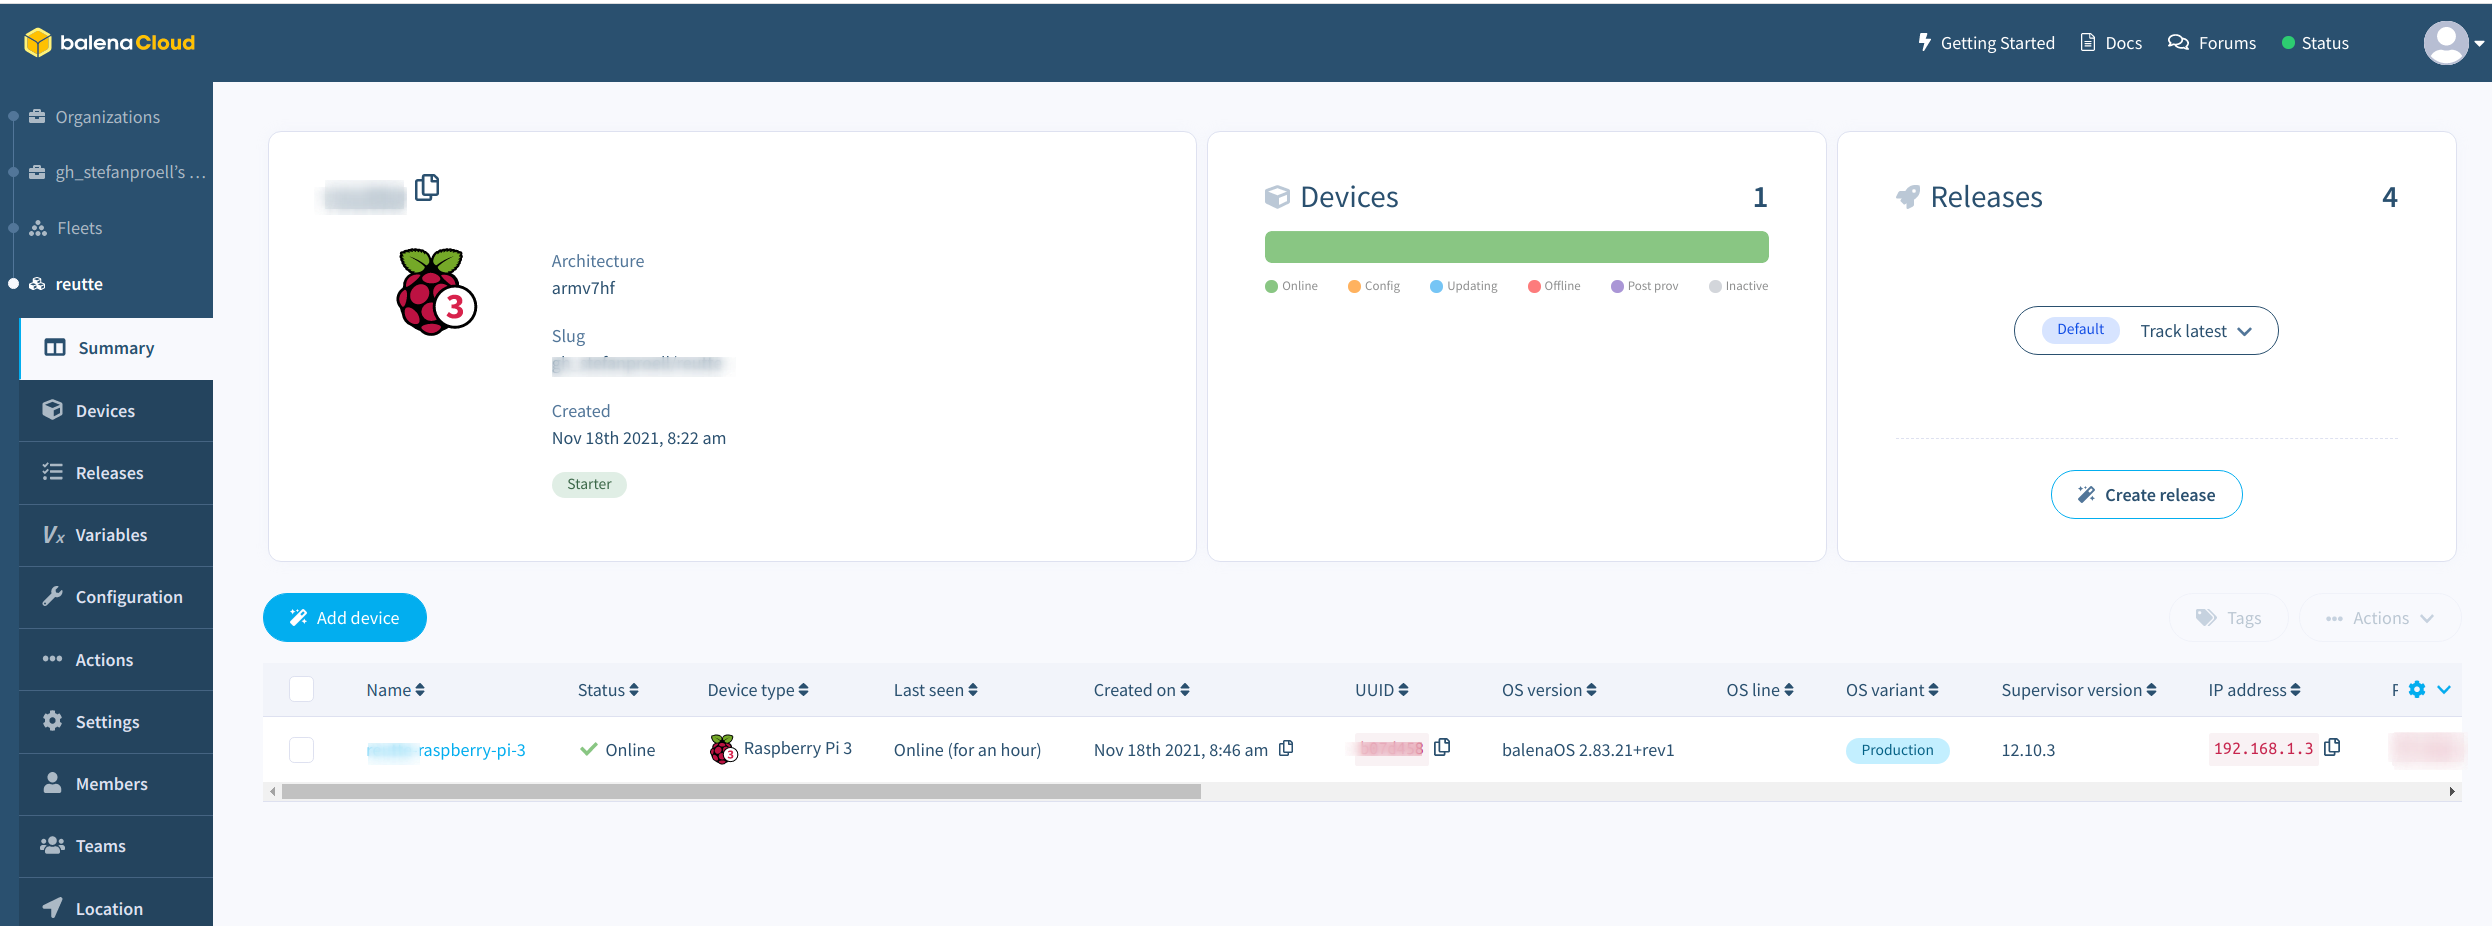
After waiting for some minutes, the device should show up in the Balena Cloud interface.
The Fleet
Then you need to install the Balena CLI and add the binary to the path.
You can then login using the CLI by typing balena login.
Enter your credentials are you are good to go.
For testing you can retrieve the fleets and devices: balena fleets
You should see the previously registered Raspberry Pi.
Network Setup
For testing I used my regular wifi network and I also have the battery powered UMTS Wifi modem activated.
In order to add a second wifi network and to have a fallback wifi, you need to modify the configuration files.
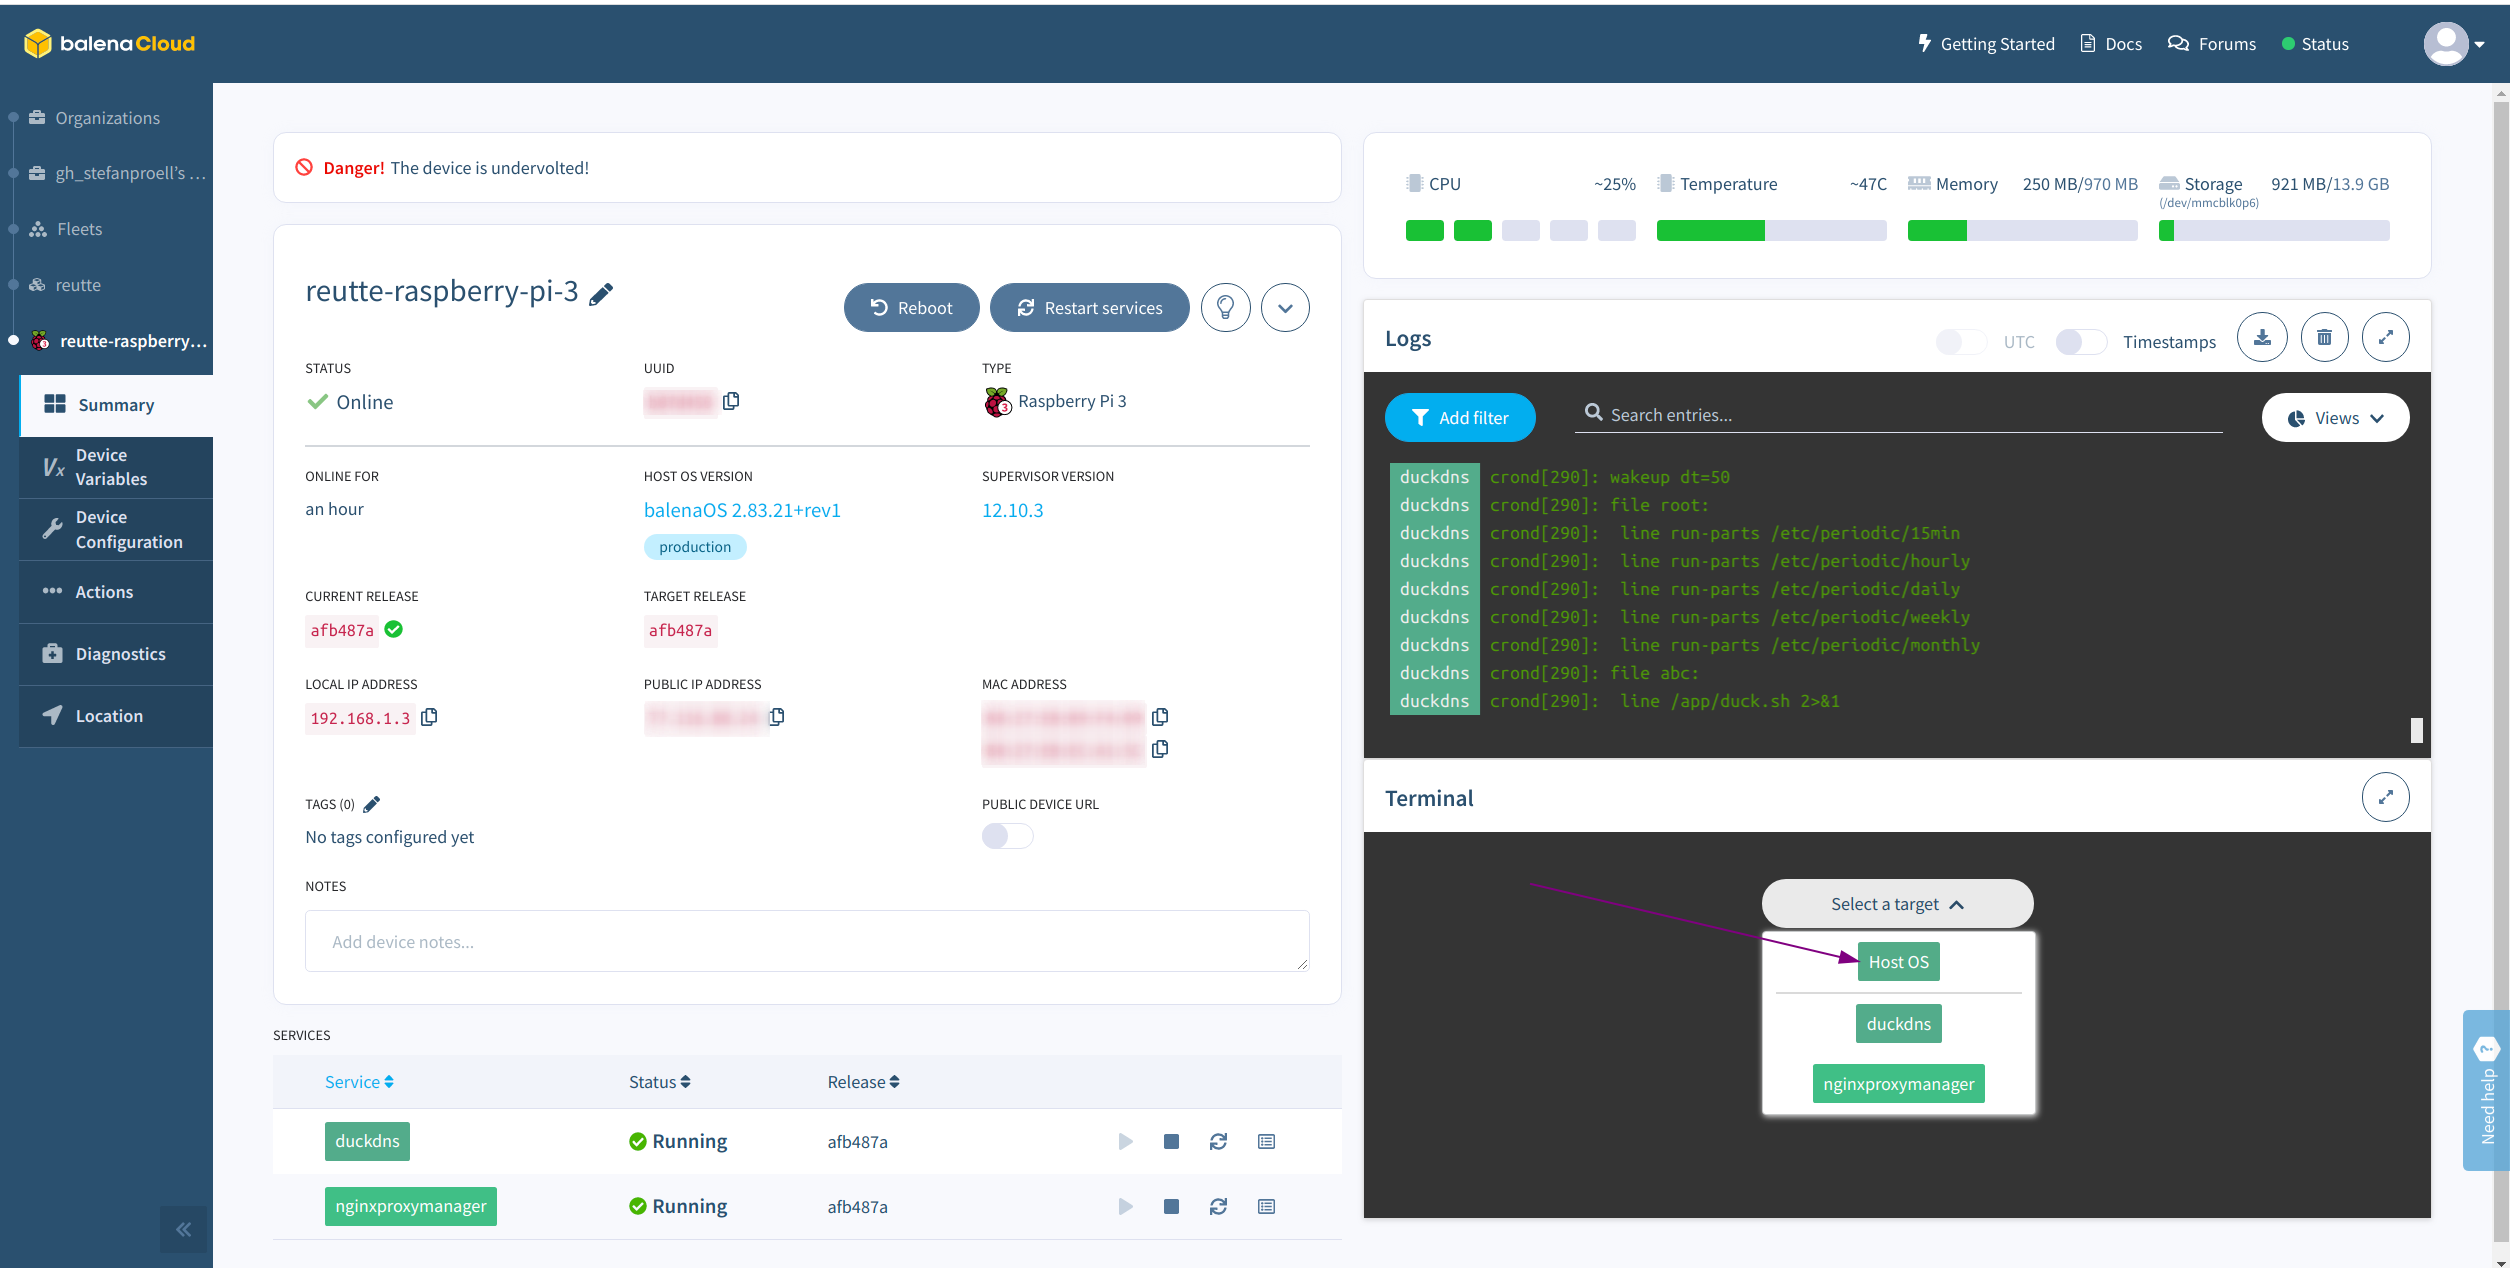
This can be easily done using the built in terminal of Balena Cloud.
The Fleet
The networking configuration templates can be found in /mnt/boot/system-connections/.
The actual configuration is stored in /etc/NetworkManager/system-connections/, but these files will be overwritten by the configuration stored in /mnt/boot/system-connections/ after every reboot. This the latter is the right place to edit the network configuration.
Make sure to append a .ignore to all the connections you do not need.
I created two files. The file balena-wifi-0-umts contains the configuration for the wifi of the UMTS modem while the file balena-wifi-1-home contains the configuration for my home network.
When the umts wifi is available, this should be the preferred network, the fallback is the home network.
The UMTS Wifi
The wifi network the camera will use in the wild is powered by a small HUAWAI UMTS modem with Wifi capabilities.
I assigned a static IPv4 and I set the priority in order to select this network first.
The important part for this is the setting in the connection section.
autoconnect=TRUE
autoconnect-priority=2
The static IP is defined in the IPv4 section.
I assign the static address 192.168.1.3 and the gateway is 192.168.1.1.
After a reboot, the device will pick the available network based on the priority.
The network with the higher integer will be picked first.
Define the Containers
The grat thing about Balena is that it can run any Docker container.
All you need to do is provid a docker-compose.yml file with the service definitions and push it to the cloud.
The following compose file is pretty self explainatory.
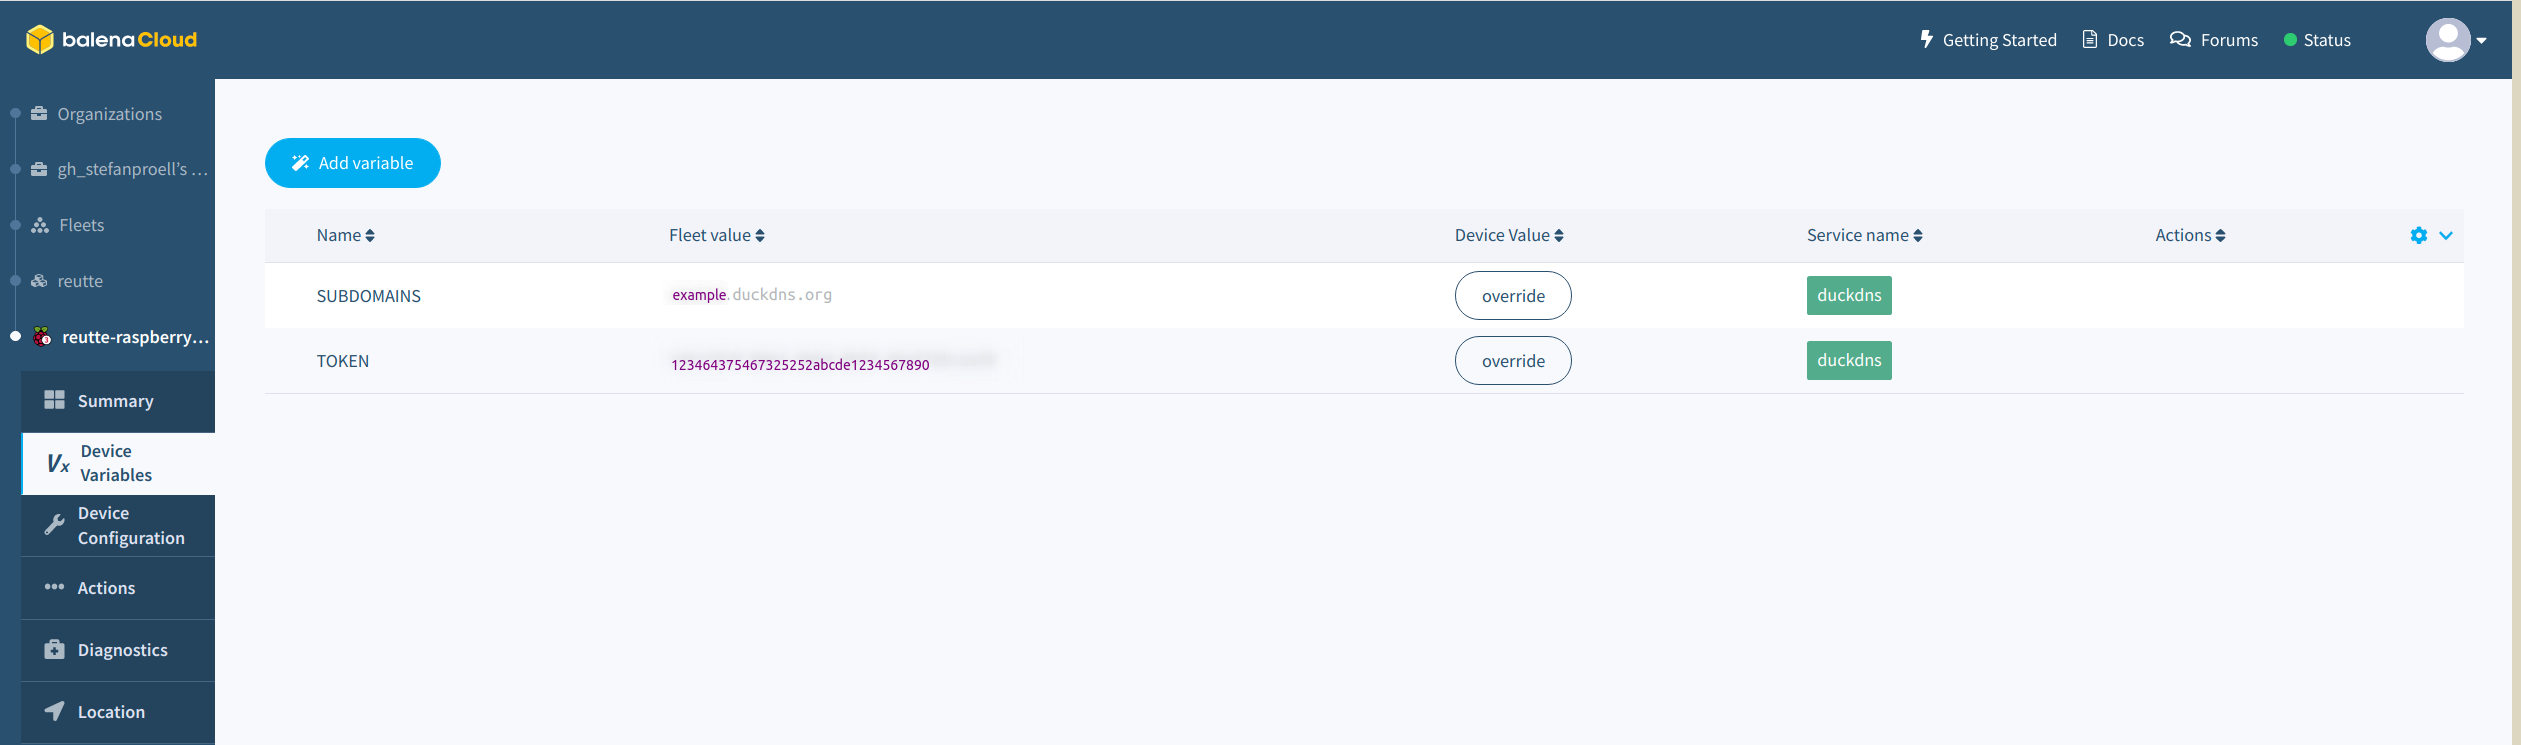
Duck DNS is a free DDNS service which will point a subdomain of duckdns.org our Raspberry Pi IP address, even when the Pi sits behind a NAT.
All you need to do is to register a domain and note the token.
In this tutorial, we will use the domain name example.duckdns.org, which is of course not my subdomain.
In order to tell our Dockerized DuckDNS service which domain we have and what our token is, we need to add two device variables in Balena.
Those variables will be injected into the container.
Add the variables SUBDOMAINS and TOKEN there.
Duck DNS Configuration
Restart the Raspberry Pi using the Balena interface in order to trigger the DNS update of the new IP address.
The subdomain example.duckdns.org neets to point to your Raspberry before the next step.
Nginx Proxy Manager
The Nginx Proxy Manager (NPM) will respond to all requests via HTTPS and then forward the request to the actual target inside our protected network.
This way we can serve services which do not offer HTTPS themselves still in a secure way.
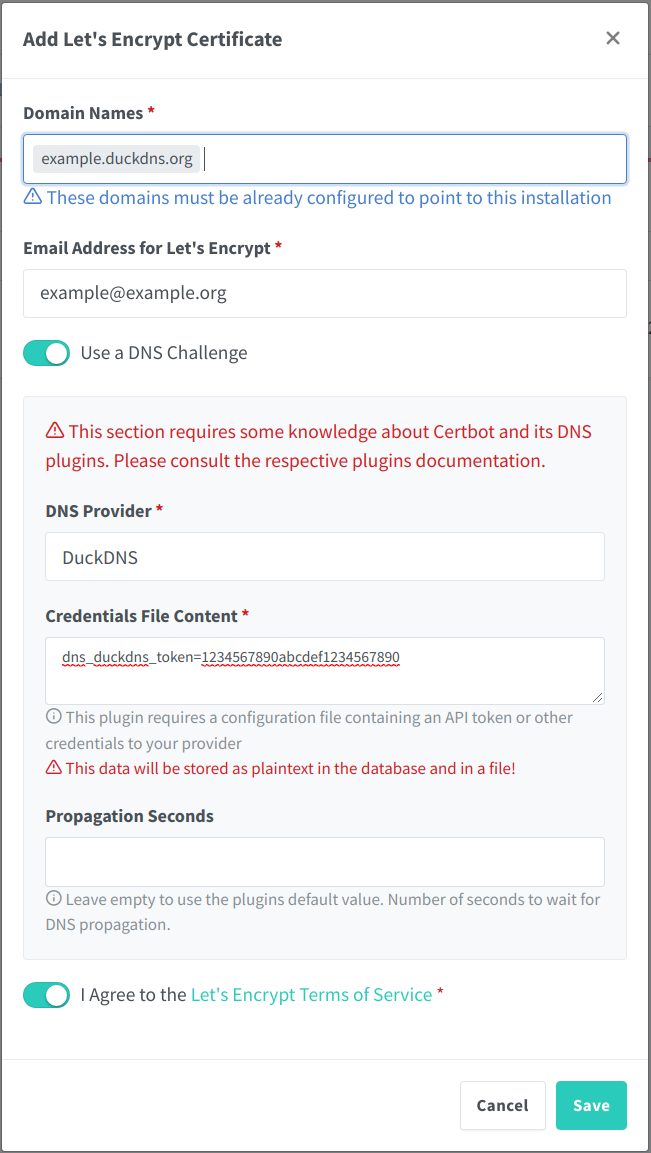
Nginx Proxy Manager uses Let’s Encrypt certificates.
After logging in for the first time, please set a good password.
Then, create a new SSL Certificate and enter the DuckDNS domain and the token.
Obtain a Let’s Encrypt Certificate
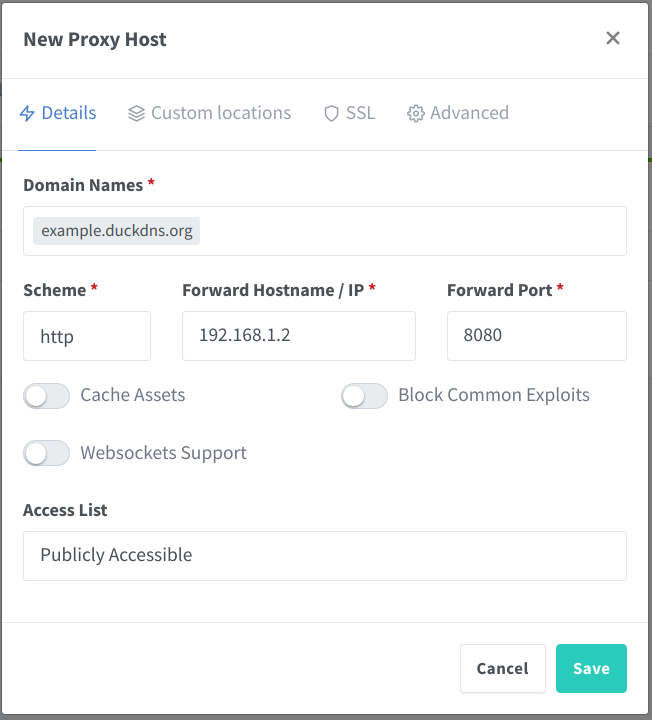
Then you can add the web cam as a new proxy host that should be served via the NPM.
Here you need to add the Webcam’s IP address (not the Raspberry Pi’s one) and the port.
Define the Proxy Target
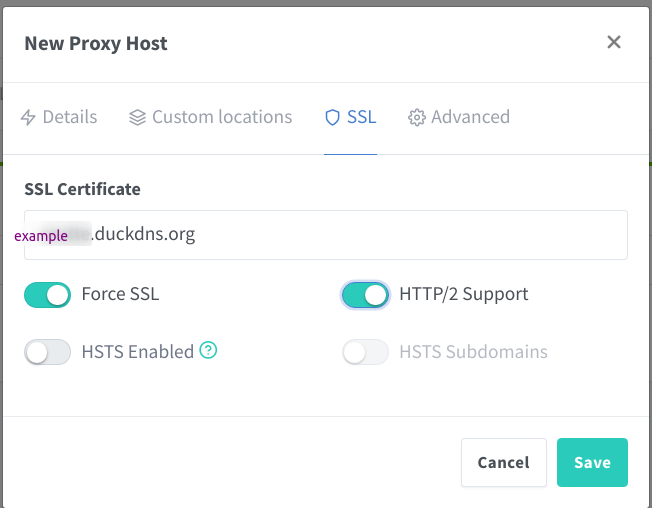
Enable the certificate we just created:
Assign the SSL Certificate
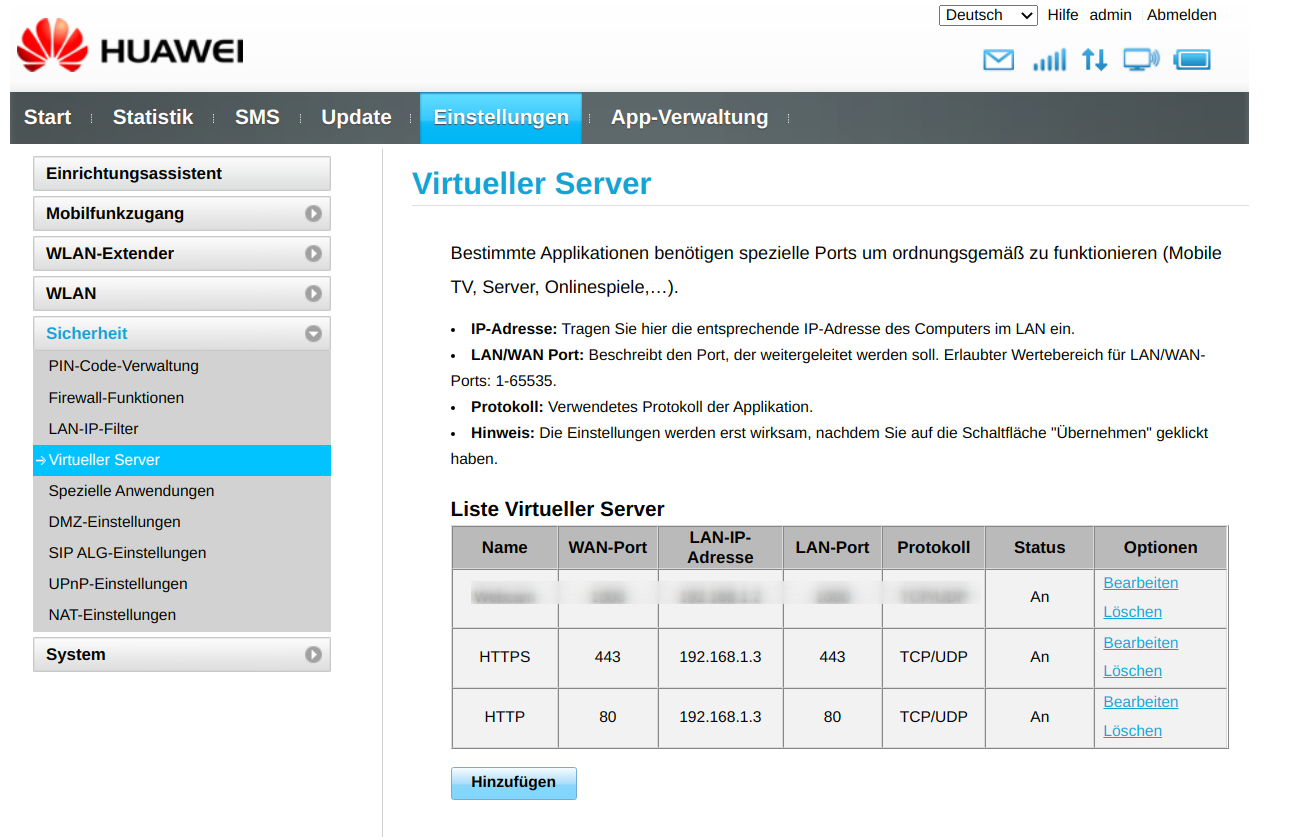
Firewall rules
In order for the web cam to become accessible, you need to allow traffic from the HTTPS port 443 to pass through.
Assign the SSL Certificate
Conclusion
Using Balena is a great way of deploying Docker containers on small IoT devices as the Raspberry Pi.
Using these tools can upgrade an existing piece of hardware to become more secure and accessible.
Of course you can use the same technique to expose all kinds of services via HTTPS behind a firewall.
Recently I bought a Remarkable 2 and was a bit disappointed.
I then bought a Boox Note 2 for a very good price on Willhaben and am very happy with it, it is exactly what I was looking for.
It is a versataile eBook reader with a good note taking functionality.
Boox Note 2
What it is
The Boox Note 2 is a 10.3 inch eInk tablet with a capacitive touch feature that you can use without a pen for navigating and it also supports Wacom stylus pens for exact drawing and writing.
Boox Note 2 booting
The device has a USB-C port and a finger print sensor. Obviously there is also a power button on the top of the device.
It supports OTG so you can connect peripherals too.
It has wifi, comes with small speakers and a microphone and other features you would expect from a tablet.
In contrast to the ReMarkable, the Boox Note 2 comes with an Android 9 operating system.
This means you can install any Android App which is compatible with the Android 9.
The device has an active backlight, which means you can read in the dark.
The light can be adjusted and you can also fine tune the color temperature of the light.
The killer feature to me is that I can install arbitrary apps.
For instance it allows me to use Amazon’s Kindle App and other readers.
I can also install Syncthing or share documents with Google Drive.
You might not find the desired apps within the integrated app store.
This app store has quite a limited selection.
But when you browse Google’s Play store you can select the device after registering it with your Google account, and then install it remotely.
Boox Note 2 App overview
You cannot directly annotate documents you read within apps, but it is possible to annotate PDFs document, when you use the integrated PDFs. Out of the box the device supports the following formats: PDF, EPUB, TXT, DJVU, HTML, RTF, FB2, DOC, MOBI, CHM and others.
Boox Note 2 with cover
The Boox 2 offers a simple cloud sync service to backup the documents and to upload documents to the device.
The note taking functionality is great, there is all you need and the lag is rather short when writing.
There is even a split screen functionality, where you can use the tablet in landscape mode and open a document on one side and scribble into a notebook on the other side of the screen.
Boox Note 2 note overview
What it is not
The hardware it self does not feel very high quality.
The menus are quite simple, the translations to English are not the best. Some menu items have a funny name.
The sync function is only very basic.
Exporting the notes requires to sync them first so that the device produces PDFs.
Only then they can be exported manually.
Foreign keys are essential for maintaining the referential integrity in relational databases.
Sometimes, their names change, for example when you use Percona’s pt-online-schema-change and suddenly all your foreign keys have an underscore prefix.
MySQL does not provide an option to rename foreign keys on the fly.
Typically the foreign key needs to be dropped and re-created.
Adding a foreign key can be expensive when the index on the column does not already exist.
In the case of renaming a foreign key, the index on the key column does exist already, thus renaming an foreign key is a lot cheaper.
The text snippets below are from the the documentation.
MySQL supports to ADD and DROP a foreign key within one ALTER TABLE statement.
This only works when you use the ALGORITHM=INPLACE option.
Adding and dropping a foreign key in the same ALTER TABLE statement is supported for ALTER TABLE ... ALGORITHM=INPLACE but not for ALTER TABLE ... ALGORITHM=COPY.
INPLACE makes the ALTER statements much faster, but there are additional constraints.
INPLACE: Operations avoid copying table data but may rebuild the table in place. An exclusive metadata lock on the table may be taken briefly during preparation and execution phases of the operation. Typically, concurrent DML is supported.
That is important because
ALTER TABLE operations that use the COPY algorithm wait for other operations that are modifying the table to complete. After alterations are applied to the table copy, data is copied over, the original table is deleted, and the table copy is renamed to the name of the original table. While the ALTER TABLE operation executes, the original table is readable by other sessions (with the exception noted shortly). Updates and writes to the table started after the ALTER TABLE operation begins are stalled until the new table is ready, then are automatically redirected to the new table. The temporary copy of the table is created in the database directory of the original table unless it is a RENAME TO operation that moves the table to a database that resides in a different directory.
The problem is that ALGORITHM=INPLACE only works when the foreign_key_checks are disabled.
Only then we can we can use a non-locking online DDL change.
The key to this is using LOCK=NONE as additional setting.
Specifying the lock mode is in general good practice.
If an operation cannot be done without a lock (LOCK=NONE) or only with an exlusive lock (LOCK=SHARED), then the ALTER statement would fail with an error.
So you do not risk to lock the database when it could not be avoided.
Retrieving odd foreign key names
The following query retrievs all foreign keys with an underscore prefix and produces the ALTER table statements we desperately need for renaming the FKs.
It retrieves only the foreign keys from the sakila database.
SELECT
    CONSTRAINT_SCHEMA,
    TABLE_NAME,
    CONSTRAINT_NAME old_name,
    REFERENCED_TABLE_NAME,
    REFERENCED_COLUMN_NAME,
    CASE
        WHEN CONSTRAINT_NAME REGEXP '^\_{1}[A-Za-z0-9]{2}.*$'
            THEN SUBSTR(CONSTRAINT_NAME, 2, LENGTH(CONSTRAINT_NAME))
        WHEN CONSTRAINT_NAME REGEXP '^\_{2}[A-Za-z0-9]{2}.*$'
            THEN SUBSTR(CONSTRAINT_NAME, 3, LENGTH(CONSTRAINT_NAME))
        END AS new_name,
    CONCAT('ALTER TABLE ', TABLE_SCHEMA, '.', TABLE_NAME, ' ADD CONSTRAINT ', (
        CASE
            WHEN CONSTRAINT_NAME REGEXP '^\_{1}[A-Za-z0-9]{2}.*$'
                THEN SUBSTR(CONSTRAINT_NAME, 2, LENGTH(CONSTRAINT_NAME))
            WHEN CONSTRAINT_NAME REGEXP '^\_{2}[A-Za-z0-9]{2}.*$'
                THEN SUBSTR(CONSTRAINT_NAME, 3, LENGTH(CONSTRAINT_NAME))
            END), ' FOREIGN KEY (', COLUMN_NAME, ') REFERENCES ', REFERENCED_TABLE_SCHEMA, '.',
           REFERENCED_TABLE_NAME, '(', REFERENCED_COLUMN_NAME,
           '), ALGORITHM=INPLACE, LOCK=NONE;') AS alter_statement_for_new_name,
    CONCAT('ALTER TABLE ', TABLE_SCHEMA, '.', TABLE_NAME, ' ADD CONSTRAINT ', CONSTRAINT_NAME,
           ' FOREIGN KEY (', COLUMN_NAME, ') REFERENCES ', REFERENCED_TABLE_SCHEMA, '.',
           REFERENCED_TABLE_NAME, '(', REFERENCED_COLUMN_NAME,
           '), ALGORITHM=INPLACE, LOCK=NONE;') AS alter_statement_for_old_name,
    CONCAT('ALTER TABLE ', TABLE_SCHEMA, '.', TABLE_NAME, ' DROP FOREIGN KEY ', CONSTRAINT_NAME,
           ', ALGORITHM=INPLACE, LOCK=NONE;') AS drop_statement,
    CONCAT('ALTER TABLE ', TABLE_SCHEMA, '.', TABLE_NAME, ' ADD CONSTRAINT ', (
        CASE
            WHEN CONSTRAINT_NAME REGEXP '^\_{1}[A-Za-z0-9]{2}.*$'
                THEN SUBSTR(CONSTRAINT_NAME, 2, LENGTH(CONSTRAINT_NAME))
            WHEN CONSTRAINT_NAME REGEXP '^\_{2}[A-Za-z0-9]{2}.*$'
                THEN SUBSTR(CONSTRAINT_NAME, 3, LENGTH(CONSTRAINT_NAME))
            END), ' FOREIGN KEY (', COLUMN_NAME, ') REFERENCES ', REFERENCED_TABLE_SCHEMA, '.',
           REFERENCED_TABLE_NAME, '(', REFERENCED_COLUMN_NAME, ') ', ', DROP FOREIGN KEY ',
           CONSTRAINT_NAME,
           ', ALGORITHM=INPLACE, LOCK=NONE;') AS alter_statement_for_new_name_combined,
    CONCAT('ALTER TABLE ', TABLE_SCHEMA, '.', TABLE_NAME, ' ADD CONSTRAINT ', CONSTRAINT_NAME,
           ' FOREIGN KEY (', COLUMN_NAME, ') REFERENCES ', REFERENCED_TABLE_SCHEMA, '.',
           REFERENCED_TABLE_NAME, '(', REFERENCED_COLUMN_NAME, ') ', ', DROP FOREIGN KEY ',
           (CASE
                WHEN CONSTRAINT_NAME REGEXP '^\_{1}[A-Za-z0-9]{2}.*$'
                    THEN SUBSTR(CONSTRAINT_NAME, 2, LENGTH(CONSTRAINT_NAME))
                WHEN CONSTRAINT_NAME REGEXP '^\_{2}[A-Za-z0-9]{2}.*$'
                    THEN SUBSTR(CONSTRAINT_NAME, 3, LENGTH(CONSTRAINT_NAME))
               END), ', ALGORITHM=INPLACE, LOCK=NONE;') AS alter_statement_for_old_name_combined
FROM INFORMATION_SCHEMA.KEY_COLUMN_USAGE
WHERE CONSTRAINT_SCHEMA = 'sakila'
    AND ASCII(CONSTRAINT_NAME) LIKE ASCII('_%')
    AND REFERENCED_TABLE_NAME IS NOT NULL ;
Changing the foreign keys on the fly
When you can ensure that no changes are happening to the database containing the foreign key you want to rename, the operation itself is only a metadata change and very fast.
So it is worth shutting down the applications writing data, ensure that all connections are closed and then run the ALTER statements with the foreign_key_checks disabled.
The proper ALTER statement has the following structure
SET SESSION foreign_key_checks = 0;
ALTER TABLE sakila.Actor ADD CONSTRAINT fk_movie_actor FOREIGN KEY (movie_id) REFERENCES sakila.Movie(id), DROP FOREIGN KEY _fk_movie_actor, ALGORITHM=INPLACE, LOCK=NONE;
SET SESSION foreign_key_checks = 1;
Recently a Wifi repeater I setup years a go was reset by accident and I lost the configuration which was providing extended wifi coverage and guest wifi on a TP-Link RE450.
Reconfiguring the setup cost me much more time than I am willing to admit, thus I wanted to share the basics in order to be prepared next time. Also I have a backup now.
The TP-Link 450 is a pretty nice and affordable device which has two different wifi bands (5Ghz, 2.4Ghz).
You can get it for around 50 Euros and it comes with three antennas and an ethernet port.
Also it can run LEDE / OpenWrt, an open source firmware for embedded systems, such as routers and wifi extenders.
The history of LEDE and OpenWrt can be read here, in this article I will call the software OpenWrt altough the interface still shows LEDE.
In this article I will refer to the RE 450 as router.
Connecting to the router
Since this router will be embedded into an existing computer network, it is essential to give it a unique IP in a unique subnet.
I have decided to assign the IP address 192.168.2.1 and the subnet 255.255.255.0 to the router.
The existing network is a wireless network called Wifi with the subnet 192.168.1.1/24.
Our plan is to add a guest wifi network 192.168.3.0/24 with its own SSID called Guest and its own password.
Clients from the guest network should not be able to access any other devices within the guest network and also not be able to access any clients from the existing network.
After installing the firmware, the router will have the default address 192.168.1.1.
In order to avvoid a clash with the existing Wifi network, I attached the router with an ethernet cable to the computer and disabled wifi on my computer during the setup.
I then assigned a static IP address 192.168.1.2 for my PC using the same subnet.
And while I am already at it, I created a second ethernet profile using the address 192.168.2.5 to switch to the desired subnet once the router is configured.
Now you can easily switch between the subnets.
Installing the firmware
The first task is to get rid of the proprietary firmware and install OpenWrt.
There are many instructions out there, it is important to verify the firmware and device version with great attention.
Otherwise you might produce a 50 Euro paperweight of waste weekends (been there.)
In case you have an older version installed, please consider updating.
For this article, I upgraded from LEDE 17.01 to a more recent OpenWRT release 19.07 and downloaded this particular release.
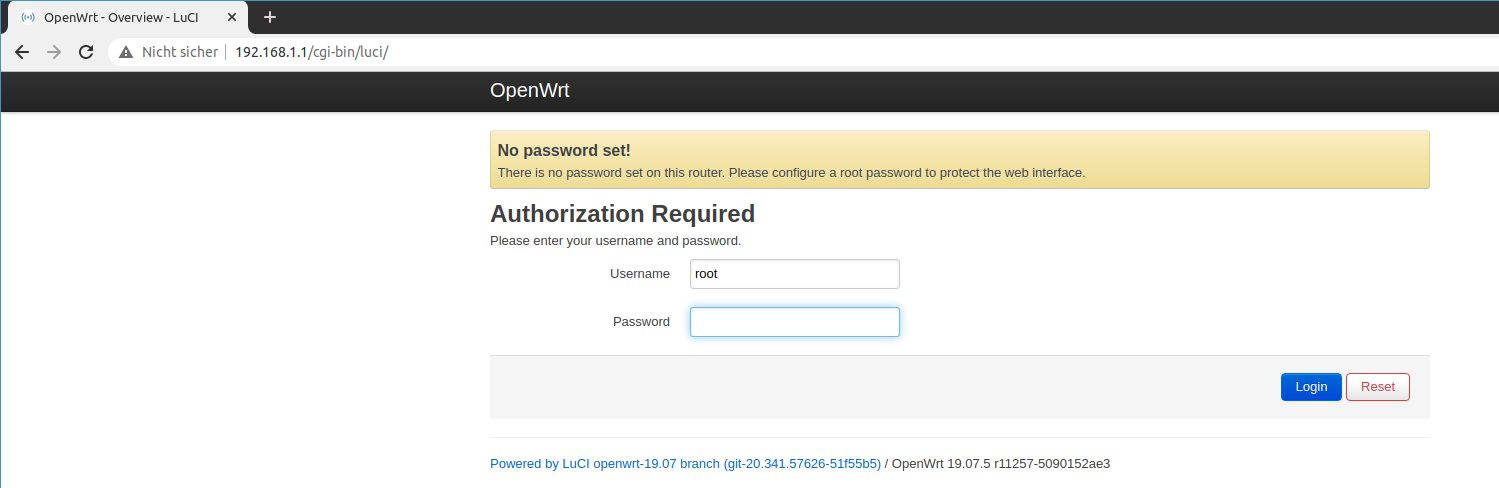
For the initial setup, open up a browser and go to 192.168.1.1.
Basic setup of the router
We now have installed OpenWrt on the router and can begin to configure it.
You will be greated by the OpenWrt interface and advised to set a password.
The first login.
We follow the advice and set a good password.
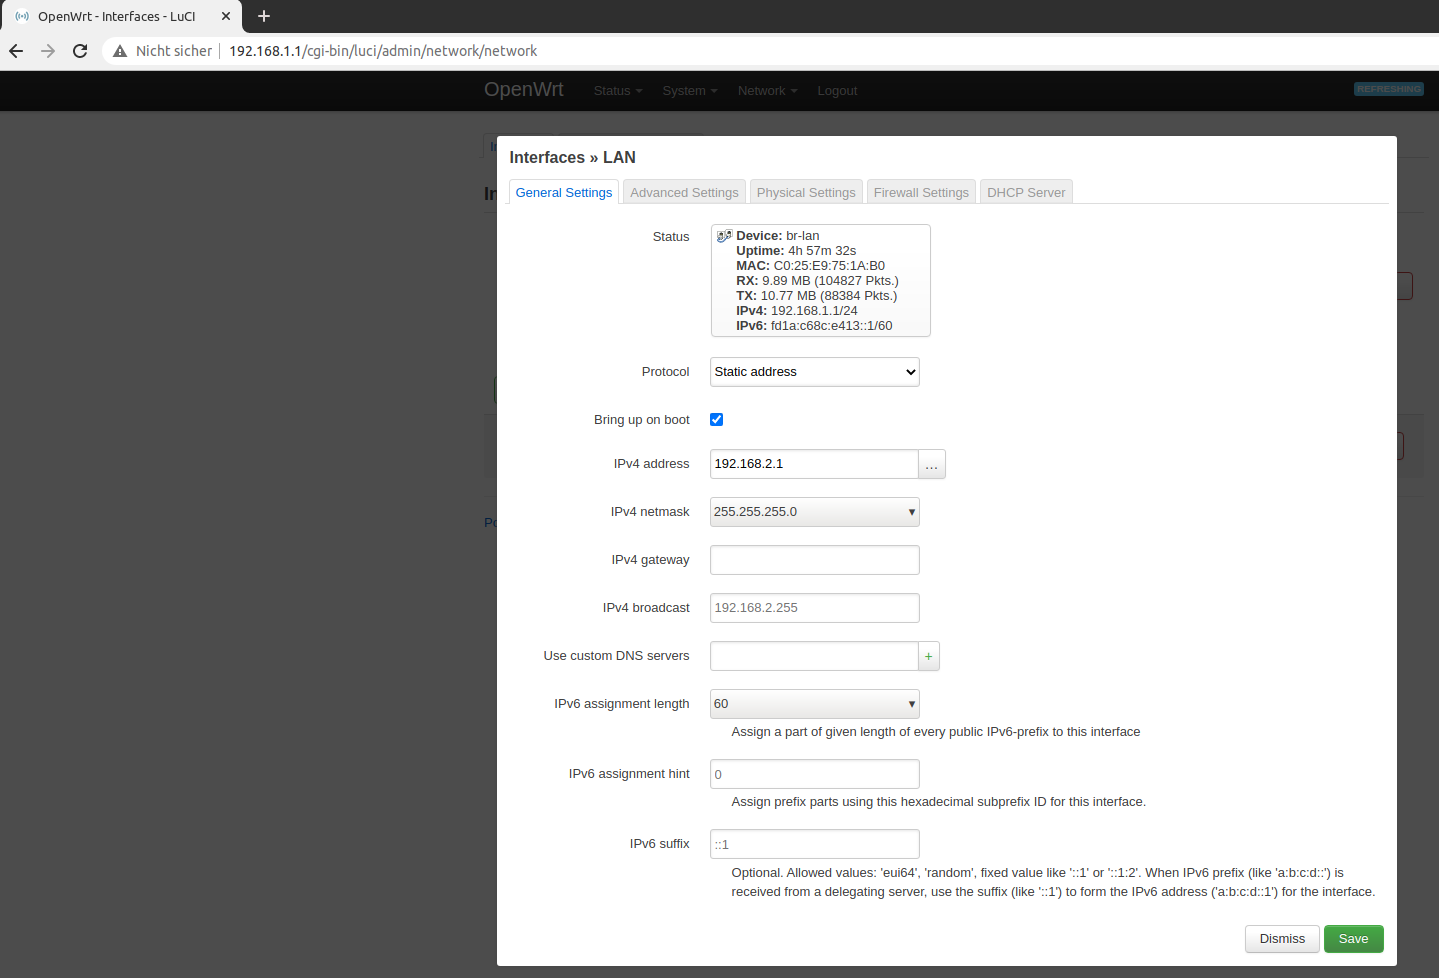
Next we will set a static IP by going to Network > Interfaces and edit the existing LAN interface.
This is obviously the ethernet connection we are connected to and we want to make sure we always find this device with the static ip 192.168.2.1 in the standard subnet.
Assign a static IP
Always save and apply thanges. Afther this change you have to switch to the 192.168.2.5 profile we created earlier so that you can access the router again.
Now when we have logged in at 192.168.2.1 with our new password, we should be greeted with the OpenWrt Luci Web interface.
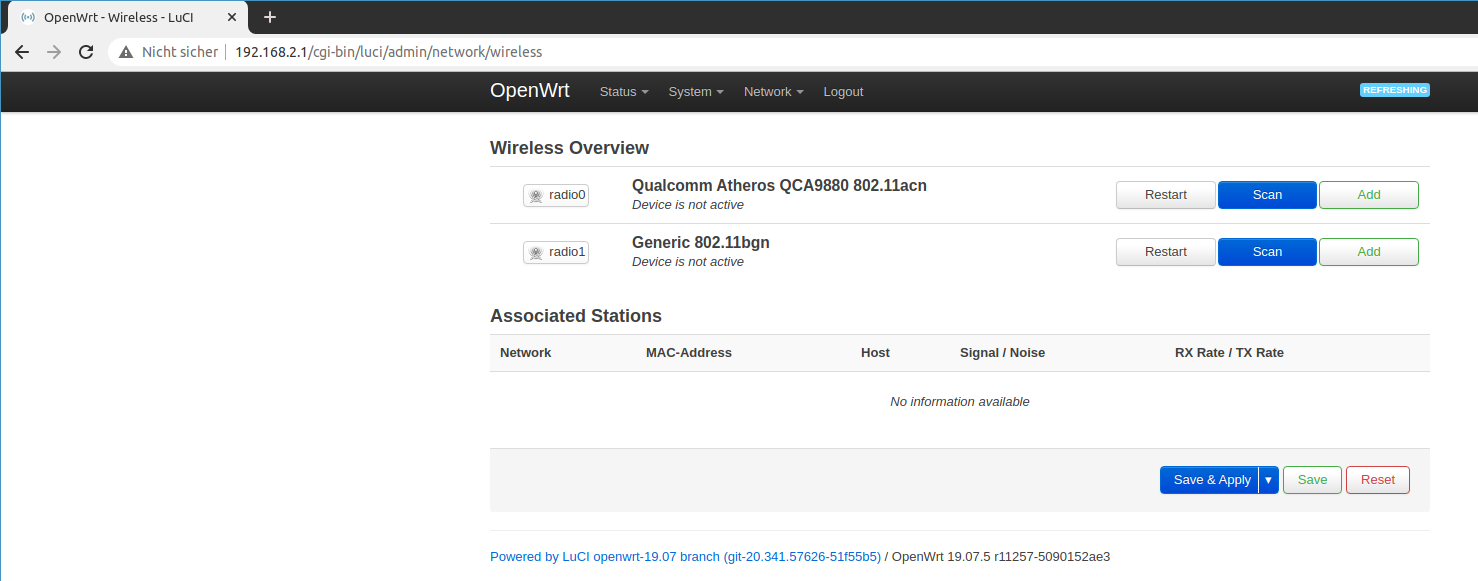
Setup the interfaces and wifi networks
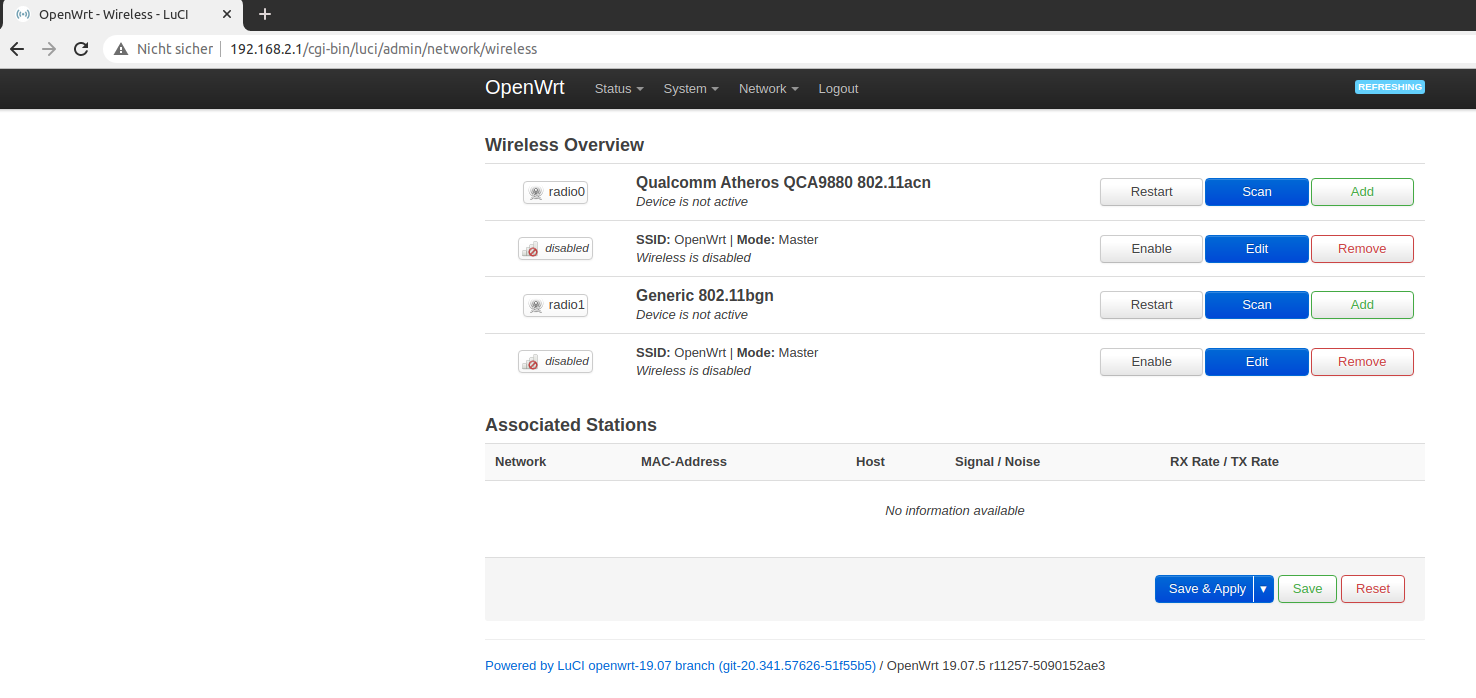
THe first step is to connect to the existing Wifi network, so that we have a working internet connection on the router for downloading updates.
Go to Network > Wireless. You will see the default wireless interfaces called OpenWrt for both devices (3.4 Ghz and 5Ghz).
The default Wifi interfaces
Remove them so that you reach a clean state.
No wireless interfaces, only devices
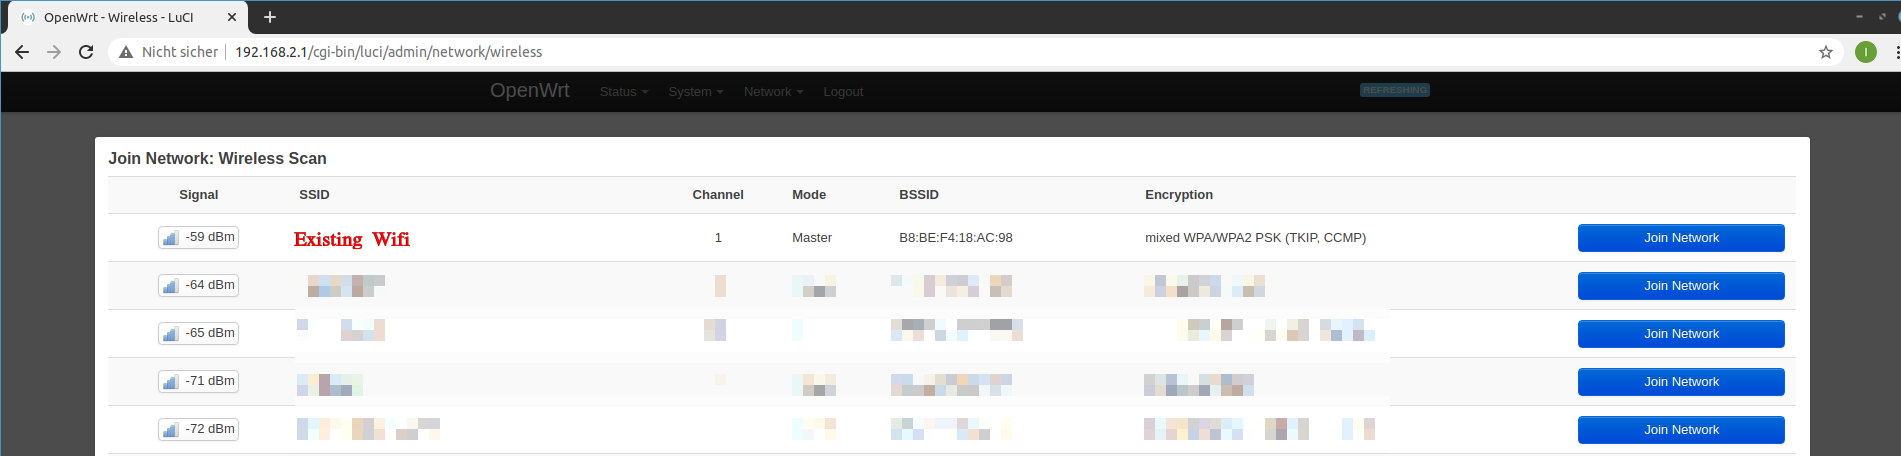
Depending if your existing wireless network is on the 5Ghz band or the 2.4 Ghz band, use the appropriate device and click scan network and select the existing network.
Obviously you need to be in range to see the network.
Join the existing Wifi network
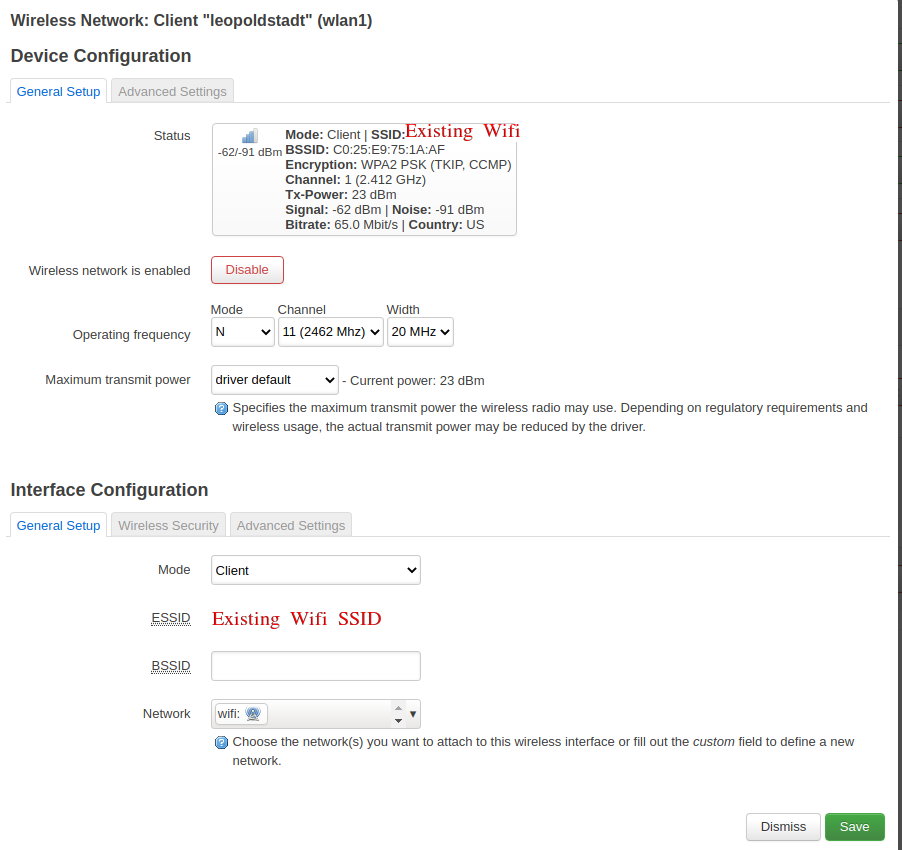
You will then be promped with a details page where you enter the passphrase for the existing network and where you can select the name of the new network.
This is maybe a bit confusing, because this will create a new interface instead.
Add the name wifi.
On the tab firewall settings, add this network to the wan zone.
This is the crucial step, because the existing wifi will act as the Internet uplink for the guest network.
The joined, existing wifi network
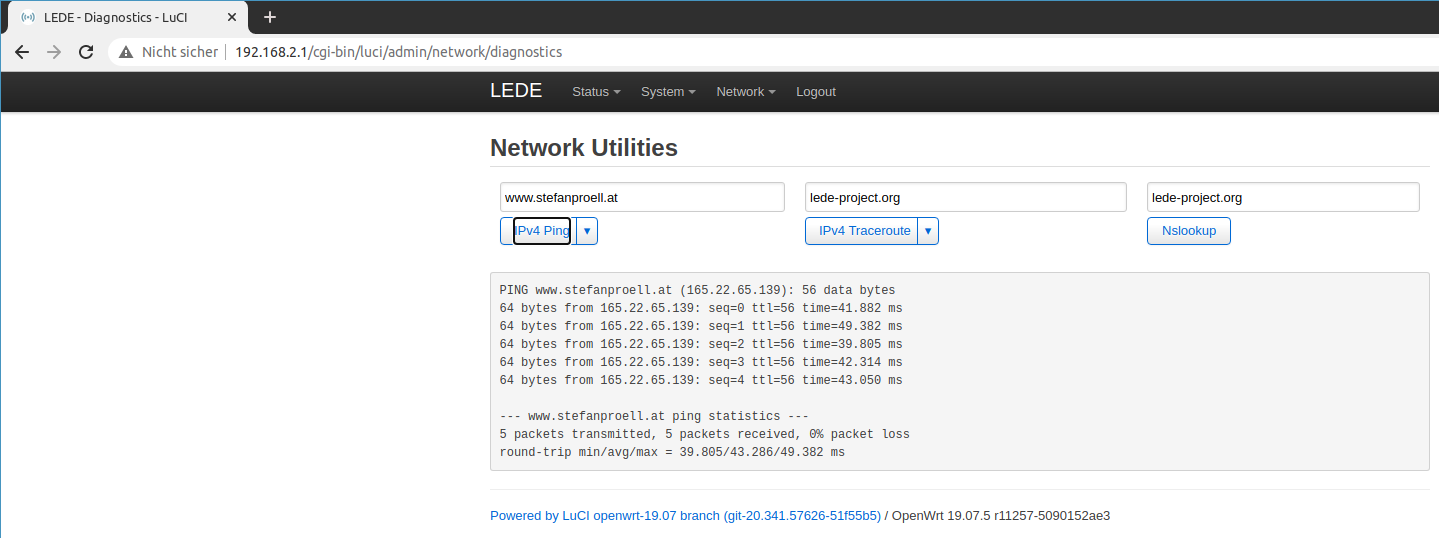
Make sure to save and apply.
You should then be able t ping any web page using Network > Diagnostics.
Testing ping
If this works it would be a perfect time to make a backup of the configuration.
Setup the Guest Wifi
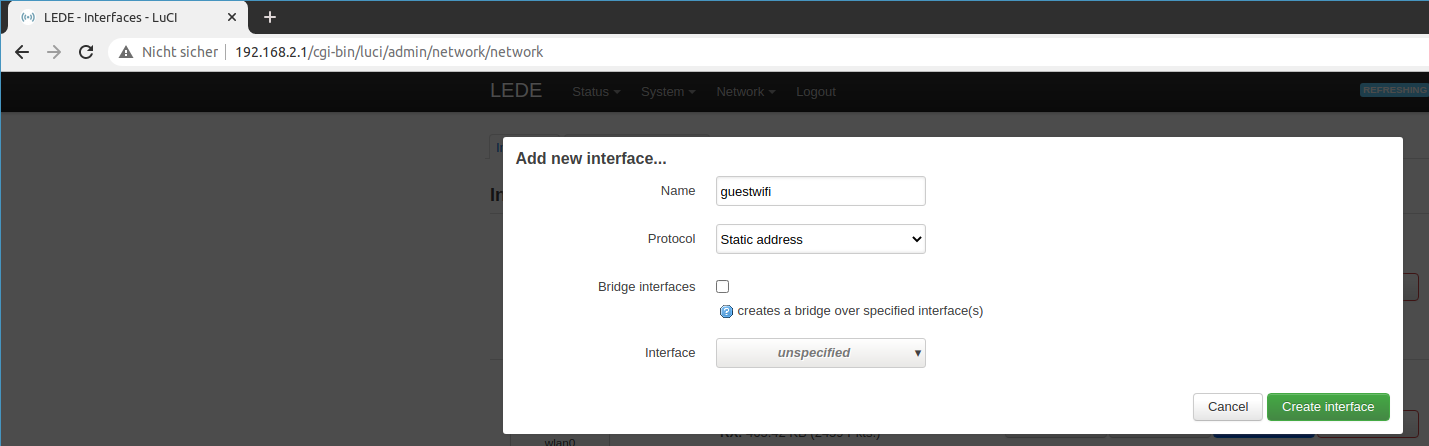
The guest wifi also needs a new interface. Thus go to Network > Interfaces and click add new.
Select static IP address and assign the name guestwifi.
Leave interface unassigned for now.
Add the guest interface
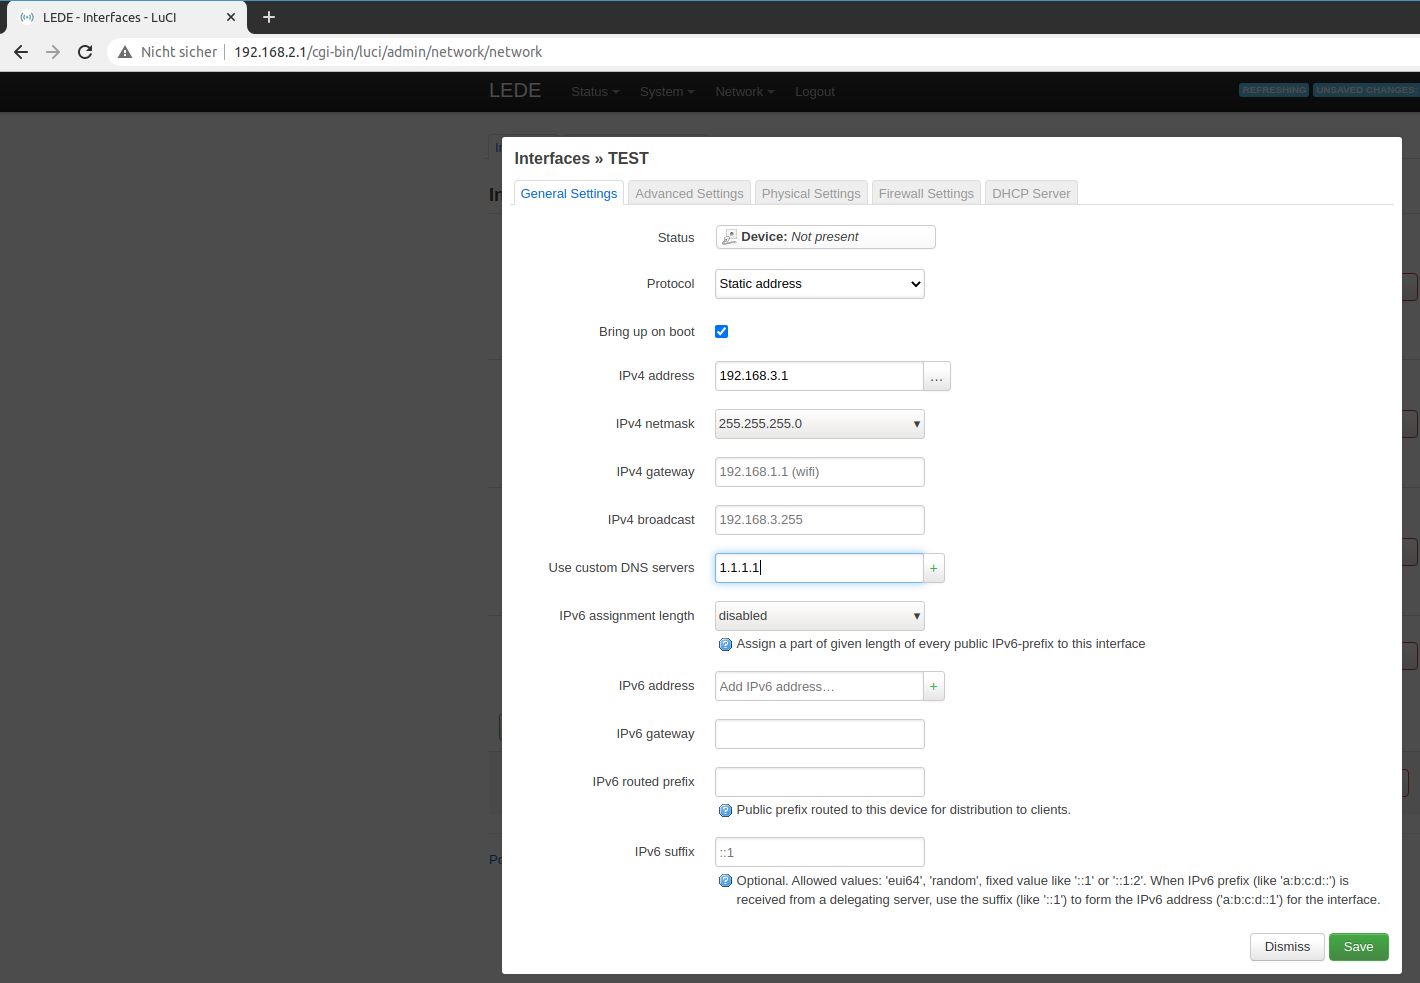
On the next page, define a static address. This time we will use 192.168.3.1 and the default subnet 255.255.255.0.
Also you should add a public DNS server like 1.1.1.1 or 8.8.8.8.
Set a static address.
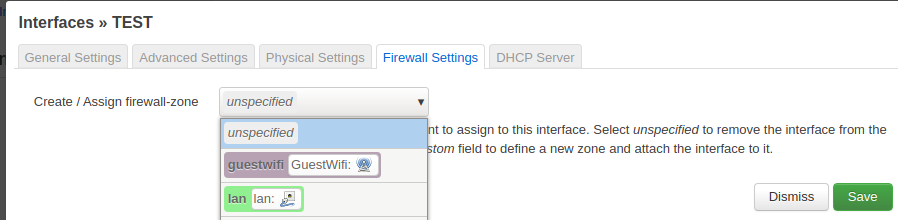
Then click on the firewall tab and create a new zone guestwifi.
Add a new firewall zone
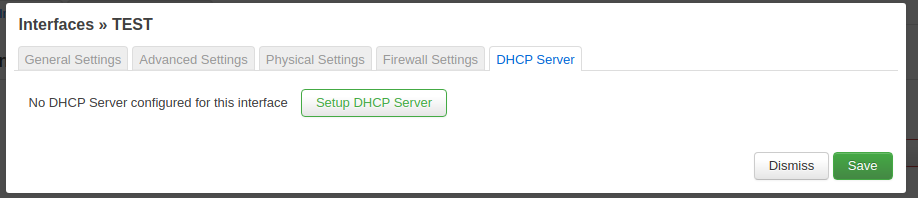
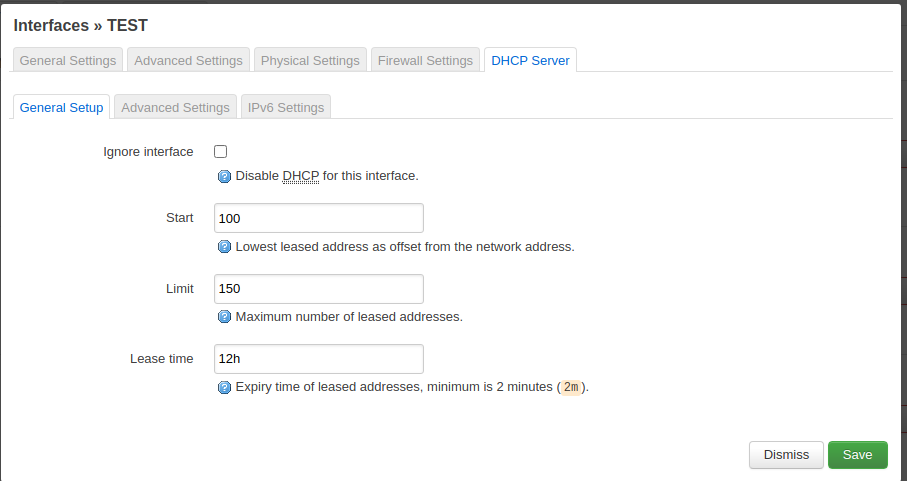
Then click on the DHCP server tab and enable the service.
Enable DHCP service.
Review the settings and save the changes.
The DHCP settings can remain as they are.
Every guest will then get an IP address from the 192.168.3.1 subnet.
Save and apply.
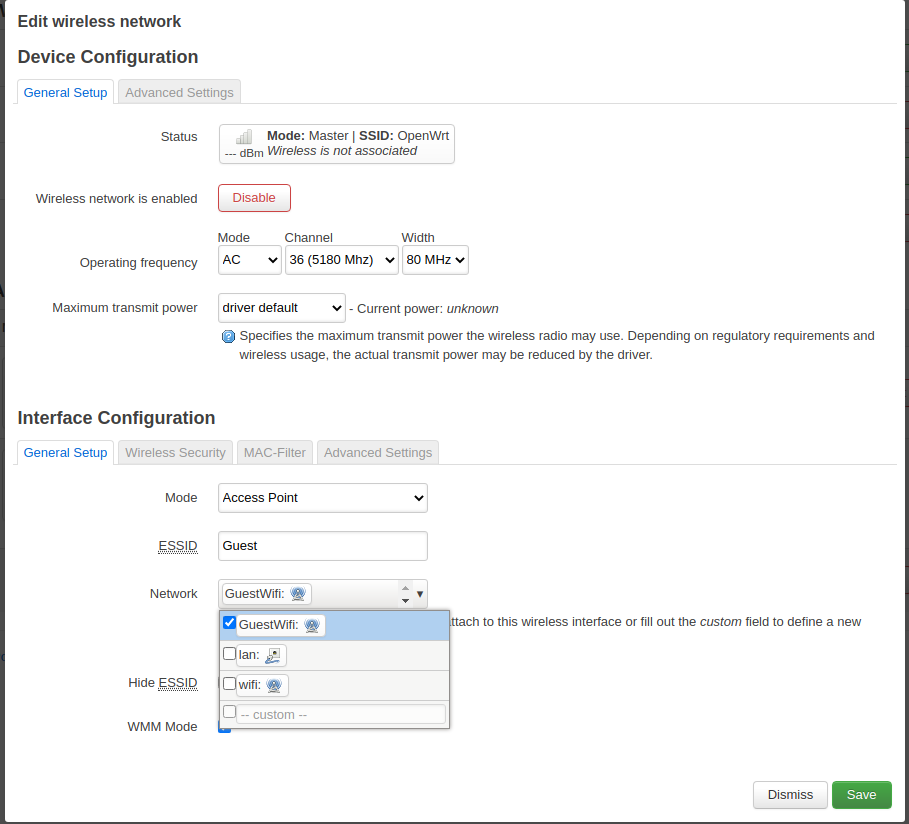
Then proceed to Network > Wireless again and create a new wireless guest network.
I used the second antenna device to achieve this.
Click on add and pick Access Point for the mode and give it a name, for instance Guest.
Add the guest network.
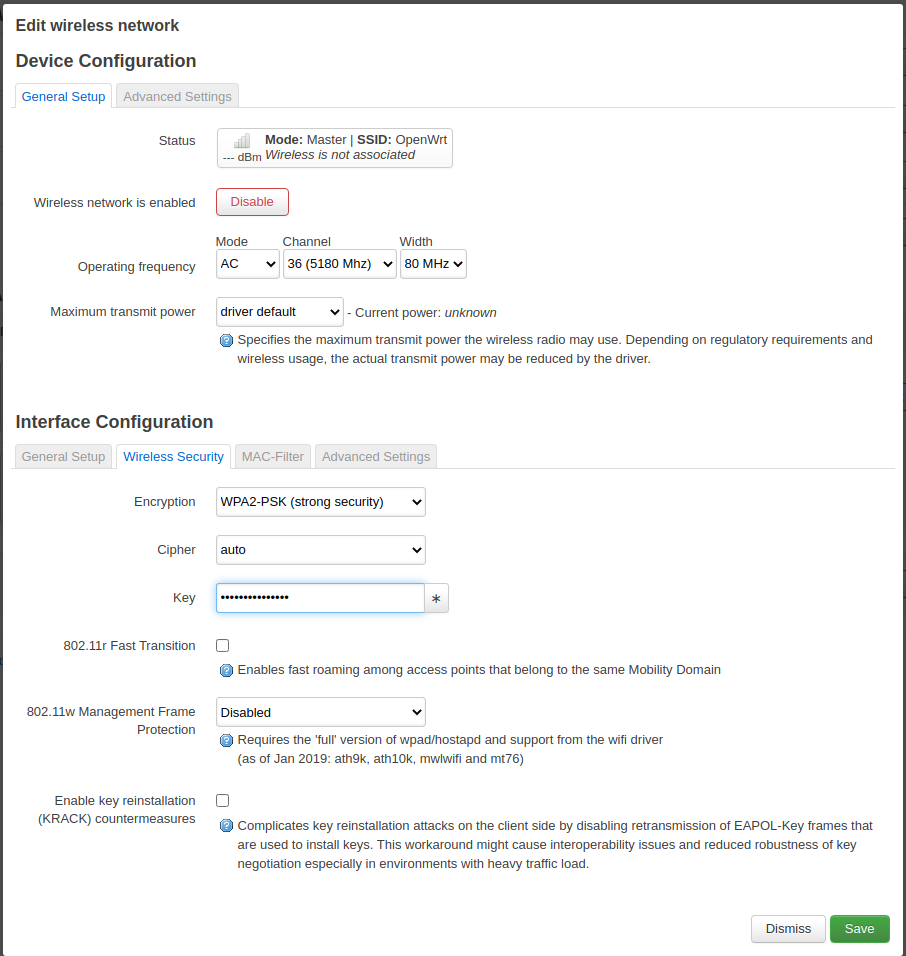
Then - and this is very important - go to the Wireless Security tab and pick WPA2 as the encryption standard and set a password you can share with your guests.
Set a password and enable encryption.
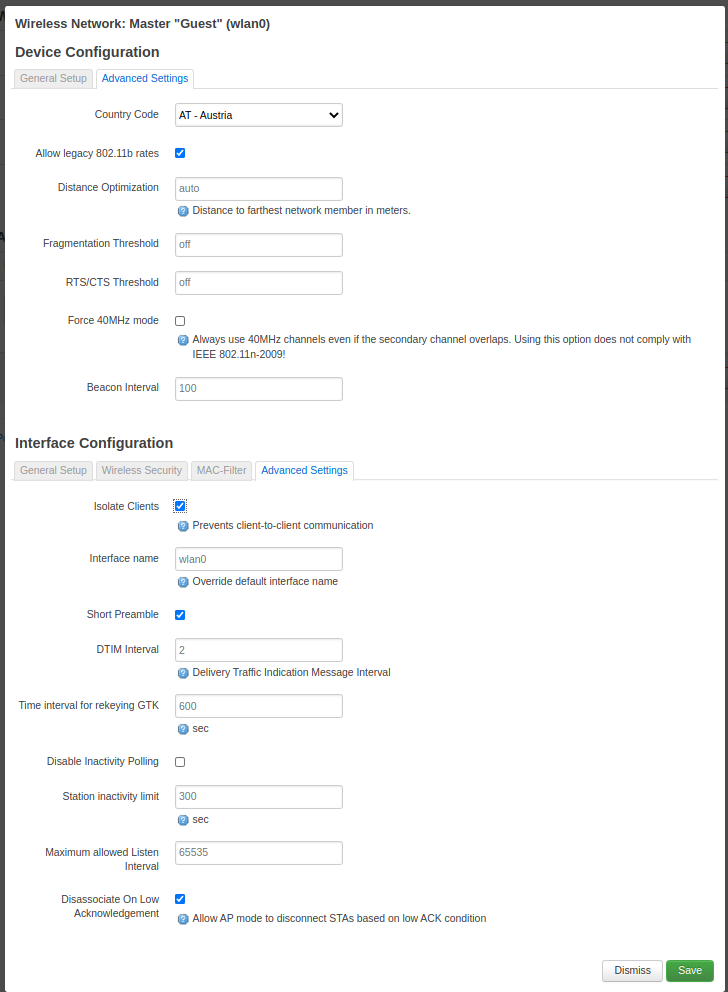
The last step is to enable client isolation in order to prevent that your guests try nasty things on each other.
You find the setting at the advanced tab.
Enable client isolation
Now you should be able to connect to the Guest wifi and get an IP address assigned to your client.
Bit it will be pretty boring because there is no internet yet.
Setup the firewall
The last step involves setting up the firewall.
Go to Network > Firewall.
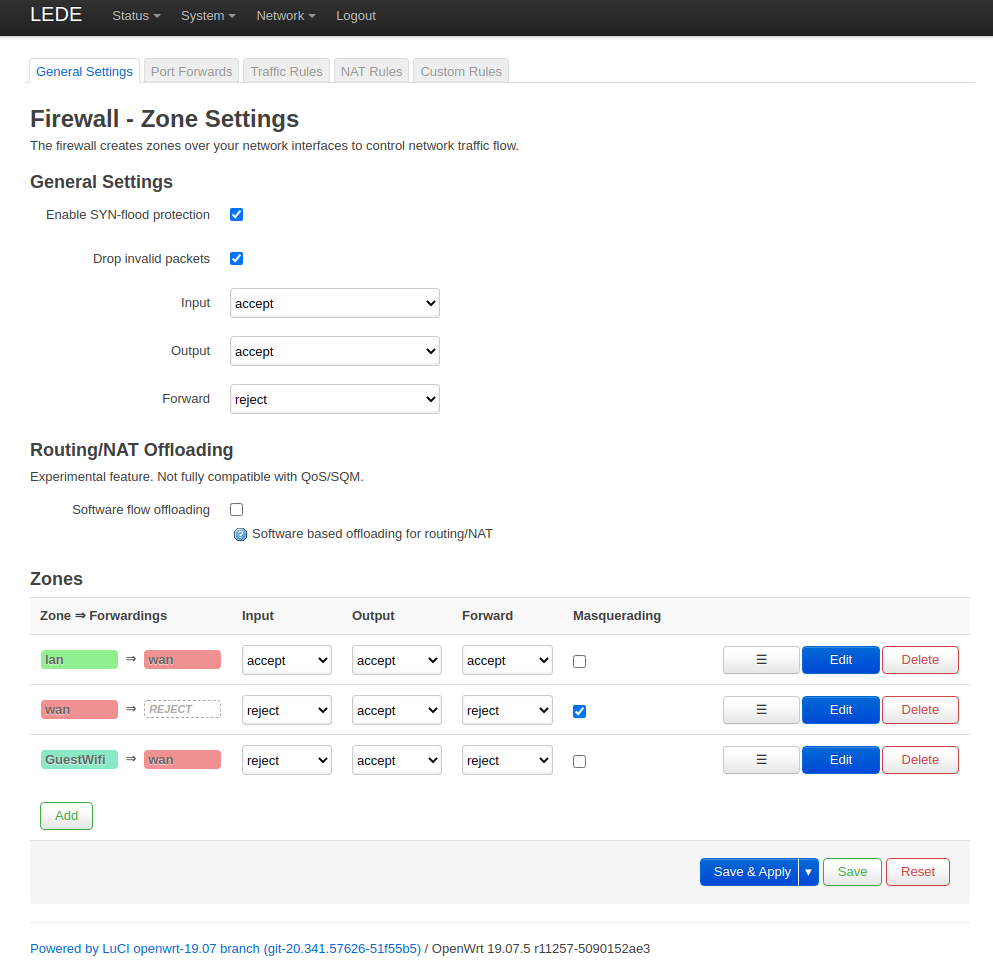
First of all we need to ensure that we have different zones for lan, wan, wifi and guestwifi.
The lan and wan zones are created by default.
We have created the other two zones wifi and guestwifi.
The zone overview should look similar to this.
We can see that the guestwifi zone can be forwarded to the wan zone.
Also make sure that masquerading is enabled for the wan zone (it is per default).
Firewall zones
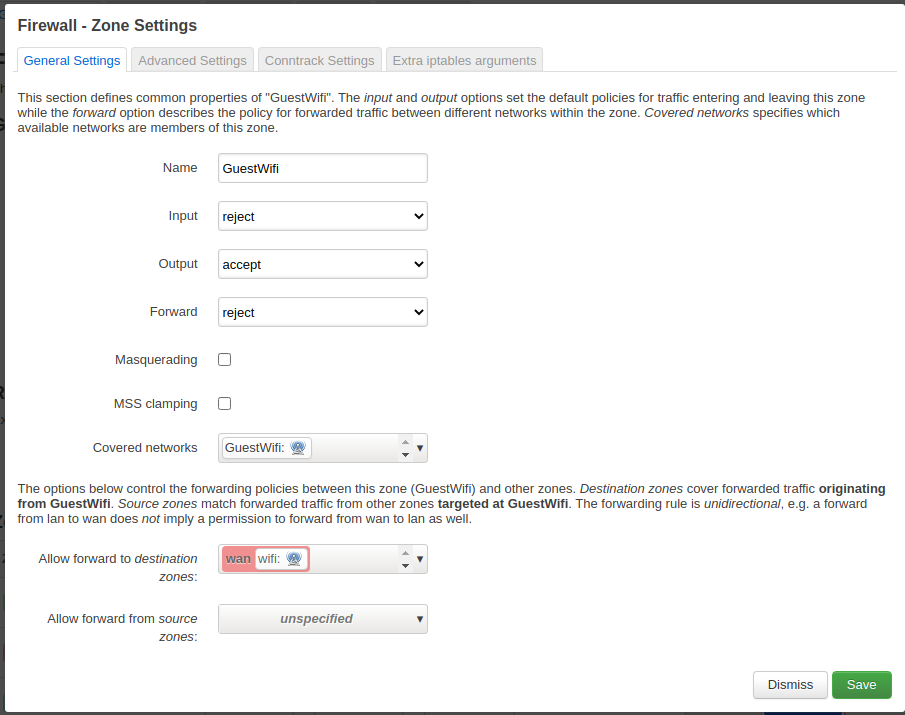
The details of the guestwifi zone settings are shown below.
Note the default reject settings for the INPUT and OUTPUT chain and that the only allowed zone to forward traffic to is the wan zone.
Guestwifi zone details
Now we have to setup three traffic rules in order to enable DHCP and DNS for the guests and to prevent them from accessing the other networks and the router web interface.
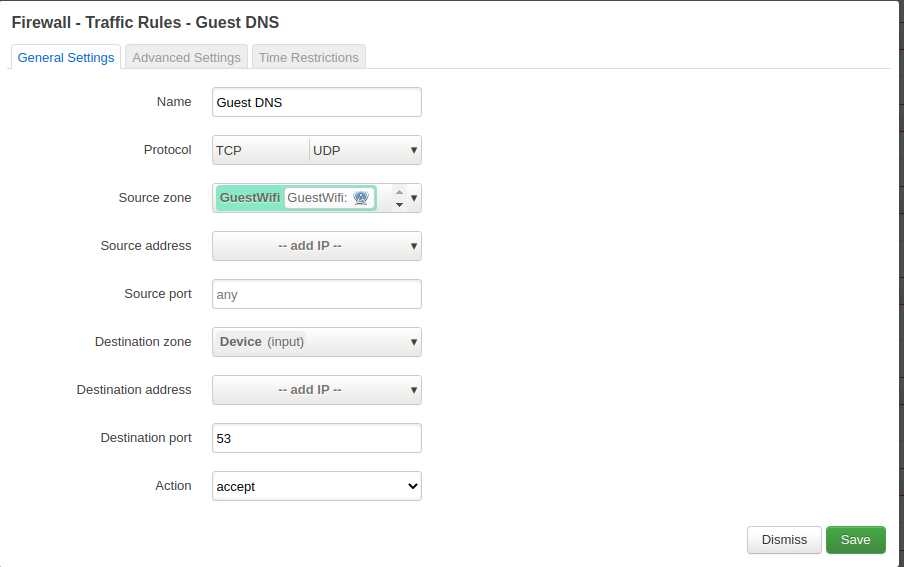
Enable DNS
Allow port 53 to be used.
Allow DNS
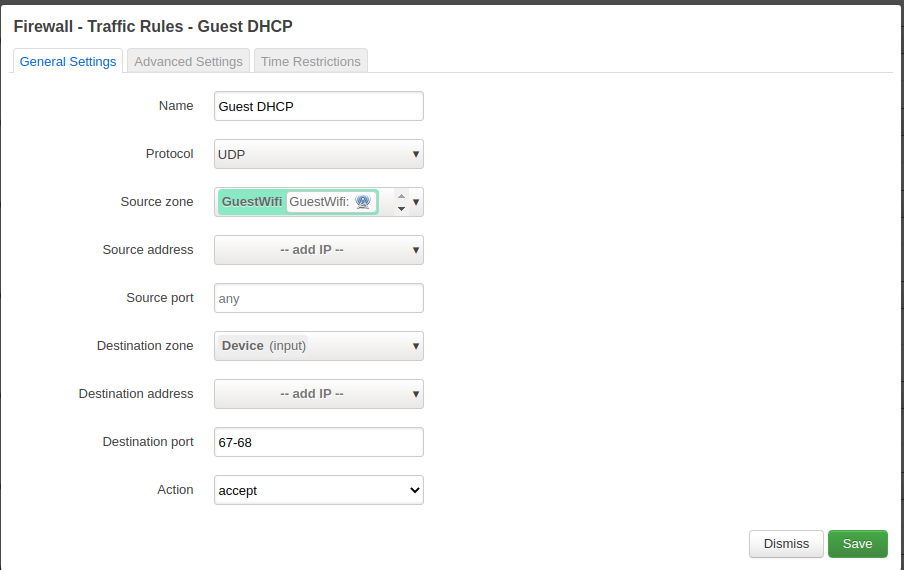
Enable DHCP (ports 67 - 68)
Allow the UDP port range 67 to 68 for DHCP requests.
Guestwifi zone details
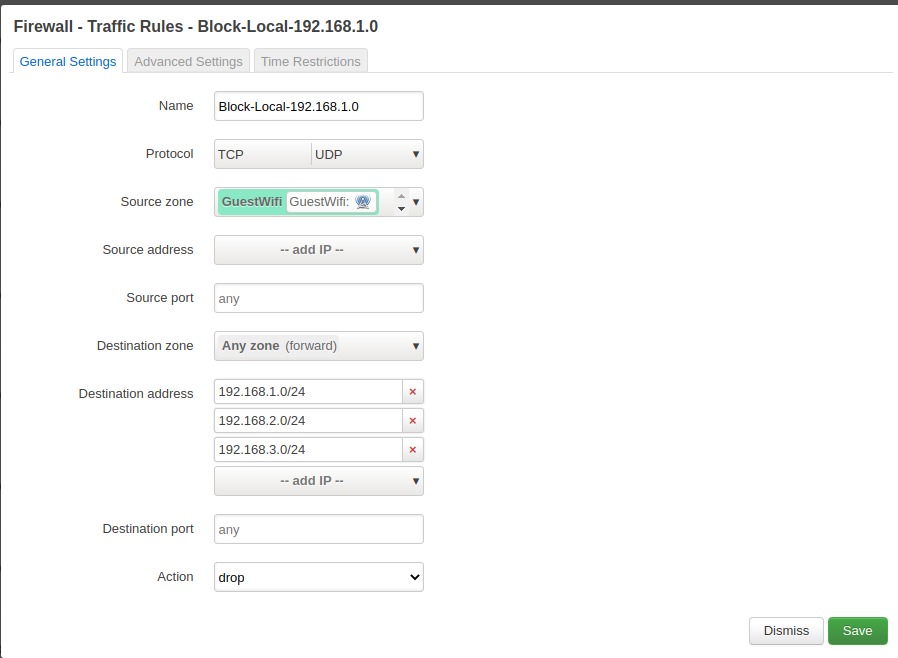
Block other networks
In order to separate the guest wifi from our regular wifi and the router, we block the entire subnets.
Guestwifi zone details
Conclusion
OpenWrt works very nice once the setup is clear.
Some of the naming conventions are a bit confusing, but I guess this is normal given that it is a complex matter.
This tutorial shows how to create a guest network on a device which is itself a client in an existing wifi network.
A new writing and reading experience - Not there yet
In the following I am going to review the reMarkable2 e-ink tablet.
I bought the device in the pre-sale and tested it extensively.
While the writing experience is great, there are quite a few drawbacks.
Unfortunately those drawbacks are outweighing the advantages by far for me.
Although being very enthusiastic about the reMarkable2, I decided to send it back.
At the end of this article you will find my thoughts.
On writing and thinking
After all this years working with computers professionally, I am still a fond lover of handwriting.
I consider writing by hand a cultural technique worth preserving and I admire people who do have a beautiful style of writing.
Unfortunately my handwriting is sloppy and hard to read for others and sometimes even for myself.
Nevertheless, investing the time to write a thought down manually allows me to retain the information longer.
Although I use a simple mark down based text file for keeping notes at work, I also use a classic notebook and Tombow caligraphy pens for jotting down ideas and tasks.
Obviously making little sketches and drawings is also more convenient using a regular pen and paper approach.
Digitization of an old craft
A friend of mine is using a remarkable 1 and is quite happy with it.
It seemed lightweight and I liked the idea of having digitized notes with a proper look and feel of paper.
I also have seen other friends using a tablet like the iPad for taking handwritten notes with a special pen.
Using a tablet with its glossy surface did not seem to appealing to me, although an Android tablet would of course offer a completely different set of possibilities.
However I noticed that writing on a tablet seems to involve a lot of navigating and selecting functions before the actual writing takes place.
Also it is of course a permanent distraction, the same as a regular laptop would be in a meeting.
It was the simplicity and the dedicated purpose of the reMarkable2 that I find intriguing.
When the reMarkable2 was announced, I decided to give it a try.
When it arrived I have had enough distance to reconsider my consumerist decision and I thought about selling it right away.
My decision of keeping it or at least giving it a try was made during a call with friend Norbert, who owns a reMarkable 2 for a few weeks and was positive about it.
I will now try if for the 30 day no questions asked period and see how it works for me.
The order process
remarkable
1x Marker Plus: €40
1x Book Folio – Polymer weave – Gray: €20
1x reMarkable 2: €399
Including taxes and shipping I ended up paying 459 EUR upfront.
The delivery date was moved two times, but I finally received the device on the 19th of November.
The reMarkable web site still offers the same pre-sale option, the marker is more expensive now.
However, I think the price might change again when the product is rolled out globally.
Screenshot from the reMarkable web site, taken on 19th Nov 2020
Unboxing
The product is very nicely packaged.
I received the reMarkable2 device, the marker and the protective cover (book folio) in separate cardboard boxes.
There is a USB Type C charging cable and some extra pen tips included.
The little boxes.
The tablet it self is super thin and looks very well made.
It is also light, but it does not feel fragile.
Setup
The setup is simple.
One needs to add the wifi details on the device and register at my.remarkable.com.
After entering a one time code the registration is complete.
The settings are straight forward and clear.
Basically one only needs to enter if you are left or right handed and select the language you are writing in the the text recognition.
No overwhelming settings.
Usage
There is only one hardware button to turn the device on and off.
You can enter a pin code to protect the device and its content from others.
The display is very sharp and the reading experience is exceptional.
Writing is also very nice, the response time is super fast, almost without delay.
One can select different pens and markers and alter the colors between black, grey and white.
My pen also came with a eraser function at the end of the pen.
Below is an example how the exported PDF looks like.
My beautiful handwriting.
The text recognition works well, one has to concentrate on a nicer hand writing though.
The text above would be just gibberish.
Also it does not detect the language automatically, but you have to select a global setting.
The text conversion functionality is rather primitive, but should be sufficient to make the text searchable.
There is also a plugin for the Chrome browser, which allows you to send any web site via the reMarkable coud to your device.
This works extremely well and makes up for the fact that there is no browser on the device itself.
It comes of course with a big privacy downside, because reMarkable will know very well what you are reading.
There is also an App for Android, whichallows you to view and upload documents from the phone.
Sharing articles does not seem to be supported.
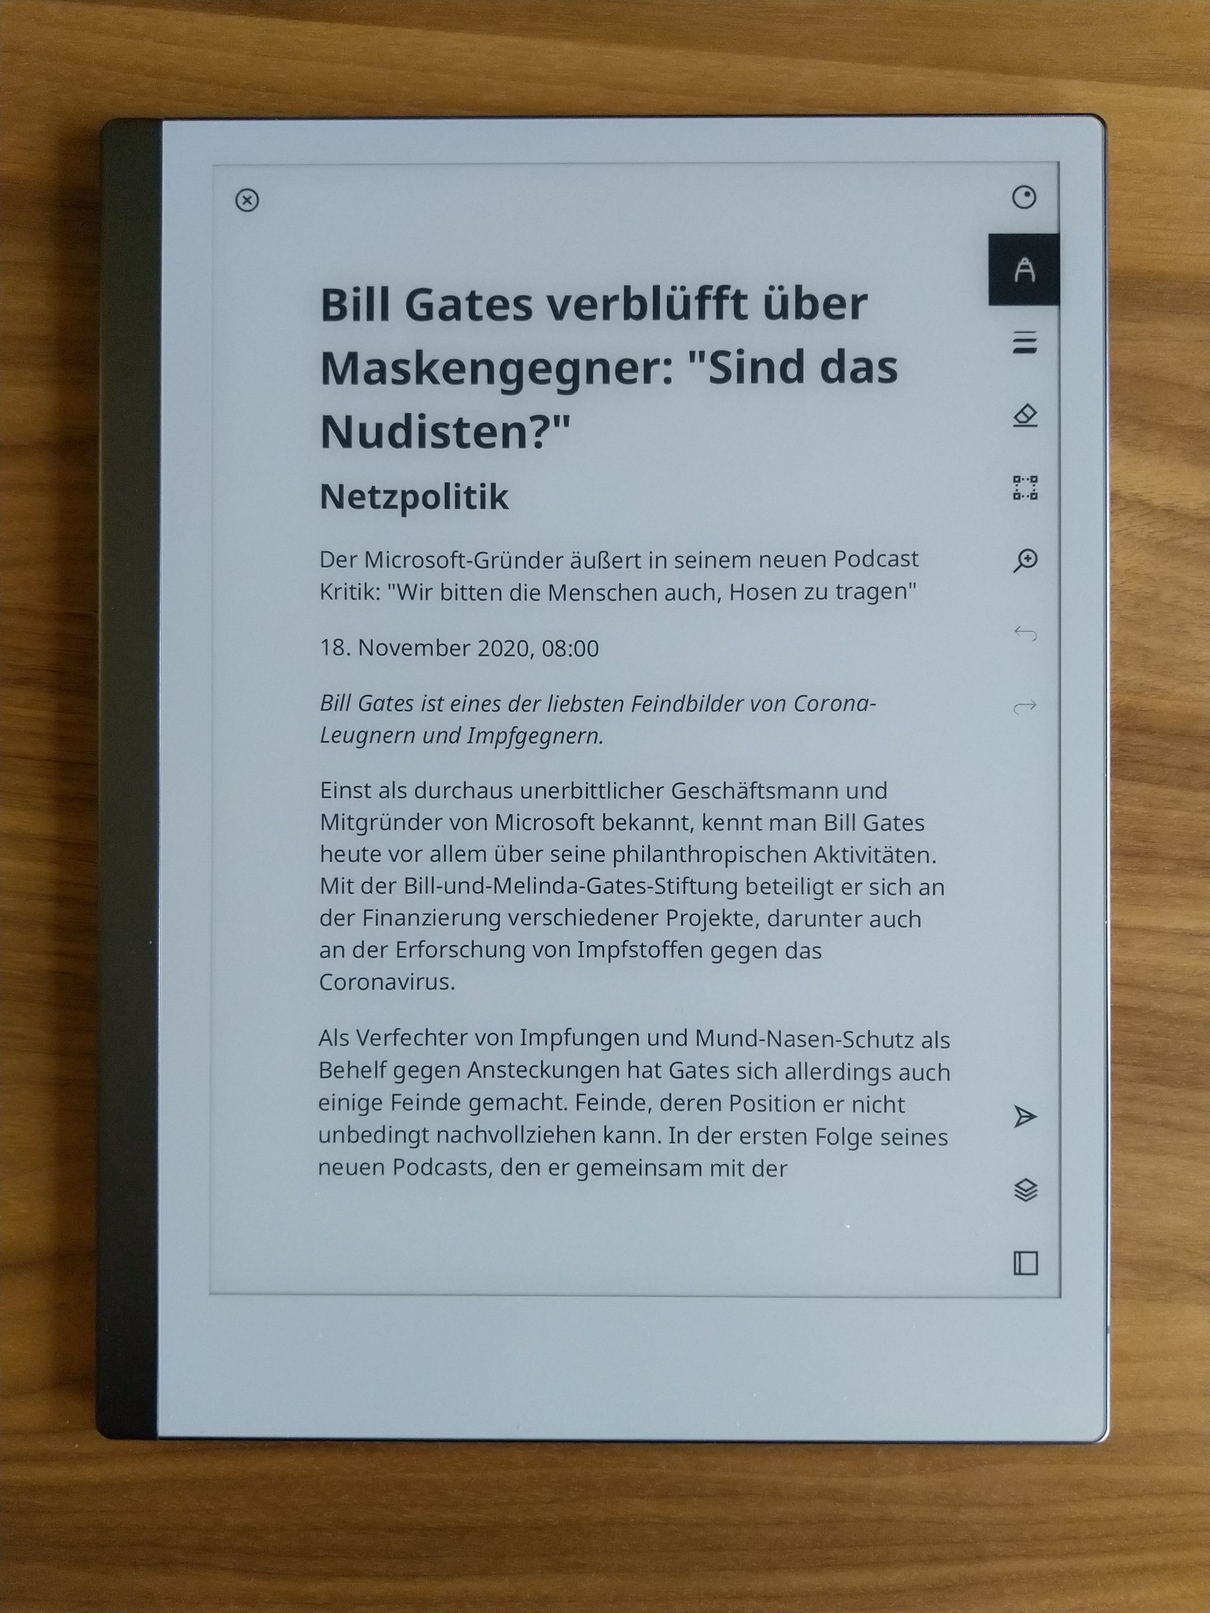
Here is an example of an "quality journalism" article that worked well (from www.derstandard.at).
Nicely rendered web page
Compared to other eBook readers it offers more reading real estate and it is much thinner.
From left to right: Tolino Shine, Amazon Kindle, reMarkable2
Conclusion: Sending it back
I have been using the reMarkable2 for almost two weeks every day.
The device arrived with great timing, because I was having a lot of meetings recently.
In total I have written more than 80 pages and the writing feel is exceptional and fun.
Collection of notes on the reMarkable2
However there are too many little things that are not there yet.
I do not intend this article to play down a device.
I do not like slating reviews, especially from products from small companies and with a great vision.
I repeat that the reMarkable2 is really great, but it does not fit into my workflow and there are too many little things which should have been fixed in a second revision.
The most annoying part is the syncing solution.
This could be so much easier and I do not understand, why the device is so closed down.
Of course, you could write that about many other devices too (looking at you Apple), but in this case, the scope of the application is so narrow.
You can only use it for writing and reading.
Why not make this as frictionless as possible.
I would have expected that a single purpose device really does this one thing extremely well.
I am not willing to take many compromises on a 460 EUR jotter.
Yes, there are independent projects on Github boosting and fixing things, but although I love tinkering, I do not want to fiddle with a writing device so much.
I do not want to install scripts to keep some directories in sync (and I say this as a 15 years Linux user).
I just want it to work.
In order to be able to find my notes again after some time, I would need something that goes beyond near miss OCR.
Sure, my writing is not easy to read, but even when trying there are too many errors.
Also the reMarkable2 can only recognize one language and very simple formating styles, such as lists.
There is no search function.
If you want to write something more than a shopping list, it will not be useable without properly digitizing the document.
Maybe there is a future iteration of the reMarkable2.
I would totally give it another shot.
But as it looks now, it is not what I expected: A replacement for a Moleskine notebook.
Pros and Cons
I will evaluate the device within the next weeks and update the list of pros and cons as I use it.
It seems to be a great device and the list below should not leave the impression that it is not, just because the list of negatives is longer.
The last update was on the 20.11.2020 04.12.2020.
Pros
Very good look and feel
The writing process is great
It does feel almost like paper
Someone more artistic might even be able to draw on it
Super lightweight
Cons
The folio is not for left handers
Yes, we are a minority, but while the device supports the left handed folks, the protective sleeve is not.
I am used to this problem and would turn around a classic notepad if needed, but this does not work with the folio.
You can only mount it on the left side and it does incommode me.
I love its hipsteresque appeal, but I probably will not be able to use it.
Lefties will relate
No backlight
I love reading in bed, next to my special someone who requires more sleep than I do.
The reMarkable2 has no backlight at all.
It really is likea book, you cannot read in the dark without a light source.
This seems to be the trade off for the slim form factor.
Other devices like the Amazon Kindle or the Tolino Shine do have backlights, but are much thicker and heavier.
Private cloud
The device only supports the private cloud of reMarkable.
You cannot sync your documents from other clouds.
This is a big blocker, the benefit would be huge if one could just use Google Drive, Owncloud or whatever.
No browser
Even a simple browser for selecting articles would be nice.
Sharing options
The Chrome desktop app is great, but the Android variant does not allow sharing articles.
I do not understand this, this would be extremely benefitial.
Getting files on the device is in general cumbersome.
It basically only works via the Chrome App or when connected via USB-C and when using the integrated Web server on the reMarkable2.
Organization
Shared web sites will show up under ebooks, there is no configuration.
If you use the feature extensively, it will clutter immediately, since you do not have control over the file name or where it will be stored.
You can create folders, but you cannot do so in the Web interface.
In the Android app you can only rename files, but not move them.
This means you have to fiddle with each and every file on the device.
Rendering
When sending a Web page to the device via the Chrome plugin, the rendering can be weird.
This also can happen with rather simple pages, below is an example from the Hibernate documentation.
I would have expected to get such a simple page without problems.
Not a nicely rendered web page
Not detected as MTP device under Linux
This could have been simpler, why can’t I just drag and drop my ebooks over?
The reMarkable registers as a new networking device, when you enable the web interface, at least there is some non-cloudbased access possible.
Nov 20 08:45:32 xps kernel: [ 5662.967832] usb 1-6.1.1.2: new high-speed USB device number 25 using xhci_hcd
Nov 20 08:45:32 xps kernel: [ 5663.085530] usb 1-6.1.1.2: New USB device found, idVendor=04b3, idProduct=4010, bcdDevice= 4.14
Nov 20 08:45:32 xps kernel: [ 5663.085537] usb 1-6.1.1.2: New USB device strings: Mfr=1, Product=2, SerialNumber=0
Nov 20 08:45:32 xps kernel: [ 5663.085540] usb 1-6.1.1.2: Product: RNDIS/Ethernet Gadget
Nov 20 08:45:32 xps kernel: [ 5663.085544] usb 1-6.1.1.2: Manufacturer: Linux 4.14.78 with 30b20000.usb
Nov 20 08:45:32 xps kernel: [ 5663.089960] cdc_ether 1-6.1.1.2:1.0 usb0: register 'cdc_ether' at usb-0000:00:14.0-6.1.1.2, CDC Ethernet Device, d2:dc:08:36:a6:a9
Nov 20 08:45:32 xps mtp-probe: checking bus 1, device 25: "/sys/devices/pci0000:00/0000:00:14.0/usb1/1-6/1-6.1/1-6.1.1/1-6.1.1.2"
Nov 20 08:45:32 xps mtp-probe: bus: 1, device: 25 was not an MTP device
When you enable the web interface, browsing to http://10.11.99.1/ shows a primitive tool where you can upload and download the documents.
You cannot create folders for organizing the books and papers to your liking using this interface.
There is no authentication, so better not activate this in an untrusted wifi.
The web interface only works when the USB cable is connected.
Maybe this is the security concept.
Inconsistent UX
On the one hand, the reMarkable cannot be used without the pen. Yes, you can navigate and enter the settings, but it is impossible to mark anything or mark something quickly just by using your finger. On the other hand (pun intended) you cannot use hand written text for naming files or any other input. You have to use the virtual keyboard and this again works best with the pen.
No proper search
The search only works for filenames, regardless of the file type. You cannot even search epub documents.
This is very poor and when you use the handwritten notes, you cannot find anything inside the documents.
With this limitation you can also take a picture of your traditional notebook and send it to yourself.
No tags or bookmarks
You have no possibility marking where in a document you stopped reading.
The only alternative is to make a handwritten annotation, but that basically is like making a digital dog-ear.
Also you cannot mark multiple pages and quickly jump to them.
All you can do is marking an entire document as favorite.
Because the file organization is so bad, you will end up with a lot of favorites, rendering the feature useless again.
Adding custom tags to documents would be super useful, yet there is no such option.
Charging cable position
The charging cable is at the bottom.
If find this not ideal, because when put on a desk like a regular notebook, the cable is incomodating.
Send via email
The send via email functionality cannot customize the send email address.
It will always send the notes from my@remarkable.com.
If you want to send your notes to a friend or colleague directly, it very likely will end up in spam.
I still spend a large amount of time in the terminal, where I mainly work with Zsh, Terminator and Vim.
Having a uniform look makes switching between the environments more smoothly.
The theme can be easily installed for vim as descibed here,
using your favorite plugin manager.
Plugin 'NLKNguyen/papercolor-theme'
How does it look in Vim?
Like this!
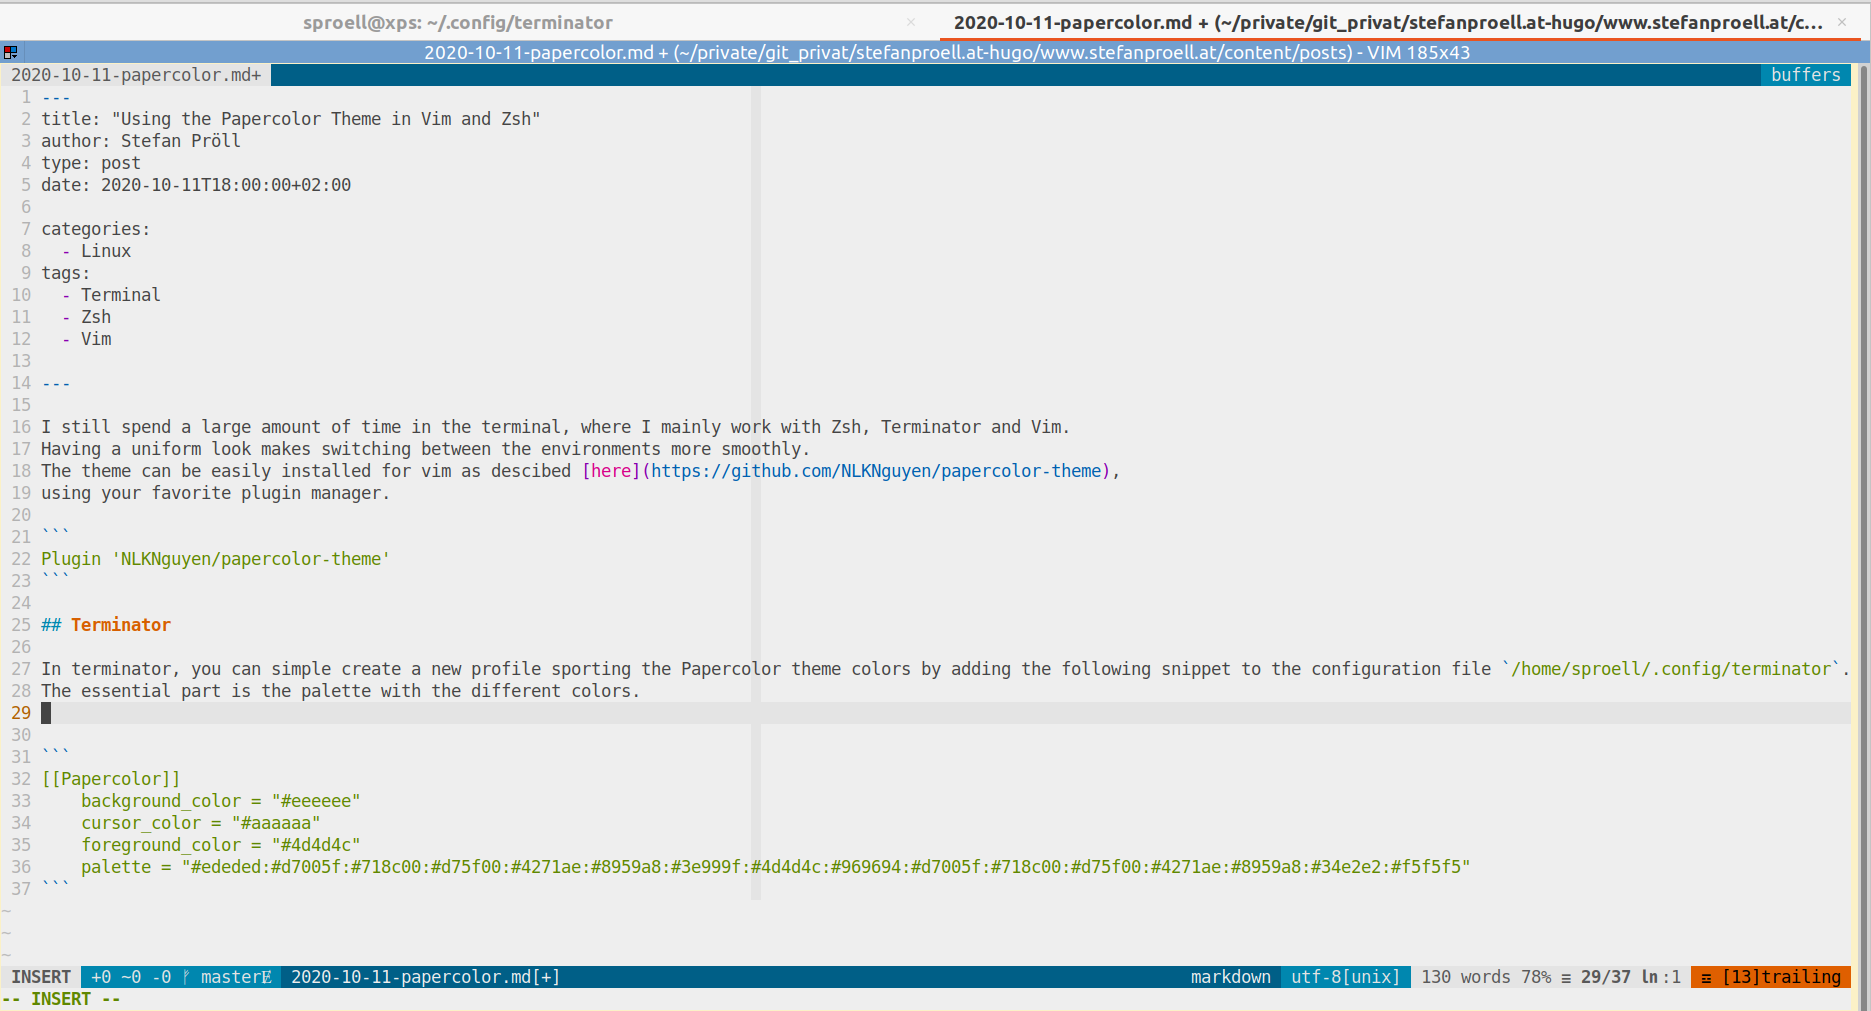
Terminator
In terminator, you can simple create a new profile sporting the Papercolor theme colors by adding the following snippet to the configuration file /home/sproell/.config/terminator.
The essential part is the palette with the different colors.
A small hint that is not obvious when working with Integers in MySQL.
All Integer types in MySQL have a fixed size.
This size determines the lower and upper bound of the integer the field can store.
You can have signed and unsigned integers, which make this range larger
(unsigned) or smaller, because you can also store negative Integers (signed).
In either case, the number M in the definition var INT(M) does not
limit the actual stored or storable length at all. It is only for
display and to indicate developers what kind of length one would expect.
It is not a technical constraint.
Only the type is (tiniyint, smallint, bigint, etc).
An example using INT(1)
All integer types have a defined range, you can find it in the official
documentation.
The maximum value for signed integers is 2147483647 and for TINYINT
it is 127.
If we define an INT(1) the number in the brackets only show how many
digits will be displayed when padded with 0.
DROP TABLE my_numbers;
CREATE TABLE my_numbers (
    integerNumber INT(1),
    tinyIntegerNumber TINYINT(1)
) ENGINE InnoDB;

# Max value for integers is 2147483647 and for TINYINT it is 127
INSERT INTO my_numbers(integerNumber, tinyIntegerNumber) VALUES (2147483647, 127);
SELECT * FROM my_numbers;
# Query OK, 1 row affected (0.005 sec)
#
# root@local> SELECT * FROM my_numbers;
# +---------------+-------------------+
# | integerNumber | tinyIntegerNumber |
# +---------------+-------------------+
# |    2147483647 |               127 |
# +---------------+-------------------+
# 1 row in set (0.000 sec)
#
As you can see the table stored both max values although we used
INT(1).
This exists only because if the database knows how long a number
typically is, it can padd it with zeros (if it is told to do so).
Padding with zeros
In the following example, we will padd integers with zero values from
the left.
Then the setting does have an effect in some clients.
The official and the MariaDB command line clients display the leading zeros.
Other clients like IntelliJ do not display them.
DROP TABLE IF EXISTS  my_padded_numbers;
CREATE TABLE my_padded_numbers (
    integerNumber INT(64) ZEROFILL,
    tinyIntegerNumber TINYINT(8) ZEROFILL
) ENGINE InnoDB;
# Max value for integers is 2147483647 and for TINYINT it is 127
INSERT INTO my_padded_numbers(integerNumber, tinyIntegerNumber) VALUES (123, 42);
SELECT * FROM my_padded_numbers;
# root@local> INSERT INTO my_padded_numbers(integerNumber, tinyIntegerNumber) VALUES (123, 42);
# Query OK, 1 row affected (0.004 sec)
#
# root@local> SELECT * FROM my_padded_numbers;
# +------------------------------------------------------------------+-------------------+
# | integerNumber                                                    | tinyIntegerNumber |
# +------------------------------------------------------------------+-------------------+
# | 0000000000000000000000000000000000000000000000000000000000000123 |          00000042 |
# +------------------------------------------------------------------+-------------------+
# 1 row in set (0.001 sec)
Conclusion
The M value for declaring integers has nothing to do with the length.
This is different when working with VARCHAR for instance, where the
number in the brackets indeed defines the maximum capacity.
The Synology devices are easy to setup but the backup applications are not that great.
In addition, Synology does not offer SSH key based authentication for non-privileged accounts out of the box.
After each upgrade the SSH key setup might be gone and it always feels like a hack.
The following text describes how to setup painless, automated, encrypted, incremental backups via CIFS using Restic.
The script makes use of passwords stored in the gnome keyring and thus can mount a CIFS aka Samba share without having to store the Synology user password
in the /etc/fstab file or in the clear in a local file.
restic is a program that does backups right. The design goals are:
Easy: Doing backups should be a frictionless process, otherwise you are tempted to skip it. Restic should be easy to configure and use, so that in the unlikely event of a data loss you can just restore it. Likewise, restoring data should not be complicated.
Fast: Backing up your data with restic should only be limited by your network or hard disk bandwidth so that you can backup your files every day. Nobody does backups if it takes too much time. Restoring backups should only transfer data that is needed for the files that are to be restored, so that this process is also fast.
Verifiable: Much more important than backup is restore, so restic enables you to easily verify that all data can be restored.
Secure: Restic uses cryptography to guarantee confidentiality and integrity of your data. The location where the backup data is stored is assumed to be an untrusted environment (e.g. a shared space where others like system administrators are able to access your backups). Restic is built to secure your data against such attackers, by encrypting it with AES-256 in counter mode and authenticating it using Poly1305-AES.
Efficient: With the growth of data, additional snapshots should only take the storage of the actual increment. Even more, duplicate data should be de-duplicated before it is actually written to the storage backend to save precious backup space.
Free: restic is free software and licensed under the BSD 2-Clause License and actively developed on GitHub.
The pre-requisits
We need the following things beforewe can start the backup:
A Synology user account
Restic installed on the local machine
The username and password stored in the Gnome keyring using the secret-tool
An initialized restic repository
The repository password stored in the Gnome key ring
The prerequisits are rather easy to setup.
We need to add the username and password once to the Gnome keyring.
We can use a label and some attributes.
The attributes are used for finding the username and password again in the key ring.
secret-tool store --label="Synology username" synology username
Our user should also be able to mount the remote folder.
One wayt to achieve this is by allowing the user to use sudo without a password for the mount and unmount command.
This can be done by adding the following line to the sudoers file:
stefan ALL=(ALL) NOPASSWD: /usr/bin/mount, /usr/bin/umount, /usr/bin/mkdir, /usr/bin/chown
In order to be mindfiul about the used storage, we will prune snapshots after a while.
# Prune older snapshots but keep 2 pe day, 7 days and 4 weeks
restic -r ${SYNOLOGY_BACKUP_PATH} \
forget \
--prune \
--keep-hourly 2 \
--keep-daily 7 \
--keep-weekly 4
The automation part is done by a classic cron job which runs for instance every 4 hours.
The prerequisits are described in the comments of the script below.
The backup script
The following script will backup the folders and files listed in the backup command.
#!/usr/bin/env bash
# exit when any command fails
set -e
# The following script assumes that you initialized the directory $SYNOLOGY_BACKUP_PATH
# on the Synology as a new restic repository:
# restic -r ${SYNOLOGY_BACKUP_PATH} init
# Make sure to add the username and the password first to the key ring
# secret-tool store --label="Synology username" synology username
# secret-tool store --label="Synology password" synology password
# Also add the restic password to the keyring
# secret-tool store --label="Restic password" restic password
# Add the mount and umount command without sudo password
# by using sudo visudo and add this line (adapt username)
# sproell ALL=(ALL) NOPASSWD: /usr/bin/mount, /usr/bin/umount, /usr/bin/mkdir, /usr/bin/chown
# Add a cron job which runs every 4 hours (for example)
# MAILTO="stefan.proell@cropster.com"
# 0 */4 * * * DISPLAY=:0 /home/sproell/scripts/automatic-restic-backup.sh
NAS_IP=192.168.1.10
BACKUP_MOUNT_TARGET=/media/${USER}/cropster-synology-backup
SYNOLOGY_PATH=/home
SYNOLOGY_BACKUP_PATH="${BACKUP_MOUNT_TARGET}/2020-restic-backups"
LOCAL_USER_ID=$( id -u )
LOCAL_GROUP_ID=$( id -g )
isPathMounted() { findmnt -rno TARGET "$1" >/dev/null;}
runResticBackup()
{
# Store the repository password in the environment variable
RESTIC_PASSWORD=$( secret-tool lookup restic password )
export RESTIC_PASSWORD
# Check of the remote directory exists, otherwise create it
[ -d ${SYNOLOGY_BACKUP_PATH} ] || ( \
sudo mkdir ${SYNOLOGY_BACKUP_PATH};\
sudo chown -R ${LOCAL_USER_ID}:${LOCAL_GROUP_ID} \
${SYNOLOGY_BACKUP_PATH})
restic -r ${SYNOLOGY_BACKUP_PATH} snapshots
restic -r ${SYNOLOGY_BACKUP_PATH} backup \
      ~/git \
      ~/.aliases \
      ~/.zshrc \
      ~/.bashrc \
      ~/.vimrc \
      ~/.ssh
 # Prune older snapshots but keep 2 pe day, 7 days and 4 weeks
    restic -r ${SYNOLOGY_BACKUP_PATH} \
      forget \
      --prune \
      --keep-hourly 2 \
      --keep-daily 7 \
      --keep-weekly 4
sudo umount ${BACKUP_MOUNT_TARGET}
unset RESTIC_PASSWORD
unset SYNO_PASS
}
echo "Current date: $( date )"
# Can I ping the nas?
echo "Pinging the NAS 10 times"
ping -c 10 $NAS_IP > /dev/null && echo "up... proceeding" || ( echo "NAS down.";exit 1)
# Get username and password from key chain
SYNO_USER=$( secret-tool lookup synology username )
SYNO_PASS=$( secret-tool lookup synology password )
if isPathMounted "${BACKUP_MOUNT_TARGET}";
then
echo "${BACKUP_MOUNT_TARGET} is mounted"
else
# Check if the directory exists locally, otherwise create it
[ -d ${BACKUP_MOUNT_TARGET} ] || sudo mkdir ${BACKUP_MOUNT_TARGET}
sudo mount -t cifs \
-o username=${SYNO_USER},password="${SYNO_PASS}",vers=2.0,uid=${LOCAL_USER_ID},gid=${LOCAL_GROUP_ID},noauto,user \
"//192.168.1.10${SYNOLOGY_PATH}/" \
"${BACKUP_MOUNT_TARGET}"
fi
runResticBackup
if isPathMounted "${BACKUP_MOUNT_TARGET}";
then
sudo umount ${BACKUP_MOUNT_TARGET}
fi
Ubuntu 20.04 updated some security policies which has the effect that some connections might not work anymore.
This happened for instance with connections to AWS Aurora 5.6 recently.
Background
AWS Aurora 5.6 only supports TLSv1 for encrypted connection.
This TLS protocol version is considered insecure for some time now and has been
disabled in Ubuntu 20.04 and MySQL Client 8 respectively.
If MySQL configuration permits TLSv1, TLSv1.1, and TLSv1.2, but your host system configuration permits only connections that use TLSv1.3 or higher, you cannot establish MySQL connections at all, because no protocol permitted by MySQL is permitted by the host system.
The problem manifests itself in the following error:
You can see the supported version on the MySQL server using
SHOW GLOBAL VARIABLES LIKE 'tls_version';
Specifying the protocol version explicitly did not help:
mysql --defaults-extra-file=~/.aws_mysql_aurora --tls-version=TLSv1
The (bug report)[https://bugs.launchpad.net/ubuntu/+source/mysql-8.0/+bug/1872541/comments/27] is also reflected in the official docs, but siumply copying the suggested fix won’t do.
Example of the problem
The following python snippet throws a protocol error with Ubuntu 20.4.
import mysql.connector
from mysql.connector import ClientFlag

config = {
    'user': 'me',
    'password': 'secret',
    'host': '127.0.0.1',
    'port': '3306',
    'database': 'sakila',
    'raise_on_warnings': True,
    'client_flags': [ClientFlag.SSL]
}

cnx = mysql.connector.connect(**config)
cur = cnx.cursor(buffered=True)
cur.execute("SHOW STATUS LIKE 'Ssl_cipher'")
print(cur.fetchone())
cur.close()
cnx.close()
The error thrown by Python is
mysql.connector.errors.InterfaceError: 2055: Lost connection to MySQL server at '127.0.0.1:8001', system error: 1 [SSL: UNSUPPORTED_PROTOCOL] unsupported protocol (_ssl.c:1108)
The quick fix
It is possible to lower the TLS version requirements in the openssl config of Ubuntu.
But in order for this to work with Aurora 5.6, you need to lower the TLS version to TLSv1.
This can be achieved by adapting the OpenSSL settings in /etc/ssl/openssl.cnf.
This lowers the allower TLS version tro TLSv1 again.
Now the python script from above can be executed.
Proper fix
The solution above can also be used by applying the SSL configuration only to the current script and not the whole operating system.
This is of course the wiser plan and should therefore be used.
In order to use TLSv1 with Python you can
Create a virtual environment with proper versions for the relevant packages
Load the openssl configuration from above as an environment file
Requirements for Python
The following dependencies can be defined in a requirements.txt file.
In order to connect you need to set the following environment variables.
Make sure to use a full path for the openssl.cfg file.
You can write those variables into a file called .venv and then source it: source .venv.
Note that this is obviously sensitive data.
The same method also works when you set the environment variables in the run / debug configuration of IntelliJ.
You need to make sure that you use the right venv as interpreted for the project.
Create a new virtual environment venv using make venv
Set this environment as the interpreter of this project: File –> Project Structure –> Project SDK
Create a new run / debug configuration and add the environment variables from above
Make sure the run configuration uses the SDK
Python Example
Then you can use the following snippet.
import mysql.connector
import sqlalchemy as sqlalchemy
from mysql.connector.constants import ClientFlag
import pandas as pd

import logging
logging.basicConfig(
    format='%(asctime)s %(levelname)-8s %(message)s',
    level=logging.INFO,
    datefmt='%Y-%m-%d %H:%M:%S')

sql_query = """
SELECT
    last_name
FROM sakila.actor
ORDER BY actor_id DESC
LIMIT 10
"""

def get_connection_config():
    """
    OPENSSL_CONF=/full/path/to/config/openssl.cfg
    DB_HOST=127.0.0.1
    DB_PORT=3306
    DB_USER=alice
    DB_PASSWORD=SECRET
    DB_NAME=sakila

    :return: db_config_dict
    """
    if(os.getenv('DB_PASSWORD') != None):
        mysql_config = {
            'host': os.getenv('DB_HOST'),
            'port': os.getenv('DB_PORT'),
            'user': os.getenv('DB_USER'),
            'password': os.getenv('DB_PASSWORD'),
            'database': os.getenv('DB_NAME'),
            'client_flags': [ClientFlag.SSL]
        }
        return mysql_config
    else:
        print("You need to set the env variables")
        exit(1)

if __name__ == "__main__":
    mysql_config = get_connection_config()

    """Use a cursor object

    You can retrieve data by using a cursor object and iterate over the results.
    Close cursors and connections when done.
    """

    mysql_connection = mysql.connector.connect(**mysql_config)

    cursor = mysql_connection.cursor()
    cursor.execute(sql_query)

    for (_username) in cursor:
        logging.info("Actor: {}".format(last_name))

    cursor.close()
    mysql_connection.close()

    """Use Pandas for retrieving data

    The more convenient way of retrieving data is to use Pandas.
    It will return a data frame and you can easily paginate large result sets in a loop.

    """
    mysql_connection = mysql.connector.connect(**mysql_config)
    for chunk in pd.read_sql_query(con=mysql_connection, sql=sql_query, chunksize = 5):
        logging.info("last_name: {}".format(chunk['last_name']))

    exit(0)
If the hack above should not work, what will help is downgrading the MySQL Client to the Version 5.7.
I downloaded the bundle from here and unpacked it.
Then I installed the following packages:
Then I could connect again without any extra settings and flags.
Update 2020-10-14
The workaround stopped to function for some reason.
I then found this trick described here which offers a temporary fix.
It uses a local configuration file for openssl.
This file can then be used for single commands by prefixing the variable.
Save the configuration below in a file, for instance ~/.openssl_allow_tls1.0.cnf.
and then export this in a terminal export OPENSSL_CONF=~/configurations/ssl/openssl_allow_tls1.0.cnf.
Update 2020-10-19
If you need to update your system, make sure to hold the installed MySQL 5.7 version of the client.
You could see which version would be installed if you would upgrade now: