Connecting to MySQL 5.6 using TLSv1 on Ubuntu 20.04.1
Ubuntu 20.04 updated some security policies which has the effect that some connections might not work anymore. This happened for instance with connections to AWS Aurora 5.6 recently.
Background
AWS Aurora 5.6 only supports TLSv1 for encrypted connection.
This TLS protocol version is considered insecure for some time now and has been disabled in Ubuntu 20.04 and MySQL Client 8 respectively. If MySQL configuration permits TLSv1, TLSv1.1, and TLSv1.2, but your host system configuration permits only connections that use TLSv1.3 or higher, you cannot establish MySQL connections at all, because no protocol permitted by MySQL is permitted by the host system. The problem manifests itself in the following error:
ERROR 2026 (HY000): SSL connection error: error:1425F102:SSL routines:ssl_choose_client_version:unsupported protocol
You can see the supported version on the MySQL server using
SHOW GLOBAL VARIABLES LIKE 'tls_version';
Specifying the protocol version explicitly did not help:
mysql --defaults-extra-file=~/.aws_mysql_aurora --tls-version=TLSv1
The (bug report)[https://bugs.launchpad.net/ubuntu/+source/mysql-8.0/+bug/1872541/comments/27] is also reflected in the official docs, but siumply copying the suggested fix won’t do.
Example of the problem
The following python snippet throws a protocol error with Ubuntu 20.4.
import mysql.connector
from mysql.connector import ClientFlag

config = {
    'user': 'me',
    'password': 'secret',
    'host': '127.0.0.1',
    'port': '3306',
    'database': 'sakila',
    'raise_on_warnings': True,
    'client_flags': [ClientFlag.SSL]
}

cnx = mysql.connector.connect(**config)
cur = cnx.cursor(buffered=True)
cur.execute("SHOW STATUS LIKE 'Ssl_cipher'")
print(cur.fetchone())
cur.close()
cnx.close()
The error thrown by Python is
mysql.connector.errors.InterfaceError: 2055: Lost connection to MySQL server at '127.0.0.1:8001', system error: 1 [SSL: UNSUPPORTED_PROTOCOL] unsupported protocol (_ssl.c:1108)
The quick fix
It is possible to lower the TLS version requirements in the openssl config of Ubuntu.
But in order for this to work with Aurora 5.6, you need to lower the TLS version to TLSv1.
This can be achieved by adapting the OpenSSL settings in /etc/ssl/openssl.cnf.
First add a default section on top of the file:
openssl_conf = default_conf
and then at the end of the file add:
[ default_conf ]

ssl_conf = ssl_sect

[ssl_sect]

system_default = system_default_sect

[system_default_sect]
MinProtocol = TLSv1
MaxProtocol = None
CipherString = DEFAULT:@SECLEVEL=1
This lowers the allower TLS version tro TLSv1 again. Now the python script from above can be executed.
Proper fix
The solution above can also be used by applying the SSL configuration only to the current script and not the whole operating system. This is of course the wiser plan and should therefore be used. In order to use TLSv1 with Python you can
- Create a virtual environment with proper versions for the relevant packages
- Load the openssl configuration from above as an environment file
Requirements for Python
The following dependencies can be defined in a requirements.txt file.
mysql-connector-python==8.0.22
pandas==1.2.0
pkg-resources==0.0.0
SQLAlchemy==1.3.22
Virtual Environment
You can also use the following snippet for a Makefile to create the virtual environment. My colleague Jonas suggested the following code:
venv: requirements.txt
	test -d venv || python3 -m venv venv
	venv/bin/pip3 install --upgrade pip setuptools
	venv/bin/pip3 install -Ur requirements.txt
	touch venv/bin/activate
Environment Variables in the Terminal
In order to connect you need to set the following environment variables.
Make sure to use a full path for the openssl.cfg file.
You can write those variables into a file called .venv and then source it: source .venv.
Note that this is obviously sensitive data.
export OPENSSL_CONF=/full/path/to/config/openssl.cfg
export DB_HOST=127.0.0.1
export DB_PORT=3306
export DB_USER=alice
export DB_PASSWORD=SECRET
export DB_NAME=sakila
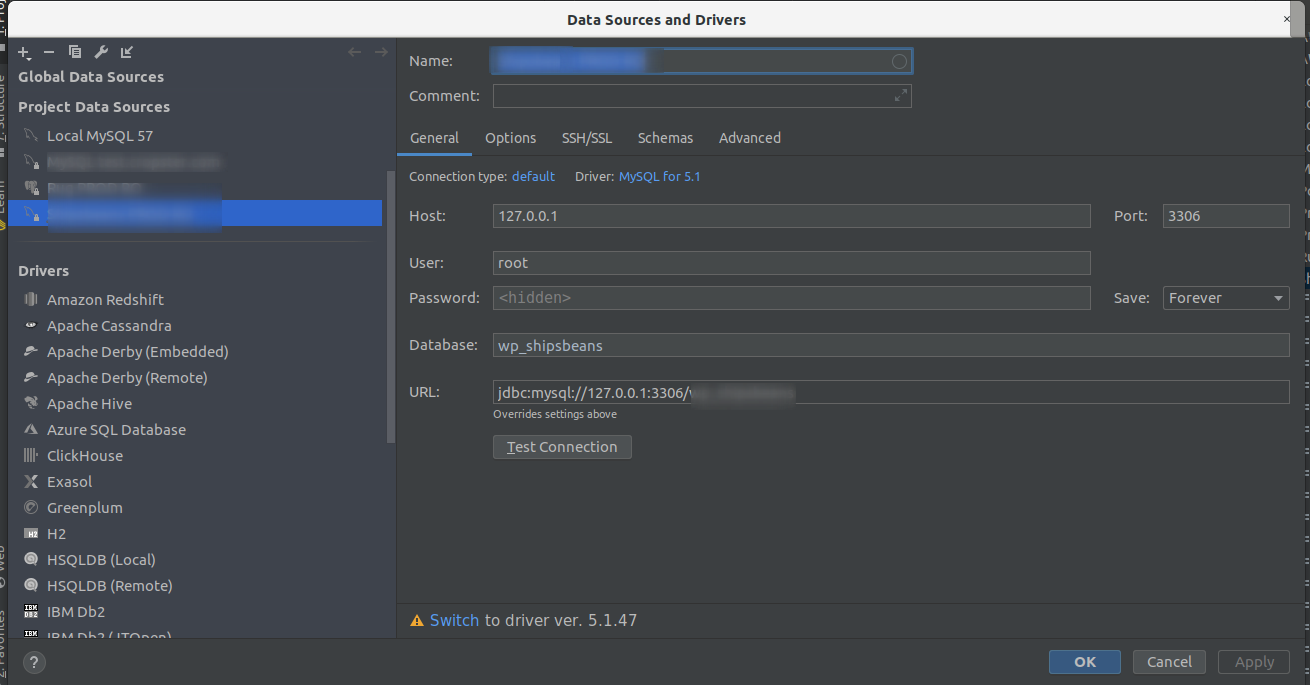
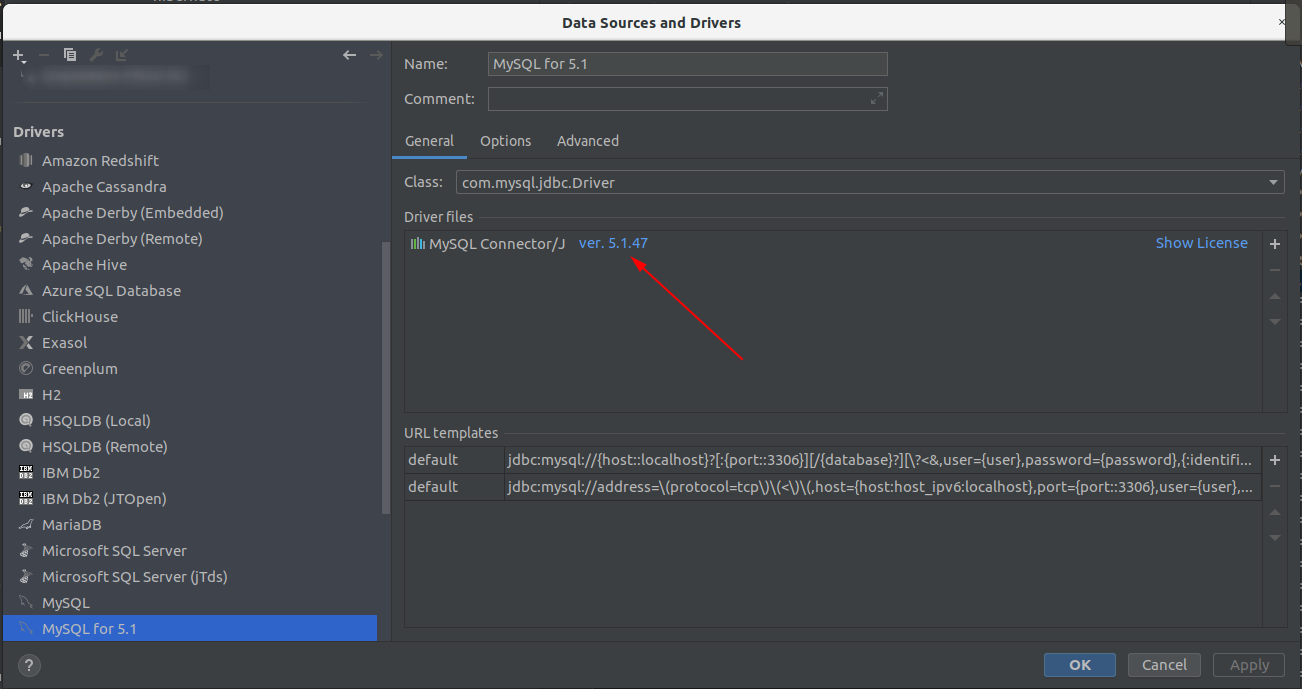
Environment Variables in IntelliJ
The same method also works when you set the environment variables in the run / debug configuration of IntelliJ.
You need to make sure that you use the right venv as interpreted for the project.
- Create a new virtual environment
venvusingmake venv - Set this environment as the interpreter of this project: File –> Project Structure –> Project SDK
- Create a new run / debug configuration and add the environment variables from above
- Make sure the run configuration uses the SDK
Python Example
Then you can use the following snippet.
import mysql.connector
import sqlalchemy as sqlalchemy
from mysql.connector.constants import ClientFlag
import pandas as pd

import logging
logging.basicConfig(
    format='%(asctime)s %(levelname)-8s %(message)s',
    level=logging.INFO,
    datefmt='%Y-%m-%d %H:%M:%S')

sql_query = """
SELECT
    last_name
FROM sakila.actor
ORDER BY actor_id DESC
LIMIT 10
"""

def get_connection_config():
    """
    OPENSSL_CONF=/full/path/to/config/openssl.cfg
    DB_HOST=127.0.0.1
    DB_PORT=3306
    DB_USER=alice
    DB_PASSWORD=SECRET
    DB_NAME=sakila

    :return: db_config_dict
    """
    if(os.getenv('DB_PASSWORD') != None):
        mysql_config = {
            'host': os.getenv('DB_HOST'),
            'port': os.getenv('DB_PORT'),
            'user': os.getenv('DB_USER'),
            'password': os.getenv('DB_PASSWORD'),
            'database': os.getenv('DB_NAME'),
            'client_flags': [ClientFlag.SSL]
        }
        return mysql_config
    else:
        print("You need to set the env variables")
        exit(1)

if __name__ == "__main__":
    mysql_config = get_connection_config()

    """Use a cursor object

    You can retrieve data by using a cursor object and iterate over the results.
    Close cursors and connections when done.
    """

    mysql_connection = mysql.connector.connect(**mysql_config)

    cursor = mysql_connection.cursor()
    cursor.execute(sql_query)

    for (_username) in cursor:
        logging.info("Actor: {}".format(last_name))

    cursor.close()
    mysql_connection.close()

    """Use Pandas for retrieving data

    The more convenient way of retrieving data is to use Pandas.
    It will return a data frame and you can easily paginate large result sets in a loop.

    """
    mysql_connection = mysql.connector.connect(**mysql_config)
    for chunk in pd.read_sql_query(con=mysql_connection, sql=sql_query, chunksize = 5):
        logging.info("last_name: {}".format(chunk['last_name']))

    exit(0)
You can find the code also at my Github repository.
Workaround
If the hack above should not work, what will help is downgrading the MySQL Client to the Version 5.7. I downloaded the bundle from here and unpacked it. Then I installed the following packages:
sudo apt-get install libtinfo5 libaio1
sudo dpkg -i mysql-common_5.7.31-1ubuntu18.04_amd64.deb
sudo dpkg -i mysql-community-client_5.7.31-1ubuntu18.04_amd64.deb
Then I could connect again without any extra settings and flags.
Update 2020-10-14
The workaround stopped to function for some reason.
I then found this trick described here which offers a temporary fix.
It uses a local configuration file for openssl.
This file can then be used for single commands by prefixing the variable.
Save the configuration below in a file, for instance ~/.openssl_allow_tls1.0.cnf.
openssl_conf = openssl_init

[openssl_init]
ssl_conf = ssl_sect

[ssl_sect]
system_default = system_default_sect

[system_default_sect]
CipherString = DEFAULT@SECLEVEL=1
and then export this in a terminal export OPENSSL_CONF=~/configurations/ssl/openssl_allow_tls1.0.cnf.
Update 2020-10-19
If you need to update your system, make sure to hold the installed MySQL 5.7 version of the client. You could see which version would be installed if you would upgrade now:
$ apt-cache policy mysql-community-client mysql-common

mysql-community-client:
  Installed: 5.7.31-1ubuntu18.04
  Candidate: 8.0.22-1ubuntu20.04
  Version table:
     8.0.22-1ubuntu20.04 500
        500 http://repo.mysql.com/apt/ubuntu focal/mysql-8.0 amd64 Packages
 *** 5.7.31-1ubuntu18.04 100
        100 /var/lib/dpkg/status
mysql-common:
  Installed: 5.7.31-1ubuntu18.04
  Candidate: 8.0.22-1ubuntu20.04
  Version table:
     8.0.22-1ubuntu20.04 500
        500 http://repo.mysql.com/apt/ubuntu focal/mysql-8.0 amd64 Packages
     5.8+1.0.5ubuntu2 500
        500 http://at.archive.ubuntu.com/ubuntu focal/main amd64 Packages
        500 http://at.archive.ubuntu.com/ubuntu focal/main i386 Packages
 *** 5.7.31-1ubuntu18.04 100
        100 /var/lib/dpkg/status
Then you can pin the version to 5.7 using a wildcard *1 by adding the packages to /etc/apt/preferences.
Package: mysql-common
Pin: version 5.7.*
Pin-Priority: 1001

Package: mysql-community-client
Pin: version 5.7.*
Pin-Priority: 1001

Package: libmysqlclient21
Pin: version 5.7.*
Pin-Priority: 1001