Security

AWS SSM and the kex_exchange_identification problem

Recently I had to setup a new laptop and forgot that the SSM feature of the AWS CLI requires an additional (and denoted optional) plugin to be installed. This SSM plugin plugin can be obtained here. It took my quite a while to find out that the missing plugin is the source of this rather obscure SSH client error message.

kex_exchange_identification: Connection closed by remote host
Connection closed by UNKNOWN port 65535

Since there were some changes regarding supported ciphers and other versions of the involved tools, I was digging down the wrong holes. Installing the plugin fixed it.

Using Balena and Nginx Proxy Manager to secure a Webcam

I have an old Web cam which does not support HTTPS and where the dynamic IP resolver service of the manufacturer stopped working some years ago. The camera uses an UMTS hotspot to connect to the Internet and gets a new IP address every now and then. Graciously the camera would send out an email with it’s new IP address after every reboot, however I then would have to update this address manually in the surveilance app each time. Since the camera is working fine, I wanted to put it behind a HTTPS proxy and use DuckDNS to have a domain pointing to it. An old Raspberry Pi 3 serves as the hardware basis for this project.

Idea and Requirements

I want to have a secure conection using HTTPS to the Web interface of the webcam. Since the camera has a dynamic IP address, I want to register a domain with DuckDNS to provide a stable entrypoint. In order for this to work, the UMTS provider needs to allow ingres traffic to the SIM card. In Austria, only the provider Drei offers this as far as I found out.

We will use BalenaOS to provision the Raspberry Pi, because it will be located at a remote location and I want easy access. We need the following parts:

  • UMTS modem with Wifi
  • Webcam
  • Raspberry Pi 3 with 16GB storage card
  • Balena Cloud
  • Nginx Proxy Manager container
  • Duck DNS service container

Setup using Balena Cloud

The first step is to register for Balena Cloud. Up to 10 devices can be deployed free of charge. The documentation of Balena is excellent and provides a great onboarding experience. After creating a fleet, I added the Raspberry Pi as a new device and entered the basic wifi details.

The Device Registration Dialog

The Device Registration Dialog

Afterwards you can download a custom image of BalenaOS and flash it on the SD card using the USB startup disk creator tool that comes with Ubuntu. After waiting for some minutes, the device should show up in the Balena Cloud interface.

The Fleet

The Fleet

Then you need to install the Balena CLI and add the binary to the path. You can then login using the CLI by typing balena login. Enter your credentials are you are good to go. For testing you can retrieve the fleets and devices: balena fleets You should see the previously registered Raspberry Pi.

Network Setup

For testing I used my regular wifi network and I also have the battery powered UMTS Wifi modem activated. In order to add a second wifi network and to have a fallback wifi, you need to modify the configuration files. This can be easily done using the built in terminal of Balena Cloud.

The Fleet

The Fleet

The networking configuration templates can be found in /mnt/boot/system-connections/. The actual configuration is stored in /etc/NetworkManager/system-connections/, but these files will be overwritten by the configuration stored in /mnt/boot/system-connections/ after every reboot. This the latter is the right place to edit the network configuration.

Make sure to append a .ignore to all the connections you do not need. I created two files. The file balena-wifi-0-umts contains the configuration for the wifi of the UMTS modem while the file balena-wifi-1-home contains the configuration for my home network. When the umts wifi is available, this should be the preferred network, the fallback is the home network.

The UMTS Wifi

The wifi network the camera will use in the wild is powered by a small HUAWAI UMTS modem with Wifi capabilities. I assigned a static IPv4 and I set the priority in order to select this network first. The important part for this is the setting in the connection section.

autoconnect=TRUE
autoconnect-priority=2

The static IP is defined in the IPv4 section. I assign the static address 192.168.1.3 and the gateway is 192.168.1.1.

address1=192.168.1.3/24,192.168.1.1
dns=8.8.8.8;8.8.4.4;

This is the complete configuration is below.

[connection]
id=balena-wifi-umts
type=wifi
autoconnect=TRUE
autoconnect-priority=2

[wifi]
hidden=true
mode=infrastructure
ssid=HUAWEI

[ipv4]
address1=192.168.1.3/24,192.168.1.1
dns=8.8.8.8;8.8.4.4;
dns-search=
method=manual

[ipv6]
addr-gen-mode=stable-privacy
method=auto

[wifi-security]
auth-alg=open
key-mgmt=wpa-psk
psk=SECRET

The Home Network

My home network is just using DHCP.

[connection]
id=balena-wifi-home
type=wifi
autoconnect=TRUE
autoconnect-priority=1

[wifi]
hidden=true
mode=infrastructure
ssid=home

[ipv4]
method=auto

[ipv6]
addr-gen-mode=stable-privacy
method=auto

[wifi-security]
auth-alg=open
key-mgmt=wpa-psk
psk=DIFFERENT-SECRET

After a reboot, the device will pick the available network based on the priority. The network with the higher integer will be picked first.

Define the Containers

The grat thing about Balena is that it can run any Docker container. All you need to do is provid a docker-compose.yml file with the service definitions and push it to the cloud. The following compose file is pretty self explainatory.

version: '2.1'
volumes:
    datavolume:
    letsencryptvolume:
services:
  nginxproxymanager:
    image: 'jc21/nginx-proxy-manager:latest'
    restart: unless-stopped
    ports:
      - '80:80'
      - '81:81'
      - '443:443'
    volumes:
      - datavolume:/data
      - letsencryptvolume:/etc/letsencrypt
  duckdns:
    image: lscr.io/linuxserver/duckdns
    container_name: duckdns
    environment:
      - PUID=1000
      - PGID=1000
      - TZ=Europe/Vienna
      - LOG_FILE=false
    restart: unless-stopped

We define two services: Nginx Proxy Manager and DuckDNS.

DuckDNS

Duck DNS is a free DDNS service which will point a subdomain of duckdns.org our Raspberry Pi IP address, even when the Pi sits behind a NAT. All you need to do is to register a domain and note the token. In this tutorial, we will use the domain name example.duckdns.org, which is of course not my subdomain. In order to tell our Dockerized DuckDNS service which domain we have and what our token is, we need to add two device variables in Balena. Those variables will be injected into the container. Add the variables SUBDOMAINS and TOKEN there.

Duck DNS Configuration

Duck DNS Configuration

Restart the Raspberry Pi using the Balena interface in order to trigger the DNS update of the new IP address. The subdomain example.duckdns.org neets to point to your Raspberry before the next step.

Nginx Proxy Manager

The Nginx Proxy Manager (NPM) will respond to all requests via HTTPS and then forward the request to the actual target inside our protected network. This way we can serve services which do not offer HTTPS themselves still in a secure way. Nginx Proxy Manager uses Let’s Encrypt certificates.

After logging in for the first time, please set a good password. Then, create a new SSL Certificate and enter the DuckDNS domain and the token.

Obtain a Let’s Encrypt Certificate

Obtain a Let’s Encrypt Certificate

Then you can add the web cam as a new proxy host that should be served via the NPM. Here you need to add the Webcam’s IP address (not the Raspberry Pi’s one) and the port.

Define the Proxy Target

Define the Proxy Target

Enable the certificate we just created:

Assign the SSL Certificate

Assign the SSL Certificate

Firewall rules

In order for the web cam to become accessible, you need to allow traffic from the HTTPS port 443 to pass through.

Assign the SSL Certificate

Assign the SSL Certificate

Conclusion

Using Balena is a great way of deploying Docker containers on small IoT devices as the Raspberry Pi. Using these tools can upgrade an existing piece of hardware to become more secure and accessible. Of course you can use the same technique to expose all kinds of services via HTTPS behind a firewall.

Setup AWS MySQL 5.6 Aurora as a Slave for an external Master with SSL

Setting up Aurora as a slave for an external MySQL server that acts as the master is a bit tricky. Of course we want a secured connection. For this reason we need to create client certificates to be used by AWS RDS. The steps below should work for RDS as well.

Generate and Sign the Certificates

The process is actually simple, but AWS is picky how you generate the certificates. I was using a SHA flag that was accepted by a regular MySQL 5.6 instance, but caused a cryptic (pun intended) MySQL 2026 Generic SSL error and it was quite hard to find the source. Also note that you need to have different common names (CN) for all three certificate pairs. They do not necessarily need to fit the actual domain name, but they need to be different. 

First we need to create the certificate authority that can sign the keys

# Generate a certificate authority key pair
openssl genrsa 2048 > ca-key.pem
# Notice the CN name. It needs to be different for all of the three key pairs that we create!
openssl req -new -x509 -nodes -days 3600 -key ca-key.pem -out ca.pem -subj "/C=AT/ST=Tirol/L=Innsbruck/O=The Good Corp/OU=IT Department/CN=ca.mysql"

Then create the server key pair

#Generate a server key. Note again the different CN
openssl req -newkey rsa:2048 -days 3600 -nodes -keyout server-key.pem -out server-req.pem -subj "/C=AT/ST=Tirol/L=Innsbruck/O=The Good Corp/OU=IT Department/CN=server.mysql"
# Convert the format
openssl rsa -in server-key.pem -out server-key.pem
# Sign it
openssl x509 -req -in server-req.pem -days 3600 -CA ca.pem -CAkey ca-key.pem -set_serial 01 -out server-cert.pem

Finally we generate a client certificate and its key. You can repeat these steps to generate multiple certificates for clients

# Again, note the CN
openssl req -newkey rsa:2048 -days 3600 -nodes -keyout client-key.pem -out client-req.pem -subj "/C=AT/ST=Tirol/L=Innsbruck/O=The Good Corp/OU=IT Department/CN=client.mysql"
# Convert
openssl rsa -in client-key.pem -out client-key.pem
# Sign
openssl x509 -req -in client-req.pem -days 3600 -CA ca.pem -CAkey ca-key.pem -set_serial 01 -out client-cert.pem
# Verify
openssl verify -CAfile ca.pem server-cert.pem client-cert.pem

Now we have all the certs we need.

Master Setup

The setup is pretty standard. Add the server certificates to the MySQL configuration of your master and restart.

# SSL Server Certificate
ssl-ca=/etc/mysql/ssl/ca.pem
ssl-cert=/etc/mysql/ssl/server-cert.pem
ssl-key=/etc/mysql/ssl/server-key.pem

Then create a user for the slave

CREATE USER 'aws'@'%' IDENTIFIED BY 'SECRET';
GRANT REPLICATION CLIENT, REPLICATION SLAVE ON *.* TO 'aws'@'%' IDENTIFIED BY 'SECRET' REQUIRE SSL;```


# Slave Setup

On AWS you do not have SUPER() privileges, but can use stored procedures provided by Amazon to setup the slave.

Start fresh by removing old records. If there was no previous setup, there might be an error.

CALL mysql.rds_remove_binlog_ssl_material; CALL mysql.rds_reset_external_master;


Now you need to pass the client certificate data as a JSON to AWS Aurora.

CALL mysql.rds_import_binlog_ssl_material('{“ssl_ca”:"—–BEGIN CERTIFICATE—– MIIBAgMBVRpcm9sMRIw… … —–END CERTIFICATE—–\n”,“ssl_cert”:"—–BEGIN CERTIFICATE—– KAoIBAQCzn28awhyN8V56Z2bskCiMhJt4 … —–END CERTIFICATE—–\n”,“ssl_key”:"—–BEGIN RSA PRIVATE KEY—– SbeLNsRzrPoCVGGqwqR6gE6AZu … —–END RSA PRIVATE KEY—–"}');


A message that the SSL data was accepted will appear if you pasted the certificate, the key and the CA certificate correctly.

Finally, start the replication and check the status

CALL mysql.rds_start_replication; SHOW SLAVE STATUS\G```

Tests and Troubleshooting

On the master, you can check if the slave even tries to connect for instance with tcpdump. In the example below the IP 1.2.3.4 would be the AWS gateway address as seen by your firewall.

sudo tcpdump src host 1.2.3.4 -vv```


<div class="twttr_buttons">
  <div class="twttr_twitter">
    <a href="http://twitter.com/share?text=Setup+AWS+MySQL+5.6+Aurora+as+a+Slave+for+an+external+Master+with+SSL" class="twitter-share-button" data-via="" data-hashtags=""  data-size="default" data-url="https://blog.stefanproell.at/2018/11/30/setup-aws-mysql-5-6-aurora-as-a-slave-for-an-external-master-with-ssl/"  data-related="" target="_blank">Tweet</a>
  </div>
  
  <div class="twttr_followme">
    <a href="https://twitter.com/@stefanproell" class="twitter-follow-button" data-show-count="true" data-size="default"  data-show-screen-name="false"  target="_blank">Follow me</a>
  </div>
</div>

Jupyter docker stacks with a custom user

Jupyter allows to set a custom user instead of**_jovyan_** which is the default for all containers of the [Jupyter Docker Stack][1]. You need to change this user or its UID and GID in order to get the permissions right when you mount a volume from the host into the Jupyter container. The following steps are required:

  1. Create an unprivileged user and an asociated group on the host. Here we call the user and the group docker_worker
  2. Add your host user to the group. This gives you the permissions to modify and read the files also on the host. This is useful if your working directory on the hist is under source code control (eg. git)
  3. Launch the container with the correct settings that change the user inside the container

It is important to know that during the launch the container needs root privileges in order to change the settings in the mounted host volume and inside the container. After the permissions have been changed, the user is switched back and does not run with root privileges, but your new user. Thus make sure to secure your Docker service, as the permissions inside the container also apply to the host.

Prepare an unprivileged user on the host

1. sudo groupadd -g 1011 docker_worker
2. sudo useradd -s /bin/false -u 1010 -g 1020 docker_worker
3. Add your user to the group: sudo usermod -a -G docker_worker stefan```


# Docker-compose Caveats

It is important to know that docker-compose supports either an array or a dictionary for environment variables ([docs][2]). In the case below we use arrays and we quote all variables. If you accidentally use a dictionary, then the quotes would be passed along to the Jupyter script. You would then see this error message:&nbsp;

/usr/local/bin/start-notebook.sh: ignoring /usr/local/bin/start-notebook.d/* Set username to: docker_worker Changing ownership of /home/docker_worker to 1010:1020 chown: invalid user: ‘'-R’’```

The docker-compose file

version: '2'
services:
    datascience-notebook:
        image: jupyter/base-notebook:latest
        volumes:
            - /tmp/jupyter_test_dir:/home/docker_worker/work            
        ports:
            - 8891:8888
        command: "start-notebook.sh"
        user: root
        environment:
          NB_USER: 'docker_worker'
          NB_UID: 1010
          NB_GID: 1020
          CHOWN_HOME: 'yes'
          CHOWN_HOME_OPTS: -R```


Here you can see that we set the variables that cause the container to ditch jovyan in favor of docker_worker.

> NB\_USER: &#8216;docker\_worker&#8217;  
> NB_UID: 1010  
> NB_GID: 1020  
> CHOWN_HOME: &#8216;yes&#8217;  
> CHOWN\_HOME\_OPTS: -R

This facilitates easy version control of the working directory of Jupyter. I also added the snipped to my [Github Jupyter template][3].

<div class="twttr_buttons">
  <div class="twttr_twitter">
    <a href="http://twitter.com/share?text=Jupyter+docker+stacks+with+a+custom+user" class="twitter-share-button" data-via="" data-hashtags=""  data-size="default" data-url="https://blog.stefanproell.at/2018/08/08/jupyter-docker-stacks-with-a-custom-user/"  data-related="" target="_blank">Tweet</a>
  </div>
  
  <div class="twttr_followme">
    <a href="https://twitter.com/@stefanproell" class="twitter-follow-button" data-show-count="true" data-size="default"  data-show-screen-name="false"  target="_blank">Follow me</a>
  </div>
</div>

 [1]: https://github.com/jupyter/docker-stacks
 [2]: https://docs.docker.com/compose/compose-file/#environment
 [3]: https://github.com/stefanproell/jupyter-notebook-docker-compose/blob/master/README.md

Deploying MySQL in a Local Development Environment

Installing MySQL via apt-get is a simple task, but the migration between different MySQL versions requires planning and testing. Thus installing one central instance of the database system might not be suitable, when the version of MySQL or project specific settings should be switched quickly without interfering with other applications. Using one central instance can quickly become cumbersome. In this article, I will describe how any number of MySQL instances can be stored and executed from within a user’s home directory.

Adapting MySQL Data an Log File Locations

Some scenarios might require to run several MySQL instances at once, other scenarios cover sensitive data, where we do not want MySQL to write any data on non-encrypted partitions. This is especially true for devices which can get easily stolen, for instance laptops. If you use a laptop for developing your applications from time to time, chances are good that you need to store sensitive data in a database, but need to make sure that the data is encrypted when at rest. The data stored in a database needs to be protected when at rest.

This can be solved with full disk encryption, but this technique has several disadvantages. First of all, full disk encryption only utilises one password. This entails, that several users who utilise a device need to share one password, which reduces the reliability of this approach. Also when the system needs to be rebooted, full disk encryption can become an obstacle, which increases the complexity further.

Way easier to use is the transparent home directory encryption, which can be selected during many modern Linux setup procedures out of the box. We will use this encryption type for this article, as it is reasonable secure and easy to setup. Our goal is to store all MySQL related data in the home directory and run MySQL with normal user privileges.

Creating the Directory Structure

The first step is creating a directory structure for storing the data. In this example, the user name is stefan, please adapt to your needs.

A MySQL 5.7 Cluster Based on Ubuntu 16.04 LTS – Part 2

In a recent article, I described how to setup a basic MySQL Cluster with two data nodes and a combined SQL and management node. In this article, I am going to highlight a hew more things and we are going to adapt the cluster a little bit.

Using Hostnames

For making our lives easier, we can use hostnames which are easier to remember than IP addresses. Hostnames can be specified for each VM in the file /etc/hosts. For each request to the hostname, the operating system will lookup the corresponding IP address. We need to change this file on all three nodes to the following example:

Encrypt a USB Drive (or any other partition) Using LUKS

Did you ever want to feel like secret agent or do you really need to transport and exchange sensitive data? Encrypting your data is not much effort and can be used to protect a pen drive or any partition and the data on it from unauthorized access. In the following example you see how to create an encrypted partition on a disk. Note two things: If you accidentally encrypt the wrong partition, the data is lost. For ever. So be careful when entering the commands below. Secondly, the method shown below only protects the data at rest. As soon as you decrypt and mount the device, the data can be read from everyone else if you do not use correct permissions.

Preparation

Prepare a mount point for your data and change ownership.

# Create a mount point
sudo mkdir /media/cryptoUSB
# Set permissions for the owner
sudo chown stefan:stefan /media/cryptoUSB

Create an Encrypted Device

Encrypt the device with LUKS. Note that all data on the partition will be overwritten during this process.

# Create encrypted device 
sudo cryptsetup --verify-passphrase luksFormat /dev/sdX -c aes -s 256 -h sha256

# From the man page:
       --cipher, -c 
              Set the cipher specification string.
       --key-size, -s 
              Sets  key  size in bits. The argument has to be a multiple of 8.
              The possible key-sizes are limited by the cipher and mode used.
       --verify-passphrase, -y
              When interactively asking for a passphrase, ask for it twice and
              complain  if  both  inputs do not match.
       --hash, -h 
              Specifies the passphrase hash for open (for  plain  and  loopaes
              device types).

# Open the Device
sudo cryptsetup luksOpen /dev/sdX cryptoUSB
# Create a file system (ext3)
sudo mkfs -t ext3 -m 1 -O dir_index,filetype,sparse_super /dev/mapper/cryptoUSB
# Add a label
sudo tune2fs -L Crypto-USB /dev/mapper/cryptoUSB
# Close the devicesudo cryptsetup luksClose cryptoUSB

Usage

The usage is pretty simple. With a GUI you will be prompted for decrypting the device. At the command line, use the following commads to open and decrypt the device.

# Open the Device
sudo cryptsetup luksOpen /dev/sdcX cryptoUSB
# Mount it
sudo mount /dev/mapper/cryptoUSB /media/cryptoUSB

When you are finished with your secret work, unmount and close the device properly.

sudo umount /media/cryptoUSB 
sudo cryptsetup luksClose cryptoUSB

Secure Automated Backups of a Linux Web Server with Rrsync and Passwordless Key Based Authentication

Backups Automated and Secure

Backing up data is an essential task, yet it can be cumbersome and requires some work. As most people are lazy and avoid tedious tasks wherever possible, automation is the key, as it allows us dealing with more interesting work instead. In this article, I describe how a Linux Web server can be backed up in a secure way by using restricted SSH access to the rsync tool. I found a great variety of useful blog posts, which I will reuse in this article.

This is what we want to achieve:

  • Secure data transfer via SSH
  • Passwordless authentication via keys
  • Restricted rsync access
  • Backup of all files by using a low privileged user

In this article, I will denote the client which should be backed up WebServer. The WebServer contains all the important data that we want to keep. The BackupServer is responsible for fetching the data in a pull manner from the WebServer.

On the BackupServer

On the BackupServer, we create a key pair without a password which we can use for authenticating with the WebServer. Details about passwordless authentication are given here.

# create a password less key pair
ssh-keygen -t rsa # The keys are named rsync-backup.key.public and rsync-backup.key.private

On the WebServer

We are going to allow a user who authenticated with her private key to rsync sensitive data from our WebServer to the BackupServer, This user should have a low privileged account and still being able to backup data which belongs to other users. This capability comes with a few security threats which need to be mitigated. The standard way to backup data is rsync. The tool can be potentially dangerous, as it allows the user to write data to an arbitrary location if not handled correctly. In order to deal with this issue, a restricted version of rsync exists, which locks the usage of the tool to a declared directory: rrsync.

Obtain Rrsync

You can obtain rrsync from the developer page or extract it from your Ubuntu/Debian distribution as described here. With the following command you can download the file from the Web page and store it as executable.

sudo wget https://ftp.samba.org/pub/unpacked/rsync/support/rrsync -O /usr/bin/rrsync
sudo chmod +x /usr/bin/rrsync

Add a Backup User

First, we create a new user and verify the permissions for the SSH directory.

sudo adduser rsync-backup # Add a new user and select a strong password
su rsync-backup # change into new account
ssh rsync-backup@localhost # ssh to some location e.g.  such that the .ssh directory is created
exit
chmod go-w ~/ # Set permissions
chmod 700 ~/.ssh
chmod 600 ~/.ssh/authorized_keys

Create a Read Only of the Data You Want to Backup

I got this concept from this blog post. As we want to backup also data from other users, our backup user (rsync-backup) needs to have read access to this data. As we do not want to change the permissions for the rsync-backup user directly in the file system, we use bindfs to create read only view of the data we want to backup. We will create a virtual directory containing all the other directories that we want to backup. This directory is called `/mnt/Backups-Rsync-Readonly`` . Instead of copying all the data into that directory, which would be a waste of space, we link all the other directories into the backup folder and then sync this folder to the BackupServer.

One Time Steps:

The following steps create the directory structure for the backup and set the links to the actual data that we want backup. With this method, we neither need root, sudo or any advanced permissions. We simply create a readonly view of the data where the only user with access is rsync-backup.

sudo apt-get install acl bindfs # Install packages
sudo mkdir /mnt/Backups-Rsync-Readonly # Create the base directory
sudo chown -R rsync-backup /mnt/Backups-Rsync-Readonly # Permissions
sudo mkdir /mnt/Backups-Rsync-Readonly/VAR-WWW # Create subdirectory for /var/www data
sudo mkdir /mnt/Backups-Rsync-Readonly/MySQL-Backups # Create subdirectory for MySQL Backups
sudo setfacl -m u:rsync-backup:rx /mnt/Backups-Rsync-Readonly/ # Set Access Control List permissions for read only
sudo setfacl -m u:rsync-backup:rx /mnt/Backups-Rsync-Readonly/MySQL-Backups
sudo setfacl -m u:rsync-backup:rx /mnt/Backups-Rsync-Readonly/VAR-WWW

Testrun

In order to use these directories, we need to mount the folders. We set the permissions for bindfs and establish the link between the data and our virtual backup folders.

sudo bindfs -o perms=0000:u=rD,force-user=rsync-backup /var/www /mnt/Backups-Rsync-Readonly/VAR-WWW
sudo bindfs -o perms=0000:u=rD,force-user=rsync-backup /Backup/MySQL-Dumps /mnt/Backups-Rsync-Readonly/MySQL-Backups

These commands mount the data directories and create a view. Note that these commands are only valid until you reboot. If the above works and the rsync-backup user can access the folder, you can add the mount points to fstab to automatically mount them at boot time. Unmount the folders before you continue with sudo umount /mnt/Backups-Rsync-Readonly/*  .

Permanently Add the Virtual Folders

You can add the folders to fstab like this:

# Backup bindfs 
/var/www    /mnt/Backups-Rsync-Readonly/VAR-WWW fuse.bindfs perms=0000:u=rD,force-user=rsync-backup 0   0
/Backups/MySQL-Dumps    /mnt/Backups-Rsync-Readonly/MySQL-Backups fuse.bindfs perms=0000:u=rD,force-user=rsync-backup 0   0

Remount the directories with sudo mount -a .

Adding the Keys

In the next step we add the public key from the BackupServer to the authorized_keys file from the rsync-backup user at the WebServer. On the BackupServer, cat the public key and copy the output to the clipboard.

ssh user@backupServer
cat rsync-backup.key.public

Switch to the WebServer and login as rsync-backup user. Then add the key to the file ~/.ssh/authorized_keys.
The file now looks similar like this:

ssh-rsa AAAAB3N ............ fFiUd rsync-backup@webServer```


We then prepend the key with the only command this user should be able to execute: rrsync. We add additional limitations for increasing the security of this account. We can provide an IP address and limit the command execution further. The final file contains the following information:

command=”/usr/bin/rrsync -ro /mnt/Backups-Rsync-Readonly”,from="192.168.0.10”,no-pty,no-agent-forwarding,no-port-forwarding,no-X11-forwarding ssh-rsa AAAAB3N ………… fFiUd rsync-backup@webServer


Now whenever the user rsync-backup connects, the only possible command is rrsync. Rrsync itself is limited to the directory provided and only has read access. We also verify the IP address and restrict the source of the command.

#### Hardening SSH

Additionall we can force the rsync-backup user to use the keybased authentication only. Additionally we set the IP address restriction for all SSH connections in the sshd_config as well.

AllowUsers rsync-backup@192.168.0.10 Match User rsync-backup PasswordAuthentication no


## Backing Up

Last but not least we can run the backup. To start synching we login into the BackupServer and execute the following command. There is no need to provide paths as the only valid path is already defined in the authorized_key file.

rsync -e “ssh -i /home/backup/.ssh/rsync-backup.key.private” -aLP  –chmod=Do+w rsync-backup@webServer: .


# Conclusion

This article covers how a backup user can create backups of data owned by other users without having write access to the data. The backup is transferred securely via SSH and can run unattended. The backup user is restricted to using rrsync only and we included IP address verification. The backup user can only create backups of directories we defined earlier.

Add your Spotify / Streaming Account to the Pi Musicbox in a Secure Way With Device Passwords

In a recent article I wrote about the old Raspberry Pi, which serves its duty as my daily Web radio. The Pi MusicBox natively supports a bunch of streaming services, which improves the experience if you already have a streaming account, by providing your custom playlists on any HDMI capable hifi system. Unfortunately, the passwords are stored in plaintext, which is not a recommended practice for sensitive information. Especially if you use your Facebook credentials for services such as Spotify.

Most streaming services offer device passwords, which are restricted accounts where you can assign a dedicated username and password. Having separate credentials in the form of API keys for your devices is good practices, as it does not allow a thief to get hold of your actual account password, but only read access to your playlists. Also Spotify provides device passwords, but at the time of writing of this article, the assignment of new passwords simply did not work. A little googling revealed that the only possible way at the moment is using Facebook and its device passwords for the service. As Spotify uses Facebooks Authentication service, the services can exchange information about authorized users.

In the Settings, go to the Security panel and create a new password for apps. Name the app accordingly and provide a unique password.

Then, open the Pi MusicBox interface and add the Emailaddress you registered with facebook and provide the newly created app password.

You can then enjoy your playlists in a secure way. You will receive a warning about the connection, which is an indicator that it worked.

A Reasonable Secure, Self-Hosted Password Database with Versioning and Remote Access

The average computer users needs to memorize at least 17 passwords for private accounts. Power users need to handle several additional accounts for work too and memorizing (good and complex) passwords quickly becomes a burden if not yet impossible. To overcome the memory issue, there exists a variety of tools, which allow to store passwords and associated metadata in password stores. Typically, a password manager application consists of a password file, which contains the passwords and the metadata in structured form, and an application, assisting the user in decrypting and encrypting the passwords. A typical example is Keepass, which is an open source password management application. Keypass uses a master password in order to encrypt the password file. An additional key file can be used in order to increase security by requiring a second factor to open the password database. There exists a very large variety of ports of this software, which allow to open, edit and store passwords on virtually any platform. As the passwords are stored in a single file, a versioning mechanism is required, which allows to track changes in the passwords on all devices and merge them together in order to keep the synchronized. There also exist online services which handle versioned password storage, but obviously this requires to give away sensitive information and to trust the provider for handling the passwords safely. Storing the encrypted password file in a cloud drive such as Dropbox, Google Drive or Microsoft Azure also solves the versioning issue partially, but still the data is out there on foreign servers. For this reason, the new Raspberry Pi Zero is a low cost, low power device, which can be turned into a privately managed and reasonable secure, versioned password store under your own control.

What is needed?

  1. A Raspberry Pi (in fact, a Linux system of any kind, in this example we use a new Zero Pi)
  2. Power supply
  3. SD micro card
  4. USB Hub
  5. Wifi Dongle
  6. USB Keyboard

Preparing the Raspberry Pi Zero

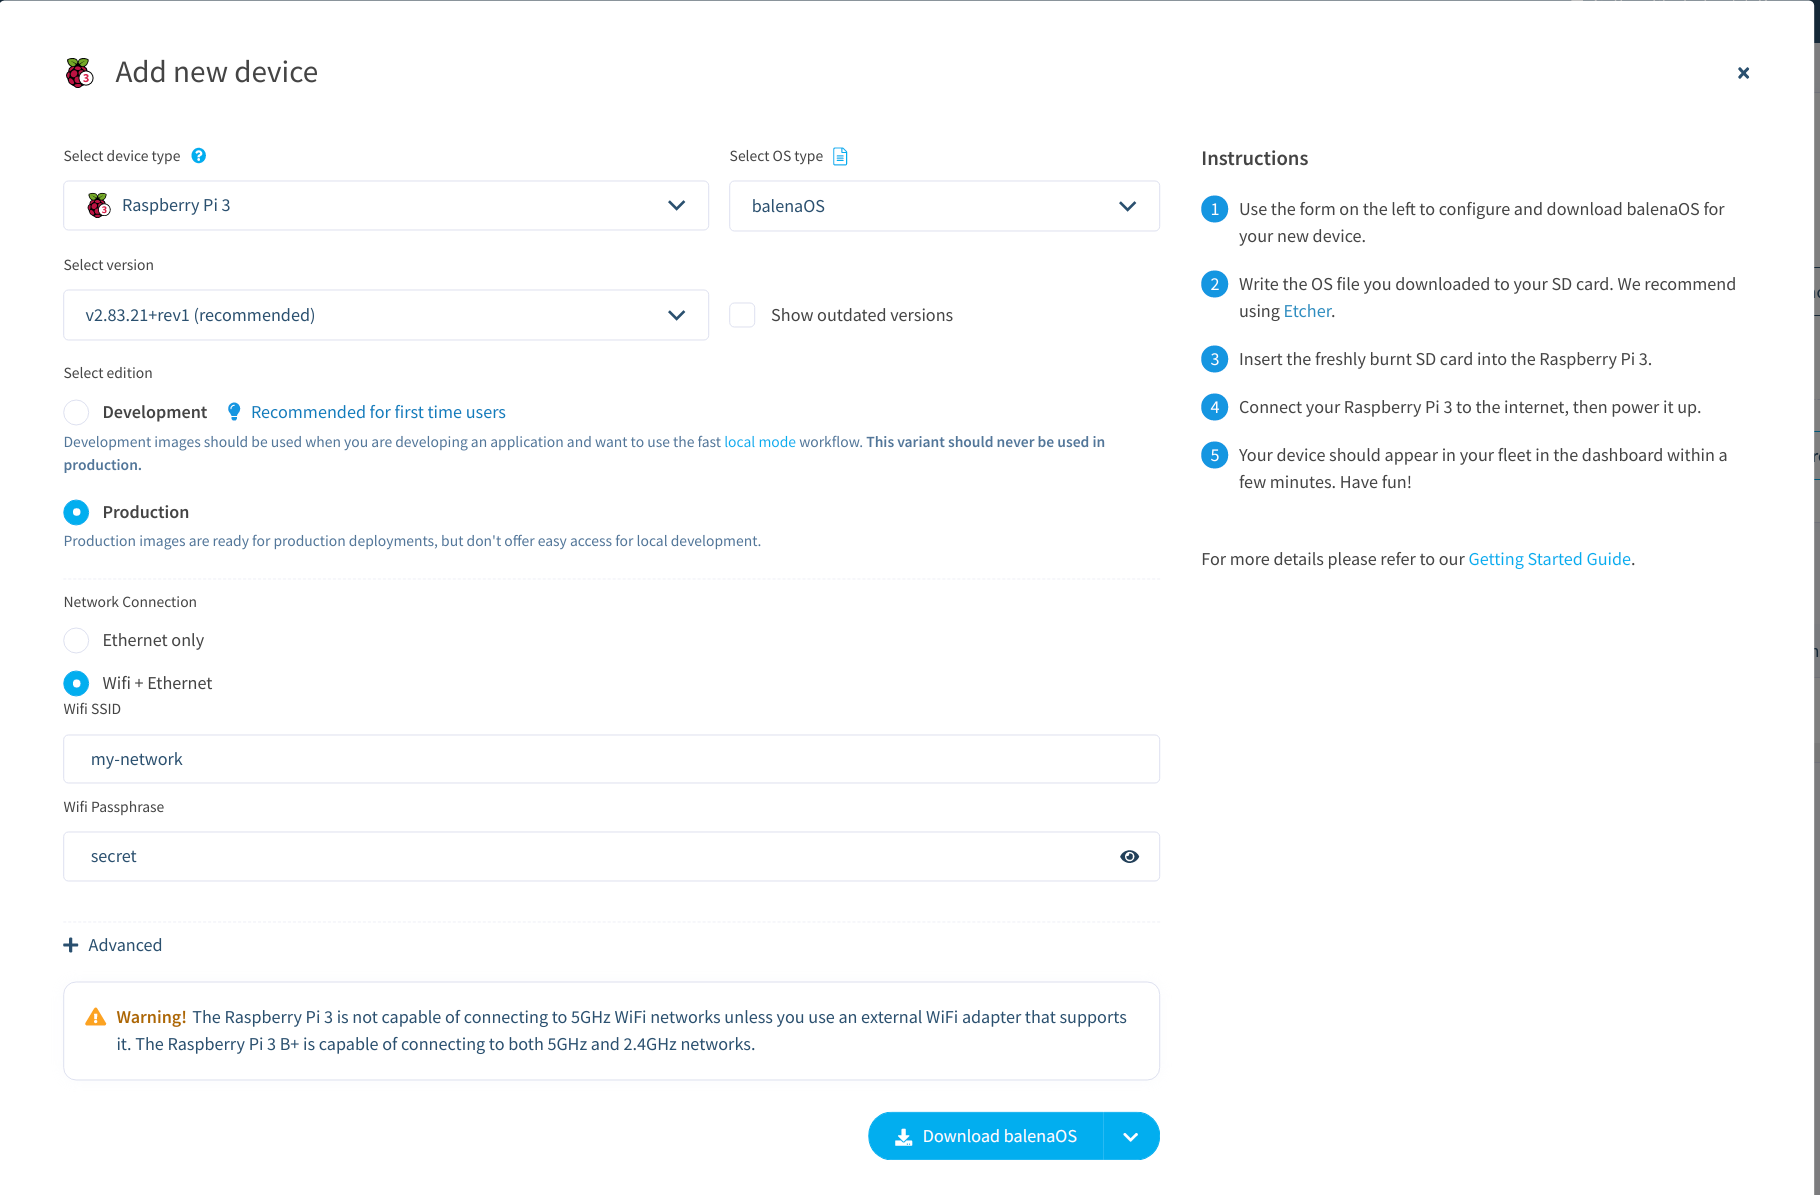
The Raspbian operating system can be easily installed by dumping the image to the SD micro card. As the Zero Pi does not come with an integrated network interface, a Wifi dongle can be used for enabling wireless networking. You can edit the config file  directly on the SD card, by opening it on a different PC with any editor, and provide the SSID and the shared secret already in advance.

# File /etc/wpa_supplicant/wpa_supplicant.conf
ctrl_interface=DIR=/var/run/wpa_supplicant GROUP=netdev
update_config=1

network={
    ssid="MyWIFI
    psk="SECRET"
}

Then place the card again in the Pi and boot it with a keyboard and wifi dongle attached and the Pi connected to a screen. Boot the device and login with standard credentials, which are the user name pi and the password raspberry.

sudo adduser stefan # add new user
sudo apt-get install openssh-server git-core # Install ssh server and git
passwd # change the default password
sudo adduser stefan sudo # add the new user to the sudoers

In the next step, it is recommended to use a static IP address for the Pi, as we need to configure port forwarding for a specific IP address for the router in a later step. Open the interfaces file and provide a static IP address as follows:

# File: /etc/network/interfaces
allow-hotplug wlan0
iface wlan0 inet static
    address 192.168.0.100
    netmask 255.255.255.0
    gateway 192.168.0.1
    wpa-conf /etc/wpa_supplicant/wpa_supplicant.conf

You can then remove the HDMI cable and also the keyboard, as now SSH is available via the static IP address we just defined above.  The next step covers the installation of the [Git server][1] and the configuration of public key authentication.

sudo adduser git # add a new git user
su git # change into the git account
cd /home/git # change to home directory
mkdir .ssh # create the directory for the keys
chmod 700 .ssh # secure permissions
touch .ssh/authorized_keys  # create file for authorized keys
chmod 600 .ssh/authorized_keys # secure permissions for this file```


We are now ready to create a key pair consting of a private and a public key. You can do this on your normal pc or on the Pi directly.

ssh-keygen -t rsa # Create a key pair and provide a strong password for the private key```

Note that you can provide a file name during the procedure. The tool creates a key pair consisting of a private and a public key. The public key ends with the suffix pub.

# Folder ~/Passwordstore $ ll
insgesamt 32
drwxr-xr-x  2 stefan stefan 4096 Mär 13 22:40 .
drwxr-xr-x 10 stefan stefan 4096 Mär 13 22:38 ..
-rw-------  1 stefan stefan 1766 Mär 13 22:40 pi_git_rsa
-rw-r--r--  1 stefan stefan  402 Mär 13 22:40 pi_git_rsa.pub

If you created the key files on a different PC than the Pi, you need to upload the public key to the Pi. We can do this with the following command:

cat ~/Passwordstore/pi_git_rsa.pub | ssh git@192.168.0.100 "cat >&gt;  ~/.ssh/authorized_keys"```


If you generated the keys directly on the Pi it is sufficient to cat the key into the file directly. After you managed this step, verify that the key has been copied correctly. If the file looks similar like the following example, it worked.

git@zeropi:~/.ssh $ cat authorized_keys ssh-rsa AAAAB3NzaC1yc2EAAAADAQABAAABAQDZ7MZYvI……..wnQqchM1 stefan@pc


We can the test key based SSH authentication with the following command.

ssh -i pi_git_rsa git@192.168.0.100 # connect with using the private key```

You are then prompted to connect to the Pi by using the private key password you specified earlier. Note that this password differs from the one we created for the git user. A less secure but more convenient solution is to leave the password empty during the key pair creation process. If the password has not been set, then everyone can connect to the Pi who gets hold of the private key.  By the way, additional interesting facts about passwords can be found here.

In order to increase convenience, you can add a short cut for this connection, by editing the /home/user/.ssh/config file. Simply add the following record for the password store SSH connection.

Host passwords
hostname 192.168.0.100
port 22
user git
IdentityFile    /home/stefan/passwort/pi_git_rsa

Now you can connect to the Pi by typing the following command `ssh passwords . Note that now you need to provide the password for the key file instead of the user password. Delete the pre-installed user pi from the system:

sudo userdel pi```


The default Raspbian partition configuration only utilises 2 GB of your SD card. This can become insuficient quickly. There exists a convenient tool which allows to increase the root partition to the full size of your SD card. Simply run the following command and select the appropriate menu item.

<span class="lang:default decode:true  crayon-inline ">sudo raspi-config</span>

## Prepare the Git Repository

In the following, we create an empty git repository which we will use for versioning the password database from Keepass.

mkdir Password-Repository git@zeropi:~ $ cd Password-Repository/ git@zeropi:~/Password-Repository $ git init –bare Initialisierte leeres Git-Repository in /home/git/Password-Repository/


The repository on the Pi is now ready for ingesting the passwords.

## Checkout the new Repository on your PC and add the Password File

Now that the repository is inititalized, we can start versioning the password file with git.  Clone the repository and add the password file to git, by copying the password file into the cloned repository directory.

git clone passwords:/home/git/Password-Repository cp /home/user/oldLocation/Password-Database.kdb ~/Password-Repository git add Password-Database.kdb git commit -m “initial commit”


The last step is to push the  newly committed password file to  the remote repository. You can improve the security by not adding the key file for KeePass into the repository.

git push origin master```

The basic setup is now completed and you can clone this repository on any device, in order to have the latest password file available.

Checkout the Password Repository on Your Phone

There exists a variety of Git clients for Android, which can deal with identity files and private key authentication. I have good experience with Pocket Git. Clone the repository by using the URL like this:

ssh://git@pi.duckdns.org:1234/home/git/Password-Repository```


### Versioning the Password File: Pull, Commit and Push

Handling versions of the password file follows the standard git procedure. The only difference is, that in contrast to source code files for which git is usually used for, the encrypted password database does not allow for diffs. So you cannot find differences between to versions of the password database. For this reason, you need to make sure that you get the latest version of the password database before you edit the file. Otherwise you need to merge the file manually.  In order to avoid this, follow these steps from within the repository everytime you plan additions, edits or deletes of the password database.

  1. git pull
  2. \## make your changes
  3. git commit -m &#8220;describe your changes&#8221;
  4. git push

## Enabling Remote Access

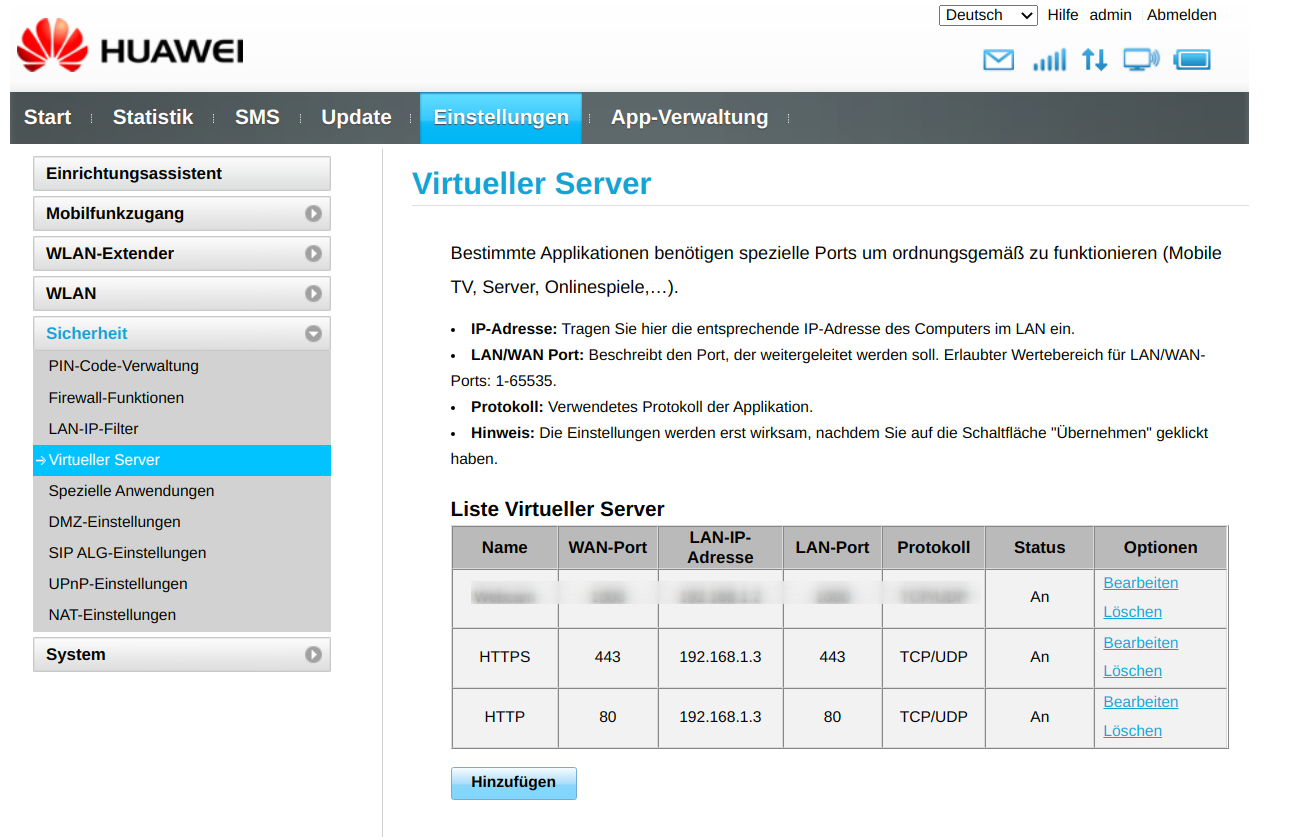
You can already access the Git repository locally in your own network. But in order to retrieve, edit and store passwords from anywhere, you need to enable port forwarding and Dynamic DNS. Port forwarding is pretty easy. Enter your router&#8217;s Web interface, browse to the port forwarding options and specify an external and internal port which points to the IP of the Raspberry Pi.

  * IP Address 192.168.0.100
  * Internal port 22
  * External port (22100)
  * Protocol: both

Now the SSH service and therefore the Git repository becomes available via the external port 22100. As we left the internal port at the default, no changes for the SSH service are required.

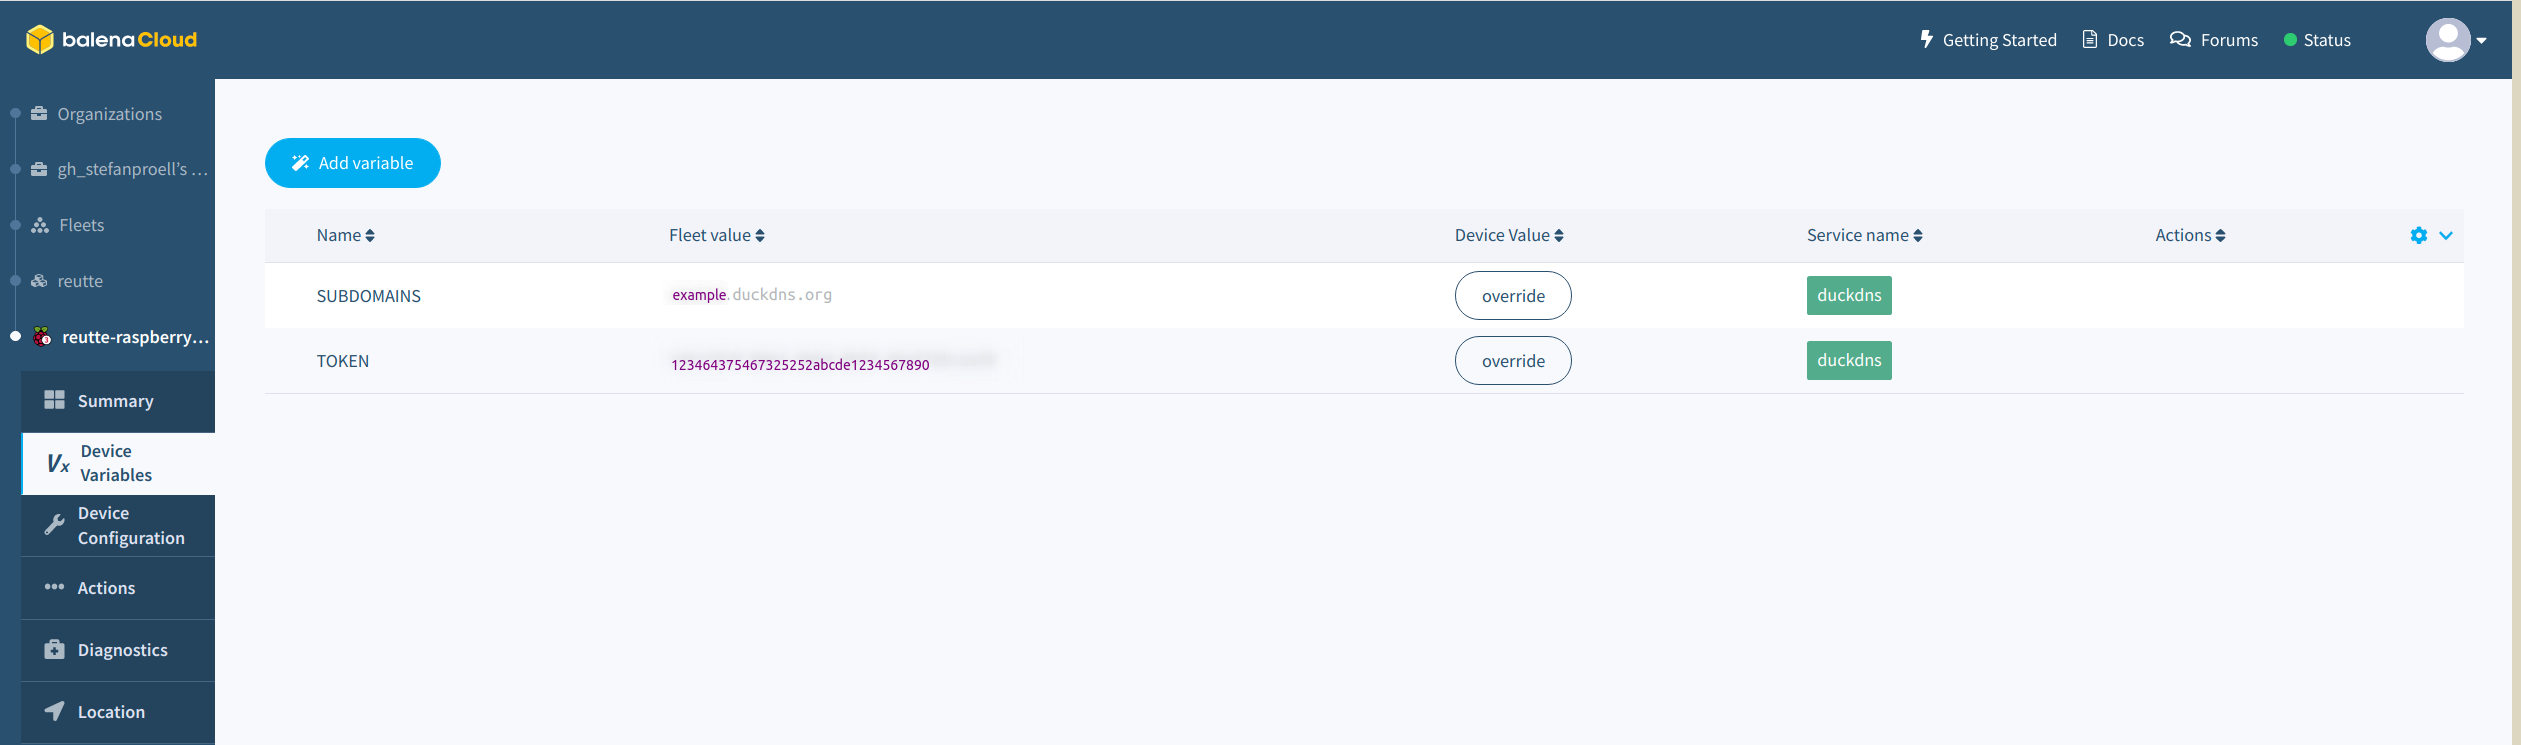
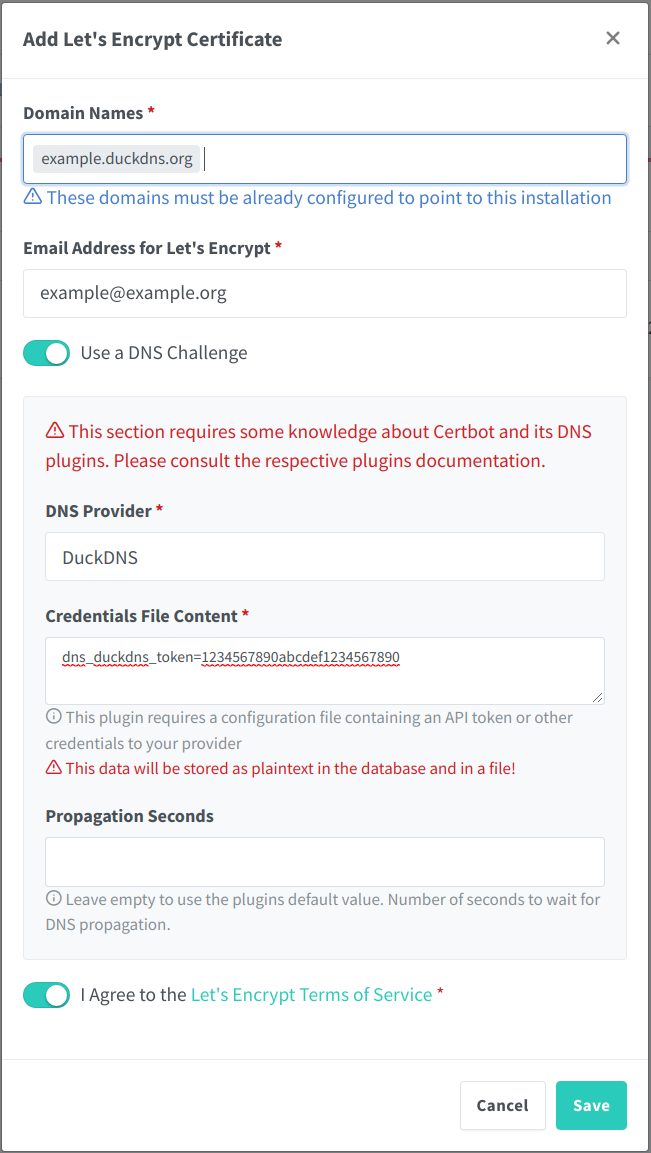
For Dynamic DNS I regularly use <a href="http://www.duckdns.org" target="_blank">Duck DNS</a>, which is a free service for resolving dynamic IP addresses to a static host name. After registering for the service, you can choose a host name and download the installer. There exists an installer particularly for the <a href="https://www.duckdns.org/install.jsp" target="_blank">Raspberry Pi</a>. Follow this instructions and exchange the token and the domain name in the file to match your account.  You can now use the domain you registered for accessing the service from other machines outside your network.

## Security Improvements

The setup so far is reasonably secure, as only users having the key file and its password may authenticate with the Git repository user. It is in general good practice to disallow root to connect via SSH and to restrict remote access. Ensure that all other users on the system can only connect via SSH if and only if they use public key based authentication. Always use passwords for the key file, so that if someone should get hold of your keys, the still require a password.

You can also disable password login for the user git explicitly and allow passwords for local users. Add these lines in the sshd config file.

Match User git
PasswordAuthentication no

Match address 192.168.0.0/24 PasswordAuthentication yes


If you know the IP addresses where you will update the password file in advance, consider limiting access only to these. The git user can authenticate with the key, but still may have too many privilieges and also could execute potentially harmful commands. Ensure that the git user is not in the list of superusers:

grep -Po ‘^sudo.+:\K.*$’ /etc/group```

The user git should not be in the output list. In order to limit the commands that the git user may execute, we can specify a list of allowed commands executable via SSH and utilise a specialised shell, which only permits git commands. Prepend the public key of the git user in the authorised_keys file as follows:

no-port-forwarding,no-agent-forwarding ssh-rsa AAAAB ........```


In addition, we can change the default shell for the user git. Switch to a different user account with sudo privileges and issue the following command:

sudo usermod -s /usr/bin/git-shell git```

This special shell is called git-shell and comes with the git installation automatically. It only permits git specific commands, such as push and pull, which is sufficient for our purpose. If you now connect to the Pi with the standard SSH command, the connection will be refused:

stefan $ ssh passwords 
Enter passphrase for key '/home/passwort/pi_git_rsa': 

The programs included with the Debian GNU/Linux system are free software;
the exact distribution terms for each program are described in the
individual files in /usr/share/doc/*/copyright.

Debian GNU/Linux comes with ABSOLUTELY NO WARRANTY, to the extent
permitted by applicable law.
Last login: Sun Mar 20 20:48:04 2016 from 192.168.0.13
fatal: Interactive git shell is not enabled.
hint: ~/git-shell-commands should exist and have read and execute access.
Connection to 192.168.0.100 closed.

Firewall

The Uncomplicated FireWall (ufw) is way less comlex to setup than classic IP tables and provides exactly what the name implies: a simple firewall. You can install and initialize it as follows:

sudo apt-get install ufw # Insatall it
sudo ufw default deny incoming # Deny all incoming traffic 
sudo ufw allow ssh # Only allow incoming SSH
sudo ufw allow out 80 # Allow outgoing port 80 for the Duck DNS request
sudo ufw enable # Switch it on
sudo ufw status verbose # Verify status```


The great tutorials at <a href="https://www.digitalocean.com/community/tutorials/how-to-setup-a-firewall-with-ufw-on-an-ubuntu-and-debian-cloud-server" target="_blank">Digital Ocean</a> provide more details.

## Conclusion

In this little tutorial. we installed a Git server on a Raspberry Pi Zero (or any other Linux machine) and created a dedicated user for connecting to the service. The user requires a private key to access the service and the git server only permits key based logins from users other than users from the local network. The git user may only use a restricted shell and cannot login interactively. The password file is encrypted and all versions of the passwords are stored within the git repository.


<div class="twttr_buttons">
  <div class="twttr_twitter">
    <a href="http://twitter.com/share?text=A+Reasonable+Secure%2C+Self-Hosted+Password+Database+with+Versioning+and+Remote+Access" class="twitter-share-button" data-via="" data-hashtags=""  data-size="default" data-url="https://blog.stefanproell.at/2016/03/20/a-reasonable-secure-password-database-with-versioning-and-remote-access/"  data-related="" target="_blank">Tweet</a>
  </div>
  
  <div class="twttr_followme">
    <a href="https://twitter.com/@stefanproell" class="twitter-follow-button" data-show-count="true" data-size="default"  data-show-screen-name="false"  target="_blank">Follow me</a>
  </div>
</div>

 [1]: https://git-scm.com/book/en/v2/Git-on-the-Server-Setting-Up-the-Server

Connecting a Tomato Router with an existing Wifi Network

I recently moved and therefore had to get a new contract with my ISP. Unfortunately, it as not possible to get the Ethernet modem (yet) and simply hook it to my beloved Netgear WNR3500L v2 powered by TomatoUSB. Instead, the provider shipped a Connect Box, which is very convenient to install for basic use, but does not allow you to define anything more complex than port forwarding. The previous wifi router did have the option to act as a simple bridge, but the new model does not come with this option. Fortunately, the Tomato firmware is very flexible and allows connect as a client into the existing network and provide connectivity to Ethernet ports and also virtual wireless networks.

Setting up the Client Mode

The good thing with this approach is that the primary router I got from my ISP, does not require any modifications or changes in the settings, the ISP Router remains in its original configuration. In this article, the ISP router is denoted as primary router. All modifications are made at the Tomato USB router, which is denoted as secondary router.

Change the IP address of the Tomato Router

First of all, the secondary router requires to have a different IP than the primary router. Make sure that you are connected via Ethernet cable to the secondary router and login using its original IP address, which is most likely 192.168.0.1. Change the IP  192.168.0.1 to 192.168.0.2` in the Basic Network Settings. Turn off DHCP, because the primay router  has an active DHCP server. Of course you can also use the secondary router as DHCP server or use static IPs for all devices. The screenshot below shows the network settings.

Reboot the secondary router and login again using the new IP address 192.168.0.2`. Open the same page again and set the gateway and DNS address to the IP of primary router, as depicted above.

Connect the Secondary Router as Wireless Client with the Primary Router

Remain on the Basic Networking page at the secondary router and set the Wireless Interface as Wireless Ethernet Bridge. This way, the secondary router creates a bridge to the primary router and allows clients connected to the Ethernet ports with the Internet. Enter the SSID of the primary router and provide the password. If you do not know the SSID by heart, you can use the Wireless Survey in the Tools menu. The screenshot below depicts the settings.

The Routing

The last step ensures that the routing of the traffic works. Change the mode of the secondary device from Gateway to router and save the settings. The Advanced Routing menu should now look somilar as shown below.

Virtual Wireless Networking

In the last optional step, you can create additional wifi networks from the secondary router which are accessible for other clients. This can be useful if you need to change the SSID on the primary router or are too lazy to change a lot of settings of your smart TV and other devices which still are looking for the old SSID. Open the Virtual Wireless page in the Advanced menu. You will see the connection with the primary router there and you can add additional networks by adding new virtual interfaces. Make sure that the mode of the wireless network is Access Point` .  This way you can create additional wifi networks and separate the devices into different zones.

Sources: Youtube

Add Self-Signed Certificates to your local trusted CA

When you use different self hosted services, such as your own Gitlab instance for example, you probably use self signed certificates for securing the connection. Self-signed certificates have the disadvantage that Browsers and other applications do not trust them and therefore either display error messages or refuse to connect at all. The IDEA IntelliJ IDE for instance does not clone from repositories which are protected by self signed certificates. Instead of disabling the SSL certificate verification completely, it is recommended to add your self signed certificate to the local certificate store.

Ubuntu and other Linux distributions store certification authorities in the file /etc/ssl/certs/ca-certificates.crt. This file is a list of trusted public keys, which is compiled by appending all certificates with the file ending .crt in the directory <span class="lang:default decode:true crayon-inline ">/etc/ssl/certs . Once a CA is in this list, the operating system trusts all certificates which have been signed by this CA. You could simply add the public part of the server certificate to this file, but it might get overwritten once the root CAs are updated. Therefore it is the better practice to simply store your self signed certificate in the mentioned directory and trigger the creation of the ca-certificates.crt file manually.

Fetch the Certificate from your Server

First, retrieve the certificate from your server. The command below trims away the information that is not needed and writes the certificate public key into a new file within the certificate directory. Run this command as root.

echo | openssl s_client -connect $SERVERADDRESS:443 2>/dev/null | openssl x509 &gt; /usr/local/share/ca-certificates/$SERVERADDRESS.crt

Update the Certificate Authority File

Then, by simply running the command sudo update-ca-certificates , the certificate will be added and trusted, as a link is created within the directory /etc/ssl/certs. The output of the command should mention that one certificate was added. Note that the command creates a new symbolic link from the file  $SERVERADDRESS.crtto$SERVERADDRESS.pem`. This certificate will then be accepted by all applications, which utilise the ca-certificates file.

Build a SMS notification service

Automated event notification is useful for many applications. In a recent blog post, I presented a solution how to use Twitter for notifying about server events. In this post you learn how to achieve the same by using an SMS API. The rationale behind an SMS service is its robust availability.

There exist plenty of different services, I chose ClockworkSMS, as it provides a simple interface for several programming languages, plugins and a prepaid billing service. Once you registered and bought some credit, you can start using the API. Integrating the service into your applications is easy, as there does not only exist libraries for several languages (C#, Java, Node.js, PHP, Python, Ruby), but also HTTP requests are supported. Thus you can also send SMS text messages from command line. When you execute the following command in bash, a SMS message will be sent to the number provided containing the text, no magic involved.

curl https://api.clockworksms.com/http/send.aspx -d "key=YOUR-API-KEY&to=4361122334455&content=Hello+World"

Simply insert your personal API key, provide the receiver’s phone number and of course the content. The text of the message needs to be URL encoded. In order to advance the notification service, you can provide a call back URL which is called whenever a SMS message was sent.

Clockworksms provides HTTP GET, form posts and XML (bulk) POST requests which are issued against the URL provided. The service appends message metadata such as an id, a status code an the number of the receiver to the request. This information can be processed in custom applications which react on the data. In the easiest scenario, you can setup a virtual host and process the log files. Each sent SMS message will result to a request from the Clockworksms servers to your server and thus create a log record with the metadata of the sms message.

89.111.58.18 - - [30/Oct/2014:18:21:32 +0100] "GET /smsnotification.htm?msg_id=VE_282415671&status=DELIVRD&detail=0&to=4361122334455 HTTP/1.1" 200 330

The ClockworkSMS service also provides some plugins for WordPress, Nagios and other applications.

Enable Hibernation on Ubuntu 22.04 with LVM and Full Disk Encryption

When settin up my new laptop I forgot to enable hibernation manually and the device deep decharged over night. It would only power on again after getting the original power supply from the office, since my USB charger had 63W instead of 65W according to Tuxedo support. Anyways, the following steps I have taken from Ask Ubuntu worked flawlessly.

Check if there is a swap partition in use

sudo swapon -s

Disable the current swap partition

sudo swapoff -a

and remove the record from /etc/fstab and add a new record for the new swap file we will create in the next step. My /etc/fstab file looks like the following, after the old record has been commented out (#) and the new record for the swapfile has been added.

# /etc/fstab: static file system information.
#
# Use 'blkid' to print the universally unique identifier for a
# device; this may be used with UUID= as a more robust way to name devices
# that works even if disks are added and removed. See fstab(5).
#
# <file system> <mount point>   <type>  <options>       <dump>  <pass>
/dev/mapper/vgubuntu-root /               ext4    errors=remount-ro 0       1
# /boot was on /dev/nvme0n1p2 during installation
UUID=e62203cc-4593-4651-b239-c9d6c8710e2e /boot           ext4    defaults        0       2
# /boot/efi was on /dev/nvme0n1p1 during installation
UUID=6FC6-A930  /boot/efi       vfat    umask=0077      0       1
# Original swap partition
#/dev/mapper/vgubuntu-swap_1 none            swap    sw              0       0
/swapfile   none    swap     sw      0       0

Since the entire disk is encrypted, the swapfile is encrypted too.

Then create the new swapfile and ensure it is big enough to hold the entire memory plus some buffer. I simpy created 40 GB just to be sure.

sudo fallocate -l 32G /swapfile
sudo chown 0 /swapfile
sudo chmod 0600 /swapfile
sudo mkswap /swapfile
sudo swapon /swapfile

Reboot with sudo reboot and check if the new swap file is in use with sudo swapon -s

Filename				Type		Size		Used		Priority
/swapfile                               file		41943036	0		-2

Lookin good!

To enable hibernation, we have to tell the bootloader grub that there is a swapfile to resume from. To do this, we have to get the UUID from the root partition / using the following command.

findmnt / -o UUID

The output will be similar to this

UUID
4674b60a-68b3-427c-9b0e-124866c78828

Then we have to get the offset from the swapfile

sudo filefrag -v /swapfile |grep " 0:"| awk '{print $4}'

This will return the offset on position 0

sudo filefrag -v /swapfile |grep " 0:"
   0:        0..       0:    3717120..   3717120:      1:

In my case the offset is 3717120.

Now add the UUID of the root partition and the offset to the grub command as follows. Open the config file with vim /etc/default/grub and add the following parameters to your existing line.

GRUB_CMDLINE_LINUX_DEFAULT="quiet splash resume=UUID=XXXXXXXX-XXXX-XXXX-XXXX-XXXXXXXXXXXX resume_offset=XXXXX"

My final grub config looks like this, your mileage will be different

# If you change this file, run 'update-grub' afterwards to update
# /boot/grub/grub.cfg.
# For full documentation of the options in this file, see:
#   info -f grub -n 'Simple configuration'

GRUB_DEFAULT=0
GRUB_TIMEOUT_STYLE=hidden
GRUB_TIMEOUT=0
GRUB_DISTRIBUTOR=`lsb_release -i -s 2> /dev/null || echo Debian`
#GRUB_CMDLINE_LINUX_DEFAULT="quiet splash i915.enable_psr=0"
GRUB_CMDLINE_LINUX_DEFAULT="quiet splash i915.enable_psr=0 i915.enable_dc=0 intel_idle.max_cstate=2 resume=UUID=4674b60a-68b3-427c-9b0e-124866c78828 resume_offset=3717120"
GRUB_CMDLINE_LINUX=""

# Uncomment to enable BadRAM filtering, modify to suit your needs
# This works with Linux (no patch required) and with any kernel that obtains
# the memory map information from GRUB (GNU Mach, kernel of FreeBSD ...)
#GRUB_BADRAM="0x01234567,0xfefefefe,0x89abcdef,0xefefefef"

# Uncomment to disable graphical terminal (grub-pc only)
#GRUB_TERMINAL=console

# The resolution used on graphical terminal
# note that you can use only modes which your graphic card supports via VBE
# you can see them in real GRUB with the command `vbeinfo'
#GRUB_GFXMODE=640x480

# Uncomment if you don't want GRUB to pass "root=UUID=xxx" parameter to Linux
#GRUB_DISABLE_LINUX_UUID=true

# Uncomment to disable generation of recovery mode menu entries
#GRUB_DISABLE_RECOVERY="true"

# Uncomment to get a beep at grub start
#GRUB_INIT_TUNE="480 440 1"

Finally, udate grub with sudo update-grub and restart with reboot. Then you can try to hibernate with sudo systemctl hibernate.