MySQL

A small hint for working with Integers in MySQL

Integer types in MySQL

A small hint that is not obvious when working with Integers in MySQL. All Integer types in MySQL have a fixed size. This size determines the lower and upper bound of the integer the field can store. You can have signed and unsigned integers, which make this range larger (unsigned) or smaller, because you can also store negative Integers (signed). In either case, the number M in the definition var INT(M) does not limit the actual stored or storable length at all. It is only for display and to indicate developers what kind of length one would expect. It is not a technical constraint. Only the type is (tiniyint, smallint, bigint, etc).

An example using INT(1)

All integer types have a defined range, you can find it in the official documentation. The maximum value for signed integers is 2147483647 and for TINYINT it is 127. If we define an INT(1) the number in the brackets only show how many digits will be displayed when padded with 0.

DROP TABLE my_numbers;
CREATE TABLE my_numbers (
    integerNumber INT(1),
    tinyIntegerNumber TINYINT(1)
) ENGINE InnoDB;

# Max value for integers is 2147483647 and for TINYINT it is 127
INSERT INTO my_numbers(integerNumber, tinyIntegerNumber) VALUES (2147483647, 127);
SELECT * FROM my_numbers;
# Query OK, 1 row affected (0.005 sec)
#
# root@local> SELECT * FROM my_numbers;
# +---------------+-------------------+
# | integerNumber | tinyIntegerNumber |
# +---------------+-------------------+
# |    2147483647 |               127 |
# +---------------+-------------------+
# 1 row in set (0.000 sec)
#

As you can see the table stored both max values although we used INT(1). This exists only because if the database knows how long a number typically is, it can padd it with zeros (if it is told to do so).

Padding with zeros

In the following example, we will padd integers with zero values from the left. Then the setting does have an effect in some clients. The official and the MariaDB command line clients display the leading zeros. Other clients like IntelliJ do not display them.

DROP TABLE IF EXISTS  my_padded_numbers;
CREATE TABLE my_padded_numbers (
    integerNumber INT(64) ZEROFILL,
    tinyIntegerNumber TINYINT(8) ZEROFILL
) ENGINE InnoDB;
# Max value for integers is 2147483647 and for TINYINT it is 127
INSERT INTO my_padded_numbers(integerNumber, tinyIntegerNumber) VALUES (123, 42);
SELECT * FROM my_padded_numbers;
# root@local> INSERT INTO my_padded_numbers(integerNumber, tinyIntegerNumber) VALUES (123, 42);
# Query OK, 1 row affected (0.004 sec)
#
# root@local> SELECT * FROM my_padded_numbers;
# +------------------------------------------------------------------+-------------------+
# | integerNumber                                                    | tinyIntegerNumber |
# +------------------------------------------------------------------+-------------------+
# | 0000000000000000000000000000000000000000000000000000000000000123 |          00000042 |
# +------------------------------------------------------------------+-------------------+
# 1 row in set (0.001 sec)

Conclusion

The M value for declaring integers has nothing to do with the length. This is different when working with VARCHAR for instance, where the number in the brackets indeed defines the maximum capacity.

Connecting to MySQL 5.6 using TLSv1 on Ubuntu 20.04.1

Ubuntu 20.04 updated some security policies which has the effect that some connections might not work anymore. This happened for instance with connections to AWS Aurora 5.6 recently.

Background

AWS Aurora 5.6 only supports TLSv1 for encrypted connection.

This TLS protocol version is considered insecure for some time now and has been disabled in Ubuntu 20.04 and MySQL Client 8 respectively. If MySQL configuration permits TLSv1, TLSv1.1, and TLSv1.2, but your host system configuration permits only connections that use TLSv1.3 or higher, you cannot establish MySQL connections at all, because no protocol permitted by MySQL is permitted by the host system. The problem manifests itself in the following error:

ERROR 2026 (HY000): SSL connection error: error:1425F102:SSL routines:ssl_choose_client_version:unsupported protocol

You can see the supported version on the MySQL server using

SHOW GLOBAL VARIABLES LIKE 'tls_version';

Specifying the protocol version explicitly did not help:

mysql --defaults-extra-file=~/.aws_mysql_aurora --tls-version=TLSv1

The (bug report)[https://bugs.launchpad.net/ubuntu/+source/mysql-8.0/+bug/1872541/comments/27] is also reflected in the official docs, but siumply copying the suggested fix won’t do.

Example of the problem

The following python snippet throws a protocol error with Ubuntu 20.4.

import mysql.connector
from mysql.connector import ClientFlag

config = {
    'user': 'me',
    'password': 'secret',
    'host': '127.0.0.1',
    'port': '3306',
    'database': 'sakila',
    'raise_on_warnings': True,
    'client_flags': [ClientFlag.SSL]
}

cnx = mysql.connector.connect(**config)
cur = cnx.cursor(buffered=True)
cur.execute("SHOW STATUS LIKE 'Ssl_cipher'")
print(cur.fetchone())
cur.close()
cnx.close()

The error thrown by Python is

mysql.connector.errors.InterfaceError: 2055: Lost connection to MySQL server at '127.0.0.1:8001', system error: 1 [SSL: UNSUPPORTED_PROTOCOL] unsupported protocol (_ssl.c:1108)

The quick fix

It is possible to lower the TLS version requirements in the openssl config of Ubuntu. But in order for this to work with Aurora 5.6, you need to lower the TLS version to TLSv1. This can be achieved by adapting the OpenSSL settings in /etc/ssl/openssl.cnf.

First add a default section on top of the file:

openssl_conf = default_conf

and then at the end of the file add:

[ default_conf ]

ssl_conf = ssl_sect

[ssl_sect]

system_default = system_default_sect

[system_default_sect]
MinProtocol = TLSv1
MaxProtocol = None
CipherString = DEFAULT:@SECLEVEL=1

This lowers the allower TLS version tro TLSv1 again. Now the python script from above can be executed.

Proper fix

The solution above can also be used by applying the SSL configuration only to the current script and not the whole operating system. This is of course the wiser plan and should therefore be used. In order to use TLSv1 with Python you can

  1. Create a virtual environment with proper versions for the relevant packages
  2. Load the openssl configuration from above as an environment file

Requirements for Python

The following dependencies can be defined in a requirements.txt file.

mysql-connector-python==8.0.22
pandas==1.2.0
pkg-resources==0.0.0
SQLAlchemy==1.3.22

Virtual Environment

You can also use the following snippet for a Makefile to create the virtual environment. My colleague Jonas suggested the following code:

venv: requirements.txt
	test -d venv || python3 -m venv venv
	venv/bin/pip3 install --upgrade pip setuptools
	venv/bin/pip3 install -Ur requirements.txt
	touch venv/bin/activate

Environment Variables in the Terminal

In order to connect you need to set the following environment variables. Make sure to use a full path for the openssl.cfg file. You can write those variables into a file called .venv and then source it: source .venv. Note that this is obviously sensitive data.

export OPENSSL_CONF=/full/path/to/config/openssl.cfg
export DB_HOST=127.0.0.1
export DB_PORT=3306
export DB_USER=alice
export DB_PASSWORD=SECRET
export DB_NAME=sakila

Environment Variables in IntelliJ

The same method also works when you set the environment variables in the run / debug configuration of IntelliJ. You need to make sure that you use the right venv as interpreted for the project.

  1. Create a new virtual environment venv using make venv
  2. Set this environment as the interpreter of this project: File –> Project Structure –> Project SDK
  3. Create a new run / debug configuration and add the environment variables from above
  4. Make sure the run configuration uses the SDK

Python Example

Then you can use the following snippet.

import mysql.connector
import sqlalchemy as sqlalchemy
from mysql.connector.constants import ClientFlag
import pandas as pd

import logging
logging.basicConfig(
    format='%(asctime)s %(levelname)-8s %(message)s',
    level=logging.INFO,
    datefmt='%Y-%m-%d %H:%M:%S')

sql_query = """
SELECT
    last_name
FROM sakila.actor
ORDER BY actor_id DESC
LIMIT 10
"""

def get_connection_config():
    """
    OPENSSL_CONF=/full/path/to/config/openssl.cfg
    DB_HOST=127.0.0.1
    DB_PORT=3306
    DB_USER=alice
    DB_PASSWORD=SECRET
    DB_NAME=sakila

    :return: db_config_dict
    """
    if(os.getenv('DB_PASSWORD') != None):
        mysql_config = {
            'host': os.getenv('DB_HOST'),
            'port': os.getenv('DB_PORT'),
            'user': os.getenv('DB_USER'),
            'password': os.getenv('DB_PASSWORD'),
            'database': os.getenv('DB_NAME'),
            'client_flags': [ClientFlag.SSL]
        }
        return mysql_config
    else:
        print("You need to set the env variables")
        exit(1)

if __name__ == "__main__":
    mysql_config = get_connection_config()

    """Use a cursor object
    
    You can retrieve data by using a cursor object and iterate over the results.
    Close cursors and connections when done.
    """

    mysql_connection = mysql.connector.connect(**mysql_config)

    cursor = mysql_connection.cursor()
    cursor.execute(sql_query)

    for (_username) in cursor:
        logging.info("Actor: {}".format(last_name))

    cursor.close()
    mysql_connection.close()

    """Use Pandas for retrieving data
    
    The more convenient way of retrieving data is to use Pandas.
    It will return a data frame and you can easily paginate large result sets in a loop.
    
    """
    mysql_connection = mysql.connector.connect(**mysql_config)
    for chunk in pd.read_sql_query(con=mysql_connection, sql=sql_query, chunksize = 5):
        logging.info("last_name: {}".format(chunk['last_name']))

    exit(0)

You can find the code also at my Github repository.

Workaround

If the hack above should not work, what will help is downgrading the MySQL Client to the Version 5.7. I downloaded the bundle from here and unpacked it. Then I installed the following packages:

sudo apt-get install libtinfo5 libaio1
sudo dpkg -i mysql-common_5.7.31-1ubuntu18.04_amd64.deb
sudo dpkg -i mysql-community-client_5.7.31-1ubuntu18.04_amd64.deb

Then I could connect again without any extra settings and flags.

Update 2020-10-14

The workaround stopped to function for some reason. I then found this trick described here which offers a temporary fix. It uses a local configuration file for openssl. This file can then be used for single commands by prefixing the variable. Save the configuration below in a file, for instance ~/.openssl_allow_tls1.0.cnf.

openssl_conf = openssl_init

[openssl_init]
ssl_conf = ssl_sect

[ssl_sect]
system_default = system_default_sect

[system_default_sect]
CipherString = DEFAULT@SECLEVEL=1

and then export this in a terminal export OPENSSL_CONF=~/configurations/ssl/openssl_allow_tls1.0.cnf.

Update 2020-10-19

If you need to update your system, make sure to hold the installed MySQL 5.7 version of the client. You could see which version would be installed if you would upgrade now:

$ apt-cache policy mysql-community-client mysql-common

mysql-community-client:
  Installed: 5.7.31-1ubuntu18.04
  Candidate: 8.0.22-1ubuntu20.04
  Version table:
     8.0.22-1ubuntu20.04 500
        500 http://repo.mysql.com/apt/ubuntu focal/mysql-8.0 amd64 Packages
 *** 5.7.31-1ubuntu18.04 100
        100 /var/lib/dpkg/status
mysql-common:
  Installed: 5.7.31-1ubuntu18.04
  Candidate: 8.0.22-1ubuntu20.04
  Version table:
     8.0.22-1ubuntu20.04 500
        500 http://repo.mysql.com/apt/ubuntu focal/mysql-8.0 amd64 Packages
     5.8+1.0.5ubuntu2 500
        500 http://at.archive.ubuntu.com/ubuntu focal/main amd64 Packages
        500 http://at.archive.ubuntu.com/ubuntu focal/main i386 Packages
 *** 5.7.31-1ubuntu18.04 100
        100 /var/lib/dpkg/status

Then you can pin the version to 5.7 using a wildcard *1 by adding the packages to /etc/apt/preferences.

Package: mysql-common
Pin: version 5.7.*
Pin-Priority: 1001

Package: mysql-community-client
Pin: version 5.7.*
Pin-Priority: 1001

Package: libmysqlclient21
Pin: version 5.7.*
Pin-Priority: 1001

Setup a SSH tunnel in IntelliJ

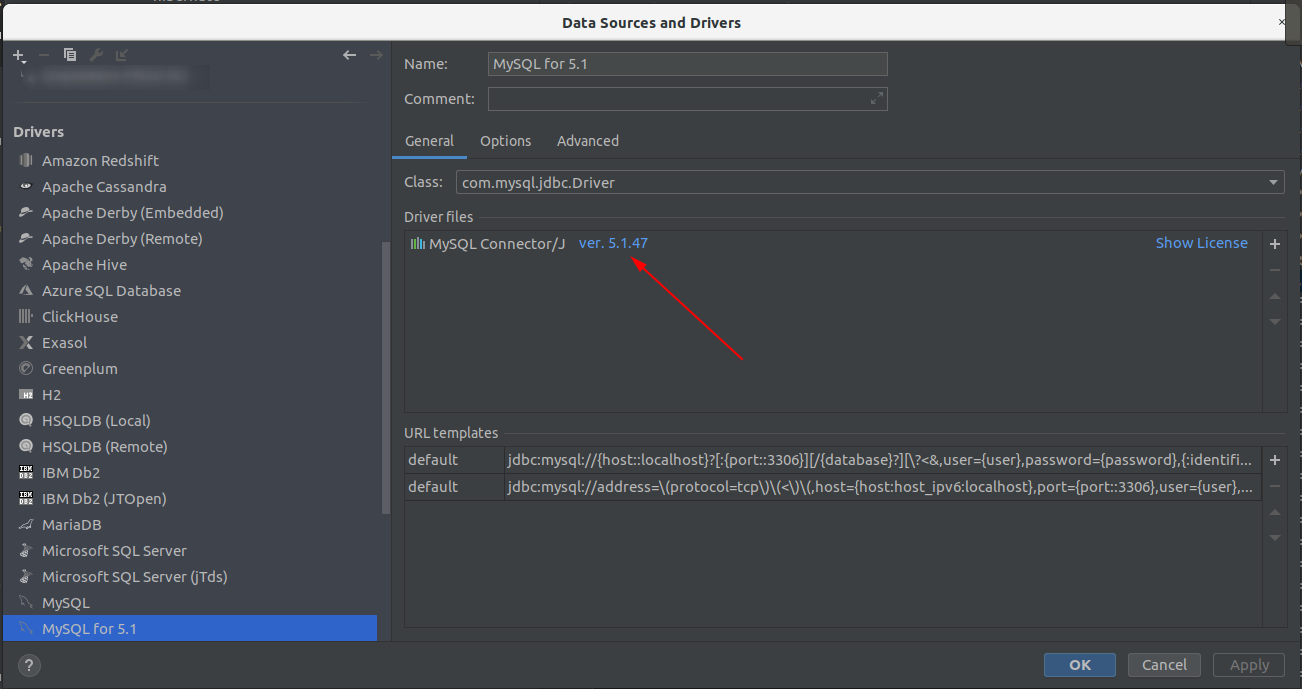
There seems to be a problem with the older MySQL driver and IntelliJ Ultimate. When I tried to connect to a remote MySQL instance using a tunnel, IntelliJ would refuse to connect. IntelliJ would show an error similar to the following:

Cannot connect to a database. Tried three times.

The linked online help page was not really helpful. I could create the tunnel manually and verify the settings, all seemed fine. As a next step I inspected the MySQL error log on the remote server and noticed that errors in relation to my connection attempts wer showing. Thus I knew at least that the connection issue was not caused by SSH, but rather seems to be related to MySQL.

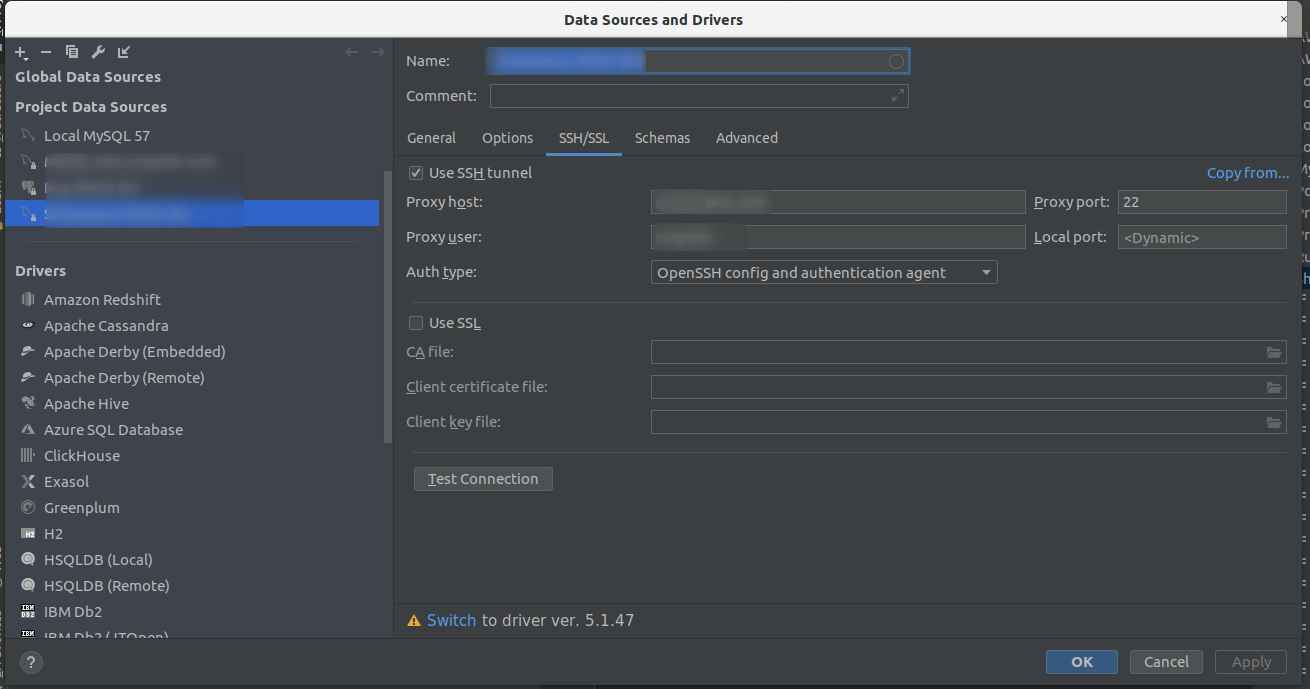
I then upgraded the MySQL driver and the connection worked out of the box. I use a SSH config section similar to this:

Host remote-mysql-database-server
	User bob
	Hostname 10.20.30.40
	IdentityFile ~/.ssh/rsa_id

This can then be used in IntelliJ. For more complex setups, for instance when you need to connect to AWS RDS and have to use a bastion host, I found it easier to setup the connection details also in the SSH config file and keep the IntelliJ configuration simple.

IntelliJ MySQL settings

MySQL Driver

SSH settings

Verifying Replication Consistency with Percona’s pt-table-checksum

Replication is an important concept for improving database performance and security. In this blog post, I would like to demonstrate how the consistency between a MySQL master and a slave can be verified. We will create two Docker containers, one for the master one for the slave.

Installing the Percona Toolkit

The Percona Toolkit is a collection of useful utilities, which can be obained for free from the company’s portal. The following commands install the prerequisits, download the package and eventually the package.

sudo apt-get install -y wget libdbi-perl libdbd-mysql-perl libterm-readkey-perl libio-socket-ssl-perl
wget https://www.percona.com/downloads/percona-toolkit/3.0.4/binary/debian/xenial/x86_64/\
    percona-toolkit_3.0.4-1.xenial_amd64.deb
sudo dpkg -i percona-toolkit_3.0.4-1.xenial_amd64.deb 

Setting up a Test Environment with Docker

The following command creates and starts a docker container. Note that these are minimal examples and are not suitable for a serious environment.

docker run --name mysql_master -e MYSQL_ALLOW_EMPTY_PASSWORD=true -d mysql:5.6 --log-bin \
   --binlog-format=ROW --server-id=1```


Get the IP address from the master container:

Get the IP of the master

docker inspect mysql_master | grep IPAddress

“SecondaryIPAddresses”: null, “IPAddress”: “172.17.0.2"```

You can connect to this container like this and verify the server id:

stefan@Lenovo ~/Docker-Projects $ mysql -u root -h 172.17.0.2
Welcome to the MySQL monitor.  Commands end with ; or \g.
Your MySQL connection id is 1
Server version: 5.6.35-log MySQL Community Server (GPL)

Copyright (c) 2000, 2017, Oracle and/or its affiliates. All rights reserved.

Oracle is a registered trademark of Oracle Corporation and/or its
affiliates. Other names may be trademarks of their respective
owners.

Type 'help;' or '\h' for help. Type '\c' to clear the current input statement.

mysql> show variables like 'server_id';
+---------------+-------+
| Variable_name | Value |
+---------------+-------+
| server_id     | 1     |
+---------------+-------+
1 row in set (0,00 sec)

We repeat the command for the slave, but use a different id. port and name:

docker run --name mysql_slave -e MYSQL_ALLOW_EMPTY_PASSWORD=true -d mysql:5.6 --server-id=2```


For simplicity, we did not use Docker links, but will rather use IP addresses assigned by Docker directly.

## Replication Setup

First, we need to setup a user with replication privileges. This user will connect from the slave to the master.

On the host, interact with the master container

Get the IP address of the slave container

$ docker inspect mysql_slave | grep IPAddress “SecondaryIPAddresses”: null, “IPAddress”: “172.17.0.3”, “IPAddress”: “172.17.0.3”,

Login to the MySQL console of the master

Grant permissions

GRANT REPLICATION SLAVE ON . TO replication@‘172.17.0.3’ IDENTIFIED BY ‘SLAVE-SECRET’;

Get the current binlog position

mysql> SHOW MASTER STATUS; +——————-+———-+————–+——————+——————-+ | File | Position | Binlog_Do_DB | Binlog_Ignore_DB | Executed_Gtid_Set | +——————-+———-+————–+——————+——————-+ | mysqld-bin.000002 | 346 | | | | +——————-+———-+————–+——————+——————-+ 1 row in set (0,00 sec)```

Now log into the slave container and add the connection details for the master:

## Connect to the MySQL Slave instance
$ mysql -u root -h 172.17.0.3

### Setup the slave

mysql> CHANGE MASTER TO   
  MASTER_HOST='172.17.0.2',
  MASTER_PORT=3306,
  MASTER_USER='replication', 
  MASTER_PASSWORD='SLAVE-SECRET',
  MASTER_LOG_FILE='mysqld-bin.000002', 
  MASTER_LOG_POS=346;
Query OK, 0 rows affected, 2 warnings (0,05 sec)

### Start and check
mysql>   start slave;
Query OK, 0 rows affected (0,01 sec)

mysql> show slave status \G
*************************** 1. row ***************************
               Slave_IO_State: Waiting for master to send event
                  Master_Host: 172.17.0.2
                  Master_User: percona
                  Master_Port: 3306
                Connect_Retry: 60
              Master_Log_File: mysqld-bin.000002
          Read_Master_Log_Pos: 346
               Relay_Log_File: mysqld-relay-bin.000002
                Relay_Log_Pos: 284
        Relay_Master_Log_File: mysqld-bin.000002
             Slave_IO_Running: Yes
            Slave_SQL_Running: Yes

Now our simple slave setup is running.

Get some test data

Lets download the Sakila test database and import it into the master. It will be replicated immediately.

wget http://downloads.mysql.com/docs/sakila-db.tar.gz
~/Docker-Projects $ tar xvfz sakila-db.tar.gz 

mysql -u root -h 172.17.0.2 < sakila-db/sakila-schema.sql 
mysql -u root -h 172.17.0.2 < sakila-db/sakila-data.sql```


Verify that the data is on the slave as well:

mysql -u root -h 172.17.0.3 -e “USE sakila;SHOW TABLES;” +—————————-+ | Tables_in_sakila | +—————————-+ | actor | | actor_info | | address | | category | | city | | country | | customer | … | store | +—————————-+


After our setup is completed, we can proceed with Percona pt-table checksum.

# Percona pt-table-checksum

The Percona pt-table-checksum tool requires the connection information of the master and the slave in a specific format. This is called the DSN (data source name), which is a coma separated string. We can store this information in a dedicated database called percona in a table called dsns. We create this table on the master. Note that the data gets replicated to the slave within the blink of an eye.

CREATE DATABASE percona; USE percona;

CREATE TABLE DSN-Table ( id int(11) NOT NULL AUTO_INCREMENT, dsn varchar(255) NOT NULL, PRIMARY KEY (id) );


The next step involves creating permissions on the slave and the master!

GRANT REPLICATION SLAVE,PROCESS,SUPER, SELECT ON . TO ‘percona’@‘172.17.0.1’ IDENTIFIED BY ‘SECRET’; GRANT ALL PRIVILEGES ON percona.* TO ‘percona’@‘172.17.0.1’;```

The percona user is needed to run the script. Note that the IP address is this time from the (Docker) host, having the IP 172.17.0.1 by default. In real world scenarios, this script would either be run on the master or on the slave directly.

Now we need to add the information about the slave to the table we created. The Percona tool could also read this from the process list, but it is more reliable if we add the information ourselves. To do so, we add a record to the table we just created, which describes the slave DSN:

INSERT INTO percona.DSN-Table VALUES (1,'h=172.17.0.3,u=percona,p=SECRET,P=3306');```


The pt-table-checksum tool the connects to the master instance and the the slave. It computes checksums of all databases and tables and compares results. You can use the tool like this:

pt-table-checksum –replicate=percona.checksums –create-replicate-table –empty-replicate-table
–recursion-method=dsn=t=percona.DSN_Table -h 172.17.0.2 -P 3306 -u percona -pSECRET TS ERRORS DIFFS ROWS CHUNKS SKIPPED TIME TABLE 09-10T10:13:11 0 0 0 1 0 0.020 mysql.columns_priv 09-10T10:13:11 0 0 3 1 0 0.016 mysql.db 09-10T10:13:11 0 0 0 1 0 0.024 mysql.event 09-10T10:13:11 0 0 0 1 0 0.014 mysql.func 09-10T10:13:11 0 0 40 1 0 0.026 mysql.help_category 09-10T10:13:11 0 0 614 1 0 0.023 mysql.help_keyword 09-10T10:13:11 0 0 1224 1 0 0.022 mysql.help_relation 09-10T10:13:12 0 0 585 1 0 0.266 mysql.help_topic 09-10T10:13:12 0 0 0 1 0 0.031 mysql.ndb_binlog_index 09-10T10:13:12 0 0 0 1 0 0.024 mysql.plugin 09-10T10:13:12 0 0 6 1 0 0.287 mysql.proc 09-10T10:13:12 0 0 0 1 0 0.031 mysql.procs_priv 09-10T10:13:12 0 1 2 1 0 0.020 mysql.proxies_priv 09-10T10:13:12 0 0 0 1 0 0.024 mysql.servers 09-10T10:13:12 0 0 0 1 0 0.017 mysql.tables_priv 09-10T10:13:12 0 0 1820 1 0 0.019 mysql.time_zone 09-10T10:13:12 0 0 0 1 0 0.015 mysql.time_zone_leap_second 09-10T10:13:12 0 0 1820 1 0 0.267 mysql.time_zone_name 09-10T10:13:13 0 0 122530 1 0 0.326 mysql.time_zone_transition 09-10T10:13:13 0 0 8843 1 0 0.289 mysql.time_zone_transition_type 09-10T10:13:13 0 1 4 1 0 0.031 mysql.user 09-10T10:13:13 0 0 1 1 0 0.018 percona.DSN_Table 09-10T10:13:13 0 0 200 1 0 0.028 sakila.actor 09-10T10:13:13 0 0 603 1 0 0.023 sakila.address 09-10T10:13:13 0 0 16 1 0 0.033 sakila.category 09-10T10:13:13 0 0 600 1 0 0.023 sakila.city 09-10T10:13:13 0 0 109 1 0 0.029 sakila.country 09-10T10:13:14 0 0 599 1 0 0.279 sakila.customer 09-10T10:13:14 0 0 1000 1 0 0.287 sakila.film 09-10T10:13:14 0 0 5462 1 0 0.299 sakila.film_actor 09-10T10:13:14 0 0 1000 1 0 0.027 sakila.film_category 09-10T10:13:14 0 0 1000 1 0 0.032 sakila.film_text 09-10T10:13:14 0 0 4581 1 0 0.276 sakila.inventory 09-10T10:13:15 0 0 6 1 0 0.030 sakila.language 09-10T10:13:15 0 0 16049 1 0 0.303 sakila.payment 09-10T10:13:15 0 0 16044 1 0 0.310 sakila.rental 09-10T10:13:15 0 0 2 1 0 0.029 sakila.staff 09-10T10:13:15 0 0 2 1 0 0.020 sakila.store


The result shows a difference in the MySQL internal table for permissions. This is obviously not what we are interested in, as permissions are individual to a host. So we rather exclude the MySQL internal database and also the percona database, because it is not what we are interested in. Also in order to test it the tool works, we delete the last five category assignments from the table with <span class="lang:default decode:true crayon-inline">mysql -u root -h 172.17.0.3 -e &#8220;DELETE FROM sakila.film_category WHERE film_id > 995;&#8221;</span> and update a row in the city table with&nbsp;

mysql -u root -h 172.17.0.3 -e “update sakila.city SET city='Innsbruck’ WHERE city_id=590;“```

Now execute the command again:

pt-table-checksum --replicate=percona.checksums --create-replicate-table --empty-replicate-table \
   --recursion-method=dsn=t=percona.DSN_Table --ignore-databases mysql,percona -h 172.17.0.2 -P 3306 -u percona -pSECRET
            TS ERRORS  DIFFS     ROWS  CHUNKS SKIPPED    TIME TABLE
09-10T10:46:33      0      0      200       1       0   0.017 sakila.actor
09-10T10:46:34      0      0      603       1       0   0.282 sakila.address
09-10T10:46:34      0      0       16       1       0   0.034 sakila.category
09-10T10:46:34      0      1      600       1       0   0.269 sakila.city
09-10T10:46:34      0      0      109       1       0   0.028 sakila.country
09-10T10:46:34      0      0      599       1       0   0.285 sakila.customer
09-10T10:46:35      0      0     1000       1       0   0.297 sakila.film
09-10T10:46:35      0      0     5462       1       0   0.294 sakila.film_actor
09-10T10:46:35      0      1     1000       1       0   0.025 sakila.film_category
09-10T10:46:35      0      0     1000       1       0   0.031 sakila.film_text
09-10T10:46:35      0      0     4581       1       0   0.287 sakila.inventory
09-10T10:46:35      0      0        6       1       0   0.035 sakila.language
09-10T10:46:36      0      0    16049       1       0   0.312 sakila.payment
09-10T10:46:36      0      0    16044       1       0   0.320 sakila.rental
09-10T10:46:36      0      0        2       1       0   0.030 sakila.staff
09-10T10:46:36      0      0        2       1       0   0.027 sakila.store

You see that there is a difference in the tables sakila.city and in the table sakila.film_category. The tool does not report the actual number of differences, but rather the number of different chunks. To get the actual differences, we need to use a different tool, which utilises the checksum table that the previous step created.

Show the differences with pt-tabel-sync

The pt-table-sync tool is the counter part for the pt-table-checksum util. It can print or even replay the SQL statements that would render the slave the same state again to be in sync with the master. We can run a dry-run first, as the tool is potentially dangerous.

pt-table-sync --dry-run  --replicate=percona.checksums --sync-to-master h=172.17.0.3 -P 3306 \
   -u percona -pSECRET --ignore-databases mysql,percona
# NOTE: --dry-run does not show if data needs to be synced because it
#       does not access, compare or sync data.  --dry-run only shows
#       the work that would be done.
# Syncing via replication P=3306,h=172.17.0.3,p=...,u=percona in dry-run mode, without accessing or comparing data
# DELETE REPLACE INSERT UPDATE ALGORITHM START    END      EXIT DATABASE.TABLE
#      0       0      0      0 Chunk     08:57:51 08:57:51 0    sakila.city
#      0       0      0      0 Nibble    08:57:51 08:57:51 0    sakila.film_category

With –dry-run, you only see affected tables, but not the actual data because it does not really access the databases tables in question. Use –print additionally or instead of dry-run to get a list:

pt-table-sync --print --replicate=percona.checksums --sync-to-master h=172.17.0.3 -P 3306 \
  -u percona -pSECRET --ignore-databases mysql,percona
REPLACE INTO `sakila`.`city`(`city_id`, `city`, `country_id`, `last_update`) VALUES \
   ('590', 'Yuncheng', '23', '2006-02-15 04:45:25') 
  \ /*percona-toolkit src_db:sakila src_tbl:city  ...
REPLACE INTO `sakila`.`film_category`(`film_id`, `category_id`, `last_update`) VALUES ... 
REPLACE INTO `sakila`.`film_category`(`film_id`, `category_id`, `last_update`) VALUES ('997',... 
REPLACE INTO `sakila`.`film_category`(`film_id`, `category_id`, `last_update`) VALUES ('998', '11 ...
REPLACE INTO `sakila`.`film_category`(`film_id`, `category_id`, `last_update`) VALUES ('999', '3', ...
REPLACE INTO `sakila`.`film_category`(`film_id`, `category_id`, `last_update`) VALUES ('1000', '5', ... 

The command shows how we can rename back from Innsbruck to Yuncheng again and also provides the INSERT statements to get the deleted records back.When we replace –print with –execute, the data gets written to the master and replicated to the slave. To allow this, we need to set the permissions on the master

GRANT INSERT, UPDATE, DELETE ON sakila.* TO 'percona'@'172.17.0.1';
pt-table-sync --execute  --replicate=percona.checksums --check-child-tables \ 
  --sync-to-master h=172.17.0.3 -P 3306 -u percona -pSECRET --ignore-databases mysql,percona
REPLACE statements on sakila.city can adversely affect child table `sakila`.`address` 
   because it has an ON UPDATE CASCADE foreign key constraint. 
   See --[no]check-child-tables in the documentation for more information. 
   --check-child-tables error  while doing sakila.city on 172.17.0.3

This error indicates that updating the city table has consequences, because it is a FK to child tables. In this example, we are bold and ignore this warning. This is absolutely not recommended for real world scenarios.

pt-table-sync --execute  --replicate=percona.checksums --no-check-child-tables \
   --no-foreign-key-checks --sync-to-master h=172.17.0.3 -P 3306 -u percona -pSECRET \ 
   --ignore-databases mysql,percona

The command–no-check-child-tables ignores child tables and the command –no-foreign-key-checks ignores foreign keys.

Run the checksum command again to verify that the data has been restored:

pt-table-checksum --replicate=percona.checksums --create-replicate-table --empty-replicate-table \ 
   --recursion-method=dsn=t=percona.DSN_Table --ignore-databases mysql,percona 
   -h 172.17.0.2 -P 3306 -u percona -pSECRET

            TS ERRORS  DIFFS     ROWS  CHUNKS SKIPPED    TIME TABLE
09-10T11:24:42      0      0      200       1       0   0.268 sakila.actor
09-10T11:24:42      0      0      603       1       0   0.033 sakila.address
09-10T11:24:42      0      0       16       1       0   0.029 sakila.category
09-10T11:24:42      0      0      600       1       0   0.275 sakila.city
09-10T11:24:42      0      0      109       1       0   0.023 sakila.country
09-10T11:24:43      0      0      599       1       0   0.282 sakila.customer
09-10T11:24:43      0      0     1000       1       0   0.046 sakila.film
09-10T11:24:43      0      0     5462       1       0   0.284 sakila.film_actor
09-10T11:24:43      0      0     1000       1       0   0.036 sakila.film_category
09-10T11:24:43      0      0     1000       1       0   0.279 sakila.film_text
09-10T11:24:44      0      0     4581       1       0   0.292 sakila.inventory
09-10T11:24:44      0      0        6       1       0   0.031 sakila.language
09-10T11:24:44      0      0    16049       1       0   0.309 sakila.payment
09-10T11:24:44      0      0    16044       1       0   0.325 sakila.rental
09-10T11:24:44      0      0        2       1       0   0.029 sakila.staff
09-10T11:24:44      0      0        2       1       0   0.028 sakila.store

0 DIFFS, we are done!
Using Hibernate Search with Spring Boot

Spring Boot is a framework, that makes it much easier to develop Spring based applications, by following a convention over configuration principle (while in contrast Spring critics claim that the framework’s principle is rather configuration over everything). In this article, I am going to provide an example how to achieve the following:

  • Create a simple Web application based on Spring Boot
  • Persist and access data with Hibernate
  • Make it searchable with Hibernate Search (Lucine)

I use Eclipse with a Gradle plugin for convenience. MySQL will be our back-end for storing the data. The full example can be obtained from my [Github Repository][1].

Bootstrapping: Create a Simple Spring Boot Webapp

The easiest way to start with Spring Boot is heading over to [start.spring.io][2] and create a new project. In this example, I will use Gradle for building the application and handling the dependencies and I add Web and JPA starters.

[][3]

Download the archive to your local drive and extract it to a folder. I called the project SearchaRoo.

Import the Project with Eclipse

Import it as an existing Gradle Project in Eclipse by using the default settings. You will end up with a nice little project structure as shown below:

[][4]

We have a central application starter class denoted SearchaRooAppication.java, package definitions, application properties and even test classes. The great thing with Spring Boot is that it is very simple to start and that you can debug it as every other local Java application. There is no need for remote debugging or complex application server setups.

Prepare the Database

We need a few permissions on our MySQL instance before we can start.

CREATE DATABASE spring_employees;
CREATE USER 'dev'@'localhost' IDENTIFIED BY 'sEcReT';
GRANT SELECT, INSERT, UPDATE, DELETE, CREATE, DROP, RELOAD, FILE, REFERENCES, INDEX,
    ALTER, SHOW DATABASES, SUPER, LOCK TABLES, CREATE VIEW, SHOW VIEW 
    on spring_employees.* TO 'dev'@'localhost';
GRANT RELOAD on *.* TO 'dev'@'localhost';
FLUSH PRIVILEGES;```


We can then add the connection details into the application.properties file. We will edit this file several times when the complexity of this project increases.

===============================

= JPA / HIBERNATE

===============================

Specify the DBMS

spring.jpa.database = MYSQL

Show or not log for each sql query

spring.jpa.show-sql = true spring.datasource.url=jdbc:mysql://127.0.0.1/employees?createDatabaseIfNotExist=true spring.datasource.username=dev spring.datasource.password=sEcReT spring.datasource.driver-class-name=com.mysql.jdbc.Driver```

Now the basic database setup is done. We can then start adding model classes.

Getting some Employees on Board

MySQL offers a rather small but well documented sample database called employees, which is hosted on Github. Obtain and import the data as follows:

git clone https://github.com/datacharmer/test_db.git
cd test_db
mysql -u dev -p sEcReT < employees.sql

The script creates a new schema called employees and you will end up with a schema like this:

[][5]

In the course of this article, we are going to model this schema with Java POJOs by annotating the entities and the a appropriate fields with JPA.

Dependencies

Before we can start modelling the entities in Java, have a look at the Gradle build file. We include additional dependencies for the MySQL connector and Apache commons.

buildscript {
	ext {
		springBootVersion = '1.5.1.RELEASE'
	}
	repositories {
		mavenCentral()
	}
	dependencies {
		classpath("org.springframework.boot:spring-boot-gradle-plugin:${springBootVersion}")
	}
}

apply plugin: 'java'
apply plugin: 'eclipse'
apply plugin: 'org.springframework.boot'

jar {
	baseName = 'SearchaRoo'
	version = '0.0.1-SNAPSHOT'
}

sourceCompatibility = 1.8

repositories {
	mavenCentral()
}


dependencies {
	compile('org.springframework.boot:spring-boot-starter-data-jpa')
	compile('org.springframework.boot:spring-boot-starter-web')
	testCompile('org.springframework.boot:spring-boot-starter-test')
	compile("mysql:mysql-connector-java")
	compile('org.apache.commons:commons-lang3:3.5')
}

Modelling Reality

The next step covers modelling the data which we imported with Java POJOs. Obviously this is not the most natural way, because in general you would create the model first and then add data to it, but as we already had the data we decided to go in this direction. In the application.properties file, set the database to the imported employees database and set the Hibernate create property to validate. With this setting, we can confirm that we modelled the Java classed in accordance with the database model defined by the MySQL employees database.

An example of such a class is shown below, the other classes can be found in the Github repository.

package at.stefanproell.model;

import java.util.Date;
import java.util.List;

import javax.persistence.Column;
import javax.persistence.Entity;
import javax.persistence.EnumType;
import javax.persistence.Enumerated;
import javax.persistence.Id;
import javax.persistence.OneToMany;

@Entity(name="employees")
public class Employee {
&nbsp; &nbsp;@Id
&nbsp; &nbsp;@Column(name="emp_no")
&nbsp; &nbsp;private int employee_id;
&nbsp; &nbsp;
&nbsp; &nbsp;@Column(name="birth_date")
&nbsp; &nbsp;private Date birthdate;
&nbsp; &nbsp;
&nbsp; &nbsp;@Column(name="first_name")
&nbsp; &nbsp;private String firstname;
&nbsp; &nbsp;
&nbsp; &nbsp;@Column(name="last_name")
&nbsp; &nbsp;private String lastname;
&nbsp; &nbsp;
&nbsp; &nbsp;@Column(name="gender",columnDefinition = "ENUM('M', 'F', 'UNKNOWN') DEFAULT 'UNKNOWN'")
&nbsp; &nbsp;@Enumerated(EnumType.STRING)
&nbsp; &nbsp;private Gender gender;
&nbsp; &nbsp;
&nbsp; &nbsp;@Column(name="hire_date")
&nbsp; &nbsp;private Date hireDate;

&nbsp; &nbsp;@OneToMany(mappedBy="employee")
&nbsp; &nbsp;List<Title> titles; 
&nbsp; &nbsp;
&nbsp; &nbsp;@OneToMany(mappedBy="employee")
&nbsp; &nbsp;List<Department_Employee> employee_department;

&nbsp; &nbsp;// Setters and getters
&nbsp; &nbsp;
&nbsp; &nbsp;
}```


Now that we have prepared the data model, our schema is now fixed and does not change any more. We can deactivate the Hibernate based dynamic generation of the database tables and use the Spring database initialization instead.To see if we modelled the data correctly, we import MySQL employee data dump we obtained before and import it into our newly created schema, which maps the Java POJOs.

## Importing the Initial Data

In the next step, we import the data from the MySQL employee database into our schema spring_hibernate. This schema contains the tables that Hibernate created for us. The following script copies the data between the two schemata. If you see an error, then there is an issue with your model.

<pre class="theme:github lang:mysql decode:true">-- The original data is stored in the database called employees
-- Spring created the new schema called spring_employees
USE `spring_employees`;

-- Departments

INSERT INTO `spring_employees`.`departments`
(`dept_no`,
`dept_name`)
SELECT `departments`.`dept_no`,
    `departments`.`dept_name`
FROM `employees`.`departments`;

-- Employees

INSERT INTO `spring_employees`.`employees`
(`emp_no`,
`birth_date`,
`first_name`,
`gender`,
`hire_date`,
`last_name`)
SELECT `employees`.`emp_no`,
    `employees`.`birth_date`,
    `employees`.`first_name`,
    `employees`.`gender`,
    `employees`.`hire_date`,
    `employees`.`last_name`
FROM `employees`.`employees`;

-- Join table 
INSERT INTO `spring_employees`.`dept_emp`
(`emp_no`,
`dept_no`,
`from_date`,
`to_date`)
SELECT 
`dept_emp`.`emp_no`,
    `dept_emp`.`dept_no`,
    `dept_emp`.`from_date`,
    `dept_emp`.`to_date`
FROM `employees`.`dept_emp`;

-- Join table 

INSERT INTO `spring_employees`.`dept_manager`
(
`emp_no`,
`dept_no`,
`from_date`,
`to_date`)
SELECT `dept_manager`.`emp_no`,
    `dept_manager`.`dept_no`,
    `dept_manager`.`from_date`,
    `dept_manager`.`to_date`
FROM `employees`.`dept_manager`;

-- Titles

INSERT INTO `spring_employees`.`titles`
(`emp_no`,
`title`,
`from_date`,
`to_date`)
SELECT `titles`.`emp_no`,
    `titles`.`title`,
    `titles`.`from_date`,
    `titles`.`to_date`
FROM `employees`.`titles`;

-- Salaries

INSERT INTO `spring_employees`.`salaries`
(`emp_no`,
`salary`,
`from_date`,
`to_date`)
SELECT `salaries`.`emp_no`,
    `salaries`.`salary`,
    `salaries`.`from_date`,
    `salaries`.`to_date`
FROM `employees`.`salaries`;```


We now imported the data in the database schema that we defined for our project. Spring can load schema and initial data during start-up. So we provide two files, one containing the schema and the other one containing the data. To do that, we create two dumps of the database. One containing the schema only, the other one containing the data only.

mysqldump -u dev -psEcReT –no-data –databases spring_employees > src/main/resources/schema.sql mysqldump -u dev -psEcReT –no-create-info –databases employees > src/main/resources/data.sql```

By deactivating the Hibernate data generation and activating the Spring way, the database gets initialized every time the application starts. Change and edit the following lines in the application.properties

spring.jpa.hibernate.ddl-auto=none
spring.datasource.initialize=true
spring.datasource.schema=classpath:/schema.sql
spring.datasource.data=classpath:/data.sql```


Before we can import the data with the scripts, make sure to drop the schema and disable foreign key checks in the schema file and enable them again at the end. Spring ignores the actionable MySQL comments. So your schema file should contain this

<pre class="theme:github lang:default decode:true ">DROP DATABASE IF EXISTS `spring_employees`;
SET foreign_key_checks = 0;

// rest of the code

SET foreign_key_checks = 1;```


And also insert the two foreign key statements to the data file. Note that the import can take a while. If you are happy with the initialized data, you can deactivate the initialization by setting the variable to false: <span class="lang:default decode:true crayon-inline">spring.datasource.initialize=false</span>

The application.properties file meanwhile looks like this:

<pre class="theme:github lang:default decode:true "># ===============================
# = JPA / HIBERNATE
# ===============================

# Specify the DBMS
spring.jpa.database = MYSQL

# Show or not log for each sql query
spring.jpa.show-sql = true
spring.datasource.url=jdbc:mysql://127.0.0.1/spring_employees?createDatabaseIfNotExist=true
spring.datasource.username=dev
spring.datasource.password=sEcReT
spring.datasource.driver-class-name=com.mysql.jdbc.Driver
spring.datasource.connectionProperties=useUnicode=true;characterEncoding=utf-8;
spring.jpa.properties.hibernate.dialect = org.hibernate.dialect.MySQL5Dialect
# Do not initialize anything
spring.jpa.hibernate.ddl-auto=none
spring.datasource.initialize=false
spring.datasource.schema=classpath:/schema.sql
spring.datasource.data=classpath:/data.sql
spring.datasource.platform=mysql```


# Adding Hibernate Search

Hibernate search offers full-text search capabilities by using a dedicated index. We need to add the dependencies to the build file.

<pre class="theme:github lang:default decode:true ">dependencies {
	compile('org.springframework.boot:spring-boot-starter-data-jpa')
	compile('org.springframework.boot:spring-boot-starter-web')
	testCompile('org.springframework.boot:spring-boot-starter-test')
	compile("mysql:mysql-connector-java")
	compile('org.apache.commons:commons-lang3:3.5')
	compile("org.hibernate:hibernate-search-orm:5.5.6.Final")
	compile('org.springframework.boot:spring-boot-starter-test')
	compile('org.springframework.boot:spring-boot-starter-logging')
	compile('org.springframework.boot:spring-boot-starter-freemarker')
}```


Refresh the gradle file after including the search dependencies.

## Adding Hibernate Search Dependencies

In this step, we annotate the model POJO classes and introduce the full-text search index. Hibernate search utilises just a few basic settings to get started. Add the following variables to tne application properties file.

===============================

= HIBERNATE SEARCH

===============================

Spring Data JPA will take any properties under spring.jpa.properties.* and

pass them along (with the prefix stripped) once the EntityManagerFactory is

created.

Specify the DirectoryProvider to use (the Lucene Directory)

spring.jpa.properties.hibernate.search.default.directory_provider = filesystem

Using the filesystem DirectoryProvider you also have to specify the default

base directory for all indexes (make sure that the application have write

permissions on such directory)

spring.jpa.properties.hibernate.search.default.indexBase = /tmp/SearchRroo/```

Please not that storing the Lucene index in the tmp directory is not the best idea, but for testing we can use this rather futile location. We also use the filesystem to store the index, as this is the simplest approach.

Create a Service

In order to facilitate Hibernate Search on our data, we add a service class, which offers methods for searching. The service uses a configuration, which is injected by Spring during run time. The configuration is very simple.

package at.stefanproell.service;

import javax.persistence.EntityManager;

import org.slf4j.Logger;
import org.slf4j.LoggerFactory;
import org.springframework.beans.factory.annotation.Autowired;
import org.springframework.context.annotation.Bean;
import org.springframework.context.annotation.Configuration;


@Configuration
public class HibernateSearchConfiguration {
	private final Logger logger = LoggerFactory.getLogger(HibernateSearchConfiguration.class);

	@Autowired
	private EntityManager entityManager;

	@Bean
	HibernateSearchService hibernateSearchService() {
		HibernateSearchService hibernateSearchService = new HibernateSearchService(entityManager);
		hibernateSearchService.initializeHibernateSearch();
		return hibernateSearchService;
	}
}```


The @Configuration is loaded when Spring builds the application context. It provides a bean of our service, which can then be injected into the application. The service itself provides methods for creating and searching the index. In this example, the search method is very simple: it only searches on the first and the last name of an employee and it allows users to make one mistake (distance 1).

<pre class="theme:github lang:default decode:true">package at.stefanproell.service;

import java.util.List;

import javax.persistence.EntityManager;
import javax.persistence.NoResultException;
import javax.persistence.PersistenceContext;

import org.apache.lucene.search.Query;
import org.hibernate.search.jpa.FullTextEntityManager;
import org.hibernate.search.jpa.Search;
import org.hibernate.search.query.dsl.QueryBuilder;
import org.slf4j.LoggerFactory;
import org.springframework.beans.factory.annotation.Autowired;
import org.springframework.stereotype.Service;
import org.springframework.transaction.annotation.Transactional;


import at.stefanproell.model.Employee;
import ch.qos.logback.classic.Logger;

@Service
public class HibernateSearchService {

&nbsp; &nbsp;private final Logger logger = (Logger) LoggerFactory.getLogger(HibernateSearchService.class);

&nbsp; &nbsp;private final EntityManager entityManager;

&nbsp; &nbsp;@Autowired
&nbsp; &nbsp;public HibernateSearchService(EntityManager entityManager) {
&nbsp; &nbsp;&nbsp;&nbsp; &nbsp;super();
&nbsp; &nbsp;&nbsp;&nbsp; &nbsp;this.entityManager = entityManager;
&nbsp; &nbsp;}


&nbsp; &nbsp;public void initializeHibernateSearch() {

&nbsp; &nbsp;&nbsp;&nbsp; &nbsp;try {
&nbsp; &nbsp;&nbsp;&nbsp; &nbsp;&nbsp;&nbsp; &nbsp;FullTextEntityManager fullTextEntityManager = Search.getFullTextEntityManager(entityManager);
&nbsp; &nbsp;&nbsp;&nbsp; &nbsp;&nbsp;&nbsp; &nbsp;fullTextEntityManager.createIndexer().startAndWait();
&nbsp; &nbsp;&nbsp;&nbsp; &nbsp;} catch (InterruptedException e) {
&nbsp; &nbsp;&nbsp;&nbsp; &nbsp;&nbsp;&nbsp; &nbsp;// TODO Auto-generated catch block
&nbsp; &nbsp;&nbsp;&nbsp; &nbsp;&nbsp;&nbsp; &nbsp;e.printStackTrace();
&nbsp; &nbsp;&nbsp;&nbsp; &nbsp;}
&nbsp; &nbsp;}
&nbsp; &nbsp;
&nbsp; &nbsp;@Transactional
&nbsp; &nbsp;public List<Employee> fuzzySearch(String searchTerm){

&nbsp; &nbsp;&nbsp;&nbsp; &nbsp;FullTextEntityManager fullTextEntityManager = Search.getFullTextEntityManager(entityManager);
&nbsp; &nbsp;&nbsp;&nbsp; &nbsp;QueryBuilder qb = fullTextEntityManager.getSearchFactory().buildQueryBuilder().forEntity(Employee.class).get();
&nbsp; &nbsp;&nbsp;&nbsp; &nbsp;Query luceneQuery = qb.keyword().fuzzy().withEditDistanceUpTo(1).withPrefixLength(1).onFields("firstname", "lastname")
&nbsp; &nbsp;&nbsp;&nbsp; &nbsp;&nbsp;&nbsp; &nbsp;&nbsp;&nbsp; &nbsp;.matching(searchTerm).createQuery();

&nbsp; &nbsp;&nbsp;&nbsp; &nbsp;javax.persistence.Query jpaQuery = fullTextEntityManager.createFullTextQuery(luceneQuery, Employee.class);

&nbsp; &nbsp;&nbsp;&nbsp; &nbsp;// execute search

&nbsp; &nbsp;&nbsp;&nbsp; &nbsp;List<Employee> employeeList = null;
&nbsp; &nbsp;&nbsp;&nbsp; &nbsp;try {
&nbsp; &nbsp;&nbsp;&nbsp; &nbsp;&nbsp;&nbsp; &nbsp;employeeList&nbsp; = jpaQuery.getResultList();
&nbsp; &nbsp;&nbsp;&nbsp; &nbsp;} catch (NoResultException nre) {
&nbsp; &nbsp;&nbsp;&nbsp; &nbsp;&nbsp;&nbsp; &nbsp;logger.warn("No result found");

&nbsp; &nbsp;&nbsp;&nbsp; &nbsp;}

&nbsp; &nbsp;&nbsp;&nbsp; &nbsp;return employeeList;

&nbsp; &nbsp;
&nbsp; &nbsp;}
}

The service implementation currently only contains an initialization method, which used for creating the Lucene index on the filesystem. Before we can test the index, we need to have at least one indexed entity. This can be achieved by simply adding the annotation @Indexed to the POJO.

Deploying MySQL in a Local Development Environment

Installing MySQL via apt-get is a simple task, but the migration between different MySQL versions requires planning and testing. Thus installing one central instance of the database system might not be suitable, when the version of MySQL or project specific settings should be switched quickly without interfering with other applications. Using one central instance can quickly become cumbersome. In this article, I will describe how any number of MySQL instances can be stored and executed from within a user’s home directory.

Adapting MySQL Data an Log File Locations

Some scenarios might require to run several MySQL instances at once, other scenarios cover sensitive data, where we do not want MySQL to write any data on non-encrypted partitions. This is especially true for devices which can get easily stolen, for instance laptops. If you use a laptop for developing your applications from time to time, chances are good that you need to store sensitive data in a database, but need to make sure that the data is encrypted when at rest. The data stored in a database needs to be protected when at rest.

This can be solved with full disk encryption, but this technique has several disadvantages. First of all, full disk encryption only utilises one password. This entails, that several users who utilise a device need to share one password, which reduces the reliability of this approach. Also when the system needs to be rebooted, full disk encryption can become an obstacle, which increases the complexity further.

Way easier to use is the transparent home directory encryption, which can be selected during many modern Linux setup procedures out of the box. We will use this encryption type for this article, as it is reasonable secure and easy to setup. Our goal is to store all MySQL related data in the home directory and run MySQL with normal user privileges.

Creating the Directory Structure

The first step is creating a directory structure for storing the data. In this example, the user name is stefan, please adapt to your needs.

A MySQL 5.7 Cluster Based on Ubuntu 16.04 LTS – Part 2

In a recent article, I described how to setup a basic MySQL Cluster with two data nodes and a combined SQL and management node. In this article, I am going to highlight a hew more things and we are going to adapt the cluster a little bit.

Using Hostnames

For making our lives easier, we can use hostnames which are easier to remember than IP addresses. Hostnames can be specified for each VM in the file /etc/hosts. For each request to the hostname, the operating system will lookup the corresponding IP address. We need to change this file on all three nodes to the following example:

A MySQL 5.7 Cluster Based on Ubuntu 16.04 LTS – Part 1

A Cluster Scenario

In this example we create the smallest possible MySQL cluster based on four nodes running on three machines. Node 1 will run the cluster management software, Node 2 and Node 3 will serve as dats nodes and Node 4 is the MySQSL API, which runs on the same VM on Node 1.

Persistent Data in a MySQL Docker Container

Running MySQL in Docker

In a recent article on Docker in this blog, we presented some basics for dealing with data in containers. This article will present another popular application for Docker: MySQL containers. Running MySQL instances in Docker allows isolating database infrastructure with ease.

Connecting to the Standard MySQL Container

The description of the MySQL docker image provides a lot of useful information how to launch and connect to a MySQL container. The first step is to create standard MySQL container from the latest available image.

sudo docker run \
   --name=mysql-instance 
   -e MYSQL_ROOT_PASSWORD=secret 
   -p 3307:3306 
   -d 
   mysql:latest

This creates a MySQL container where the root password is set to secret. As the host is already running its own MySQL instance (which has nothing to do with this docker example), the standard port 3306 is already taken. Thus we publish utilise the port 3307 on the host system and forward it to the 3306 standard port from the container.

Connect from the Host

We can then connect from the command line like this:

mysql -uroot -psecret -h 127.0.0.1 -P3307

We could also provide the hostname localhost for connecting to the container, but as the MySQL client per default assumes that a localhost connection is via a socket, this would not work. Thus when using the hostname localhost, we needed to specify the protocol TCP, wo that the client connects via the network interface.

mysql -uroot -psecret -h localhost --protocol TCP -P3307

Connect from other Containers

Connecting from a different container to the MySQL container is pretty straight forward. Docker allows to link two containers and then use the exposed ports between them. The following command creates a new ubuntu container and links to the MySQL container.

sudo docker run -it --name ubuntu-container --link mysql-instance:mysql-link ubuntu:16.10 bash

After this command, you are in the terminal of the Ubuntu container. We then need to install the MySQL client for testing:

# Fetch the package list
root@7a44b3e7b088:/# apt-get update
# Install the client
root@7a44b3e7b088:/# apt-get install mysql-client
# Show environment variables
root@7a44b3e7b088:/# env

The last command gives you a list of environment variables, among which is the IP address and port of the MySQL container.

MYSQL_LINK_NAME=/ubuntu-container/mysql-link
HOSTNAME=7a44b3e7b088
TERM=xterm
MYSQL_LINK_ENV_MYSQL_VERSION=5.7.14-1debian8
MYSQL_LINK_PORT=tcp://172.17.0.2:3306
PATH=/usr/local/sbin:/usr/local/bin:/usr/sbin:/usr/bin:/sbin:/bin
MYSQL_LINK_PORT_3306_TCP_ADDR=172.17.0.2
MYSQL_LINK_PORT_3306_TCP=tcp://172.17.0.2:3306
PWD=/
MYSQL_LINK_PORT_3306_TCP_PORT=3306
SHLVL=1
HOME=/root
MYSQL_LINK_ENV_MYSQL_MAJOR=5.7
MYSQL_LINK_PORT_3306_TCP_PROTO=tcp
MYSQL_LINK_ENV_GOSU_VERSION=1.7
MYSQL_LINK_ENV_MYSQL_ROOT_PASSWORD=secret
_=/usr/bin/env

You can then connect either manually of by providing the variables

mysql -uroot -psecret -h 172.17.0.2
mysql -uroot -p$MYSQL_LINK_ENV_MYSQL_ROOT_PASSWORD -h $MYSQL_LINK_PORT_3306_TCP_ADDR -P $MYSQL_LINK_PORT_3306_TCP_PORT

If you only require a MySQL client inside a container, simply use the MySQL image from docker. Batteries included!

Hikari Connection Pooling with a MySQL Backend, Hibernate and Maven

Conection Pooling?

JDBC connection pooling is a great concept, which improves the performance of database driven applications by reusing connections. The benefit from connection pools is that the cost of creating and closing connections is avoided, by reusing connections from a pool of available connections. Database systems such as MySQL also assign database resources by limiting simultaneous connections. This is another reason, why connection pools have benefits in contrast to opening and closing individual connections.

Dipping into Pools

There exists a selection of different JDBC compatible connection pools which can be used more or less interchangeable. The most widely used pools are:

Most of these pools work in a very similar way. In the following tutorial, we are going to take out HikariCP for a spin. It is simple to use and claims to be very fast. In the following we are going to setup a small project using the following technologies:

  • Java 8
  • Tomcat 8
  • MySQL 5.7
  • Maven 3
  • Hibernate 5

and of course an IDE of your choice (I have become quite fond of IntelliJ IDEA Community Edition).

Project Overview

In this small demo project, we are going to write a minimalistic Web application, which simply computes a new random number for each request and stores the result in a database table. We use Java and store the data by using the Hibernate ORM framework.We also assume, that you have a running Apache Tomcat Servlet Container and also a running MySQL instance available.

In the first step, I created a basic Web project by selecting the Maven Webapp archetype, which then creates a basic structure we can work with.

Adding the Required Libraries

After we created the initial project, we need to add the required libraries. We can achieve this easily with Maven, by adding the dependency definitions to our pom.xml file. You can find these definitions at maven central. The build block contains the plugin for deploying the application at the Tomcat server.

<project xmlns="http://maven.apache.org/POM/4.0.0" xmlns:xsi="http://www.w3.org/2001/XMLSchema-instance"
  xsi:schemaLocation="http://maven.apache.org/POM/4.0.0 http://maven.apache.org/maven-v4_0_0.xsd">
  <modelVersion>4.0.0</modelVersion>
  <groupId>at.stefanproell</groupId>
  <artifactId>HibernateHikari</artifactId>
  <packaging>war</packaging>
  <version>1.0-SNAPSHOT</version>
  <name>HibernateHikari Maven Webapp</name>

  <dependencies>
    <dependency>
      <groupId>junit</groupId>
      <artifactId>junit</artifactId>
      <version>3.8.1</version>
      <scope>test</scope>
    </dependency>
      <dependency>
          <groupId>org.apache.tomcat</groupId>
          <artifactId>tomcat-servlet-api</artifactId>
          <version>7.0.50</version>
      </dependency>
      <dependency>
          <groupId>mysql</groupId>
          <artifactId>mysql-connector-java</artifactId>
          <version>5.1.39</version>
      </dependency>
      <dependency>
          <groupId>org.hibernate</groupId>
          <artifactId>hibernate-core</artifactId>
          <version>5.2.0.Final</version>
      </dependency>
      <dependency>
          <groupId>com.zaxxer</groupId>
          <artifactId>HikariCP</artifactId>
          <version>2.4.6</version>
      </dependency>
  </dependencies>
    
  <build>
    <finalName>HibernateHikari</finalName>
      <plugins>
          <plugin>
              <groupId>org.apache.tomcat.maven</groupId>
              <artifactId>tomcat7-maven-plugin</artifactId>
              <version>2.0</version>
              <configuration>
                  <path>/testapp</path>
                  <update>true</update>

                  <url>http://localhost:8080/manager/text</url>
                  <username>admin</username>
                  <password>admin</password>

              </configuration>

          </plugin>
          <plugin>
              <groupId>org.apache.maven.plugins</groupId>
              <artifactId>maven-war-plugin</artifactId>
              <version>2.4</version>

          </plugin>
      </plugins>
  </build>
</project>

Now we have all the libraries we need available and we can begin with implementing the functionality.

The Database Table

As we want to persist random numbers, we need to have a database table, which will store the data. Create the following table in MySQL and ensure that you have a test user available:

CREATE TABLE `TestDB`.`RandomNumberTable` (
  `id` INT NOT NULL AUTO_INCREMENT,
  `randomNumber` INT NOT NULL,
  PRIMARY KEY (`id`));```


## POJO Mojo: The Java Class to be Persisted

Hibernate allows us to persist Java objects in the database, by annotating the Java source code. The following Java class is used to store the random numbers that we generate.

@Entity @Table(name="RandomNumberTable”, uniqueConstraints={@UniqueConstraint(columnNames={“id”})}) public class RandomNumberPOJO { @Id @GeneratedValue(strategy= GenerationType.IDENTITY) @Column(name="id”, nullable=false, unique=true, length=11) private int id;

@Column(name="randomNumber", nullable=false)
private int randomNumber;

public int getId() {
    return id;
}

public void setId(int id) {
    this.id = id;
}

public int getRandomNumber() {
    return randomNumber;
}

public void setRandomNumber(int randomNumber) {
    this.randomNumber = randomNumber;
}

}


The code and also the annotations are straight forward. Now we need to define a way how we can connect to the database and let Hibernate handle the mapping between the Java class and the database schema we defined before.

## Hibernate Configuration

Hibernate looks for the configuration in a file called hibernate.cfg.xml by default. This file is used to provide the connection details for the database.

    <property name="hibernate.dialect">org.hibernate.dialect.MySQLDialect</property>
    <property name="hibernate.connection.provider_class">com.zaxxer.hikari.hibernate.HikariConnectionProvider</property>
    <property name="hibernate.hikari.dataSource.url">jdbc:mysql://localhost:3306/TestDB?useSSL=false</property>
    <property name="hibernate.hikari.dataSource.user">testuser</property>
    <property name="hibernate.hikari.dataSource.password">sEcRet</property>
    <property name="hibernate.hikari.dataSourceClassName">com.mysql.jdbc.jdbc2.optional.MysqlDataSource</property>
    <property name="hibernate.hikari.dataSource.cachePrepStmts">true</property>
    <property name="hibernate.hikari.dataSource.prepStmtCacheSize">250</property>
    <property name="hibernate.hikari.dataSource.prepStmtCacheSqlLimit">2048</property>
    <property name="hibernate.hikari.dataSource.useServerPrepStmts">true</property>
    <property name="hibernate.current_session_context_class">thread</property>

</session-factory>

The file above contains the most essential settings. We specify the database dialect that we speak `org.hibernate.dialect.MySQLDialect`, define the connection provider class (the Hikari CP) with `com.zaxxer.hikari.hibernate.HikariConnectionProvider` and provide the URL to our MySQL database (`jdbc:mysql://localhost:3306/TestDB?useSSL=false`) including the username and password for the database connection. Alternatively, you can also define the same information in the hibernate.properties file.

## The Session Factory

We need to have a session factory, which initializes the database connection and the connection pool as well as handles the interaction with the database server. We can use the following class, which provides the session object for these tasks.

import javax.servlet.ServletContextEvent; import javax.servlet.ServletContextListener; import javax.servlet.annotation.WebListener;

import org.hibernate.SessionFactory; import org.hibernate.boot.registry.StandardServiceRegistryBuilder; import org.hibernate.cfg.Configuration; import org.hibernate.service.ServiceRegistry; import org.jboss.logging.Logger;

@WebListener public class HibernateSessionFactoryListener implements ServletContextListener {

public final Logger logger = Logger.getLogger(HibernateSessionFactoryListener.class);

public void contextDestroyed(ServletContextEvent servletContextEvent) {
    SessionFactory sessionFactory = (SessionFactory) servletContextEvent.getServletContext().getAttribute("SessionFactory");
    if(sessionFactory != null && !sessionFactory.isClosed()){
        logger.info("Closing sessionFactory");
        sessionFactory.close();
    }
    logger.info("Released Hibernate sessionFactory resource");
}

public void contextInitialized(ServletContextEvent servletContextEvent) {
    Configuration configuration = new Configuration();
    configuration.configure("hibernate.cfg.xml");
    // Add annotated class
    configuration.addAnnotatedClass(RandomNumberPOJO.class);

    ServiceRegistry serviceRegistry = new StandardServiceRegistryBuilder().applySettings(configuration.getProperties()).build();
    logger.info("ServiceRegistry created successfully");
    SessionFactory sessionFactory = configuration
            .buildSessionFactory(serviceRegistry);
    logger.info("SessionFactory created successfully");

    servletContextEvent.getServletContext().setAttribute("SessionFactory", sessionFactory);
    logger.info("Hibernate SessionFactory Configured successfully");
}

}


This class provides two so called contexts, where the session gets initialized and a second one where it gets destroyed. The Tomcat Servlet container automatically calls these depending on the state of the session. You can see that the filename of the configuration file is provided (<span class="lang:default decode:true crayon-inline">configuration.configure(&#8220;hibernate.cfg.xml&#8221;);`) and that we tell Hibernate, to map our RandomNumberPOJO file (`configuration.addAnnotatedClass(RandomNumberPOJO.class);`). Now all that is missing is the Web component, which is waiting for our requests.

## The Web Component

The last part is the Web component, which we kept as simple as possible.

import org.hibernate.Session; import org.hibernate.SessionFactory; import org.hibernate.Transaction; import javax.persistence.TypedQuery; import javax.servlet.ServletException; import javax.servlet.http.HttpServlet; import javax.servlet.http.HttpServletRequest; import javax.servlet.http.HttpServletResponse;

import java.io.IOException; import java.io.PrintWriter;

import java.util.List; import java.util.Random;

public class HelloServlet extends HttpServlet { public void doGet (HttpServletRequest req, HttpServletResponse res) throws ServletException, IOException { PrintWriter out = res.getWriter(); addRandomNumber(req); out.println(“There are " + countNumbers(req) + " random numbers”);

    List<RandomNumberPOJO> numbers = getAllRandomNumbers(req,res);

    out.println("Random Numbers:");
    out.println("----------");

    for(RandomNumberPOJO record:numbers){
        out.println("ID: " + record.getId() + "\t :\t" + record.getRandomNumber());
    }

    out.close();

}

/**
 * Create a new random number and store it the database
 * @param request
 */
private void addRandomNumber(HttpServletRequest request){
    SessionFactory sessionFactory = (SessionFactory) request.getServletContext().getAttribute("SessionFactory");

    Session session = sessionFactory.getCurrentSession();
    Transaction tx = session.beginTransaction();
    RandomNumberPOJO randomNumber = new RandomNumberPOJO();
    Random rand = new Random();
    int randomInteger = 1 + rand.nextInt((999) + 1);

    randomNumber.setRandomNumber(randomInteger);
    session.save(randomNumber);
    tx.commit();
    session.close();
}

/**
 * Get a list of all RandomNumberPOJO objects
 * @param request
 * @param response
 * @return
 */
private List<RandomNumberPOJO> getAllRandomNumbers(HttpServletRequest request, HttpServletResponse response){
    SessionFactory sessionFactory = (SessionFactory) request.getServletContext().getAttribute("SessionFactory");
    Session session = sessionFactory.getCurrentSession();
    Transaction tx = session.beginTransaction();
    TypedQuery<RandomNumberPOJO> query = session.createQuery(
            "from RandomNumberPOJO", RandomNumberPOJO.class);

    List<RandomNumberPOJO> numbers =query.getResultList();


    tx.commit();
    session.close();

    return numbers;


}

/**
 * Count records
 * @param request
 * @return
 */
private int countNumbers(HttpServletRequest request){
    SessionFactory sessionFactory = (SessionFactory) request.getServletContext().getAttribute("SessionFactory");
    Session session = sessionFactory.getCurrentSession();
    Transaction tx = session.beginTransaction();

    String count = session.createQuery("SELECT COUNT(id) FROM RandomNumberPOJO").uniqueResult().toString();

    int rowCount = Integer.parseInt(count);

    tx.commit();
    session.close();
    return rowCount;
}

}


This class provides the actual servlet and is executed whenever a user calls the web application. First, a new RandumNumberPOJO object is instantiated and persisted. We then count how many numbers we already have and then we fetch a list of all existing records.

The last step before we can actually run the application is the definition of the web entry points, which we can define in the file called web.xml. This file is already generated by the maven achetype and we only need to add a name for our small web service and provide a mapping for the entry class.

HikariCP Test App

<servlet>
    <servlet-name>hello</servlet-name>
    <servlet-class>HelloServlet</servlet-class>
</servlet>

<servlet-mapping>
    <servlet-name>hello</servlet-name>
    <url-pattern>/hello</url-pattern>
</servlet-mapping>

```

Compile and Run

We can then  compile and deploy the application with the following command:

mvn clean install org.apache.tomcat.maven:tomcat7-maven-plugin:2.0:deploy -e

This will compile and upload the application to the Tomcat server and we can then use our browser, open the URL http://localhost:8080/testapp/hello  to create and persist random numbers by refreshing the page. The result will look similar like this:

Neue Rezension: iX 11/2015

Im iX Magazin für professionelle Informationstechnik wurde unser Buch in der Ausgabe 11/2015 von Bernhard Röhrig rezensiert.

Gelobt wurden fachliche Qualität, Umfang, Testdatenbank und Layout, Kritik gab es für das Verstreuen der Neuerungen sowie kleineren Detailangaben zu speziellen Features.

Neue Rezension: Linux Magazin – Alles über MySQL

Das Linux Magazin hat in seiner Ausgabe 09/2015 die folgende Rezension veröffentlicht:


Dass dieses Buch wenige Fragen offen lassen will, machen schon seine Dimensionen deutlich: Über 800 Seiten ergeben einen soliden Wälzer. So stellen die Autoren ihren umfangreichen Erklärungen zu MySQL denn auch eine Einführung in das Thema Datenbanken an sich voran und machen den Leser mit den grundlegenden Techniken der Datenmodellierung bekannt.

Im zweiten Teil geht es dann systematisch um die MySQL-Administration: Er erläutert die Architektur der Datenbank, die Installation und die Bordwerkzeuge nebst einem Abstecher zu den Themen Backup und Monitoring sowie die Performance-Optimierung im Hinblick auf Hardware und Konfiguration. Der Optimierung von Abfragen ist dagegen ein eigenes Kapitel gewidmet. Außerdem werden in eigenen Kapiteln Replikation und Hochverfügbarkeit beziehungsweise Sicherheit diskutiert.

Der sehr umfangreiche dritte Teil widmet sich dann der Software-Entwicklung in und für MySQL: Angefangen von Stored Procedures über SQL-Programmierung bis zu Schnittstellen zu anderen Programmiersprachen. Auch NoSQL mit MySQL stellt er von Grund auf vor.

Die Autoren verstehen es, ihren Stoff gründlich und gut verständlich zu vermitteln. Zahlreiche Beispiele illustrieren das Dargebotene. Damit ist das Buch eine Empfehlung für angehende DBAs, aber auch für den gestandenen Admin, dem es als Referenz nützlich ist.

Quelle: Linux Magazin


Mehr Informationen zur aktuellen und früheren Auflagen des umfassenden Handbuchs finden Sie hier.